Shortly after writing my last article on Parameters, I had to update a script, and I wanted to make it easier for others to run. One of the features I wanted to add was the ability to show them what the script would do with the provided parameters without actually running the script, in other words, provide “help”.
Using a Switch to Control Help
My initial thought was to add another parameter, make it a Boolean and then check the state of it. If it’s true, display some help text. If not, run the code. However, like many things, the creators of PowerShell thought of a solution that’s even easier that I’ll get to later.
To keep things simple, I’ll start with the naïve example. (note I’ve started using Visual Studio Code to develop my PowerShell and but also still use the deprecated PowerShell ISE IDE, so my examples may come from either.)
Save this script as Boolean_help.ps1.
|
1 2 3 4 5 6 7 8 9 10 11 12 13 14 15 |
param([boolean] $help ) # # Author: Greg D. Moore # Date: 2020-02-18 # Version: 1.0 # Show boolean help # if ($help -eq $true) { write-host "This is help for this program. It does nothing. Hope that helps." } else { write-host "Do nothing." } |
To run it, simply navigate to the folder where it’s saved and execute it.
|
1 |
.\Boolean_help.ps1 |
Since you haven’t supplied a value for the $help parameter, your output should be:

If you add a $true value as follows, you will see your help message.
|
1 |
.\Boolean_help.ps1 $true |
Here are the results.
![]()
That’s a step in the right direction, but it’s not quite good enough. What if your next user who isn’t overly PowerShell savvy tries to use it and does something like the following or other variations?
|
1 |
.\Boolean_help.ps1 -help true |

Your user may get frustrated trying to get help from your script. Fortunately, PowerShell provides a different and, in my opinion, a far superior way of handling certain conditionals, and that’s with a data type known as switch.
Enter the following script and save it as Switch_help.ps1.
|
1 2 3 4 5 6 7 8 9 10 11 12 13 14 15 |
param([switch] $help ) # # Author: Greg D. Moore # Date: 2020-02-18 # Version: 1.0 # Show switch help # if ($help) { write-host "This is help for this program. It does nothing. Hope that helps." } else { write-host "Do nothing." } |
Here, instead of defining $help as a Boolean, it is now a switch datatype. The switch acts similar to a Boolean, but not quite.
Run the following, and you will see what I mean.
|
1 2 3 4 5 |
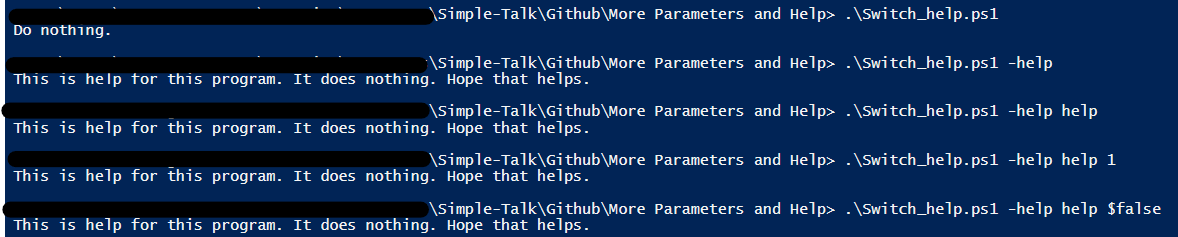
.\Switch_help.ps1 .\Switch_help.ps1 -help .\Switch_help.ps1 -help help .\Switch_help.ps1 -help help 1 .\Switch_help.ps1 -help help $false |
As you can see, it doesn’t really matter what value you put after the –help parameter. As long as the parameter itself is referenced when the script is called, it will have the value of $true.
It should also be clear that the switch datatype isn’t limited to just help. You can use it for enabling or disabling other items. For example, you might want to have a parameter called $debug, which would allow you to enable debug information. This is a great place for the use of the switch parameter.
However, you may already realize that the help provided above isn’t in the format that most cmdlets provide. I will come back to that later in this article, but first, take a look at some other options with parameters that will help those who run your code.
Adding Default Parameters
I don’t know about you, but if I can, I like to make it harder to make mistakes. One way of doing that is to provide a fixed set of default parameters. For example, you might have a script that can only run against a fixed set of servers.
Enter the following script and save it as Defaults.ps1.
|
1 2 |
param([parameter(mandatory)] [validateset("ProdDB_Server","DevDB_Server")] [string] $dbserver ) write-host "You picked $dbserver!" |
Now, I have to take a slight detour and mention one limitation of Visual Code Studio for development is that, at the time of this writing, I have not found a way to have it automatically pop-up parameters and possible defaults. For the following example, I recommend using the PowerShell ISE to see how this can work. If you enter the script name and the parameter –dbserver and then space, you should see a small pop-up
|
1 |
.\Defaults.ps1 -dbserver |

If you select one of those two items, the script will run as you expect.
Obviously, if you add another server, for example, a UAT server, you’d have to update the script. But, by using validated parameters, you ideally avoid a user from entering an invalid server name here.
Also, if you do try to type in an option not allowed, you will get an error message.
|
1 |
.\Defaults.ps1 -dbserver UATDBserver |

Conflicting Defaults
If you start to use default parameters, you may suddenly find yourself with required parameters that conflict with each other. For example, if you are using scripts to deploy code (and if you’re not, you should be) you might find in some cases you want to deploy to an environment, but other times to a specific database.
Now, you could write a script that takes both mandatory parameters and then tries to figure out what you want, but there’s an easier way. Enter the following:
|
1 2 3 4 5 6 7 8 9 10 |
param([parameter(mandatory, ParameterSetName='ByEnvironment')] [validateset("ProdDB_Server","DevDB_Server")] [string] $dbserver, [parameter(mandatory, ParameterSetName='ByDatabase')] [validateset("sales","product")] [string] $database ) if ($dbserver) { Write-Host "Your code will be deployed to the $dbserver server" } if ($database) { Write-Host "Your code will be deployed to the $database database" } |
And save it as Conflicting_Parameters.ps1.
When you try to run it, you will find you can decide whether you want to deploy to a specific server using the $dbserver parameter OR to a specific database using the $database parameter. For example, you may want to initially want to deploy a new script to your dev server, and once tested to your production server, or, in the second case, you may want to deploy the script to a specific database across all your servers at once.
|
1 2 |
.\Conflicting_Parameters.ps1 -database product .\Conflicting_Parameters.ps1 -dbserver DevDB_Server |

Save the following script as Conflicting_Parameters_2.ps1:
|
1 2 3 4 5 6 7 8 9 10 11 12 13 14 15 16 |
param([parameter(mandatory, ParameterSetName='ByEnvironment')] [validateset("ProdDB_Server","DevDB_Server")] [string] $dbserver, [parameter(mandatory, ParameterSetName='ByDatabase')] [validateset("sales","product")] [string] $database, [parameter(mandatory, ParameterSetName='ByEnvironment')] [validateset("Europe","North America","All")] [string] $region, [string] $comment) if ($dbserver) { Write-Host "Your code will be deployed to the $dbserver server in the $region region." } if ($database) { Write-Host "Your code will be deployed to the $database database" } if ($comment) { Write-host "Your comment was: $comment" } |
You will note several major changes. You now have two parameters, $dbserver and $region that are both part of the same Parameter Set ByEnvironment. Note that they’re separated by the $database parameter. This should make it clear, that the ParameterSetName is what ties them together, not their placement in the list of parameters. Also, you will note that there is a final optional parameter, $comment that is not tied to either Parameter Set.

The $comment parameter can be optionally used with either Parameter Set.
Adding Better Help
As noted above, the first and most obvious solutions for providing help that come to mind are the ones mentioned at the start of the article. However, like most things, PowerShell provides a better way of handling this.
First, your scripts already might give help if parameters. Simply try this:
|
1 |
get-help .\Conflicting_Parameters_2.ps1 |
You should see:
![]()
So that’s a start.
But it might be nice to actually let users know what the parameters, like –region, mean.
Take the script Conflicting_Parameters_2.ps1 and save it as Conflicting_Parameters_Help1.ps1.
Then add the following block of code as the first lines of the script:
|
1 2 3 4 |
<# .Description This is a test file to demonstrate conflicting parameters. #> |
Save this and then run:
|
1 |
get-help .\Conflict_Parameters_Help1.ps1 |
You should see something very similar to:
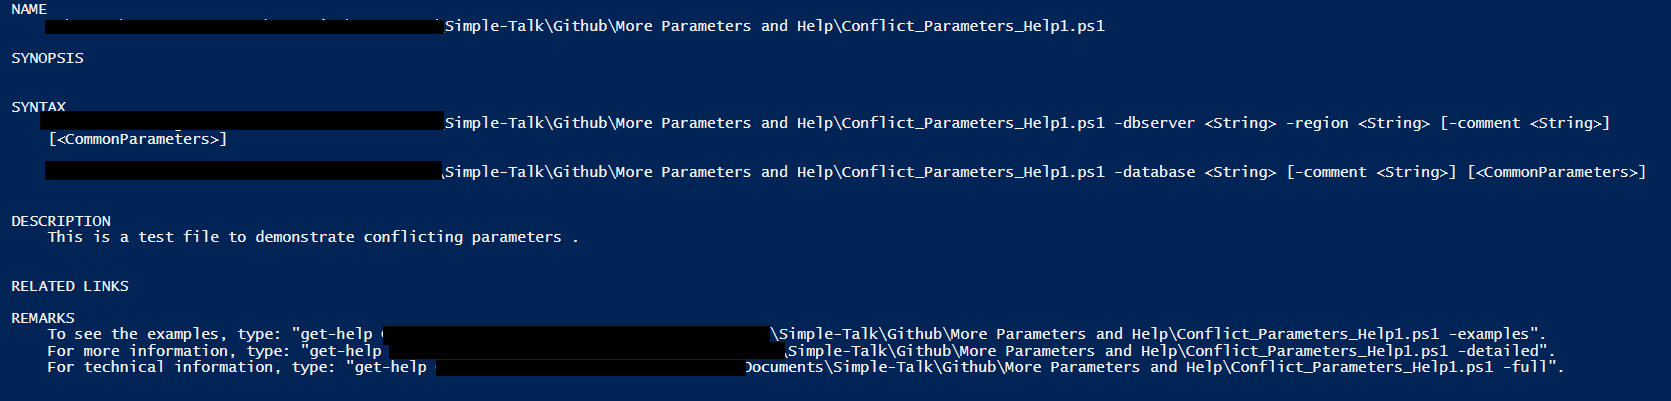
Now, this is starting to look a bit more like a real script!
But you haven’t solved the problem of giving useful examples about what the parameters can or should be. Fortunately, that’s easy to fix with the addition of the following lines. Add these and save as Conflicting_Parameters_Help2.ps1.
|
1 2 3 4 5 6 7 8 9 10 11 12 13 14 |
.PARAMETER dbserver Determines if you are deploying to the Production or Dev DB server. Valid values are ProdDB_Server or DevDB_Server Must be used with the region parameter. May not be used with the database parameter .PARAMETER database Determines if you are deploying to the Sales or Product database. Valid values are sales or product May not be used with the dbServer and region parameters .PARAMETER region Determines which region you are deploying to. Valid values are Europe, North America or All Must be used with the dbserver parameter. May not be used with the database parameter .PARAMETER Comment Allows you to add a comment to your deploy. |
Make sure to have a blank line before the first .PARAMETER and after the final line of the block above.
If you simply run this:
|
1 |
get-help .\Conflict_Parameters_Help2.ps1 |
You won’t see any difference. However, if you run this code:
|
1 |
get-help .\Conflicting_Parameters_Help2.ps1 -Full |
You will now see all your parameter help in its full glory! I’ve only reproduced the relevant part here with details highlighted
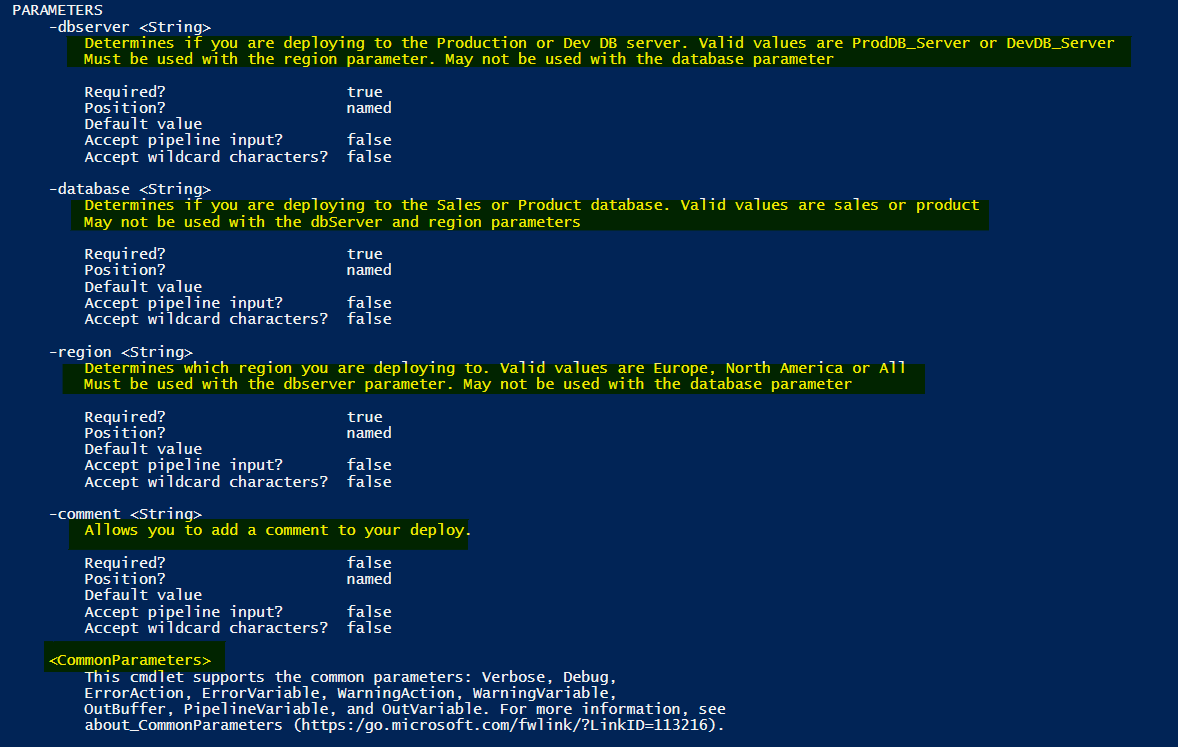
Note that the details about the parameters are now part of the help. You will also note that common parameters are also listed.
While this help text is useful, you may find yourself wanting it in a separate window so you can consult it while continue writing your script. In this case, try the following:
|
1 |
get-help .\Conflicting_Parameters_Help2.ps1 -showwindow |
You should see a window similar to this:
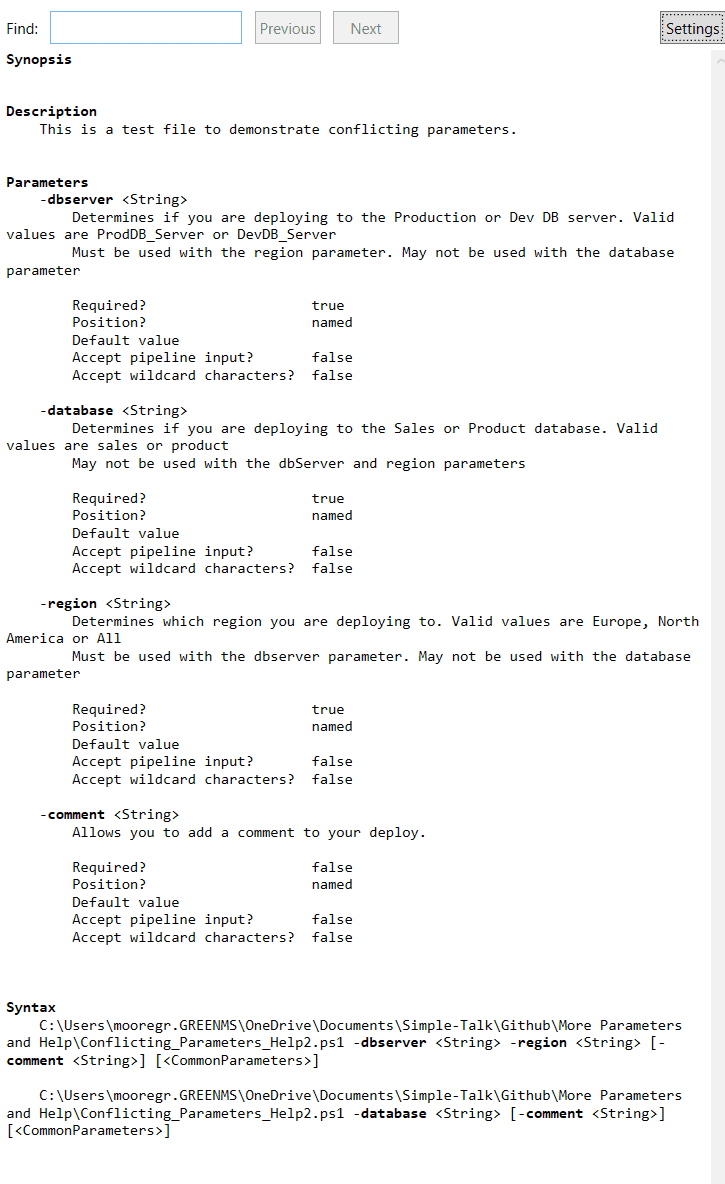
Note that the examples nicely highlight the parameters and because there are two Parameter Sets, shows you both possibilities.
However, you may ask yourself, what if you want help on just one parameter? PowerShell allows for that also:
Run this code:
|
1 |
get-help .\Conflicting_Parameters_Help2.ps1 -Parameter dbserver |
You should get:

You will also notice, in addition to the help details you’ve provided, PowerShell is also informing the user if the parameter is required, if it is handled by position and other details. In an earlier article, I discussed the value of naming parameters. I will cover pipeline input at a later date.
If you want to make life even easier for your users, you may want to include examples of how to execute the script with the proper parameters.
Add the following lines (again, remembering to have a blank line before and after the new lines) and save as Conflicting_Parameters_Help3.ps1.
|
1 2 3 4 5 6 |
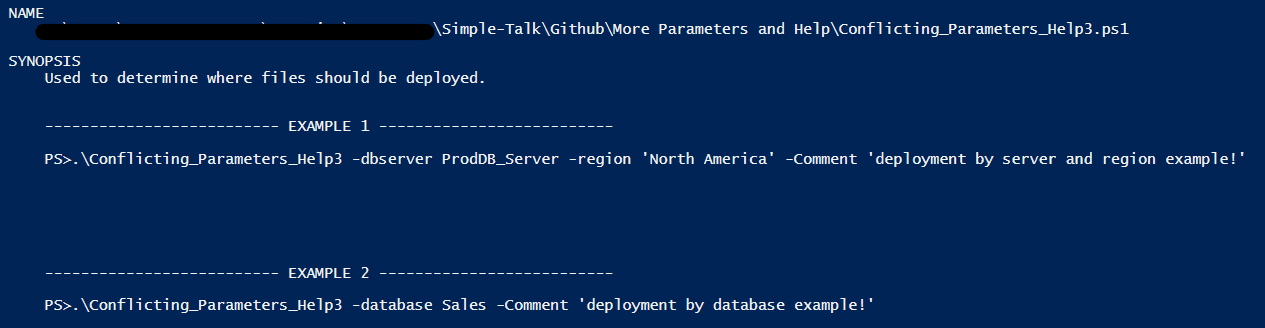
.EXAMPLE PS> .\Conflicting_Parameters_Help3 -dbserver ProdDB_Server -region 'North America' -Comment 'deployment by server and region example!' .EXAMPLE PS> .\Conflicting_Parameters_Help3 -database Sales -Comment 'deployment by database example!' .SYNOPSIS Used to determine where files should be deployed. |
Then run the following:
|
1 |
get-help .\Conflicting_Parameters_Help3.ps1 -Examples |
You will get back something very much like:
If you cut and paste either example, it will run the command as expected. For example, using the first example will return:
![]()
Finally, I want to show you another way of adding help. It’s not one I would generally recommend but in some cases may be quicker and easier. For ease of coding, I’ll put the entire script here. It’s basically the last script with two minor modifications. Save it as Conflicting_Parameters_Help4.ps1.
|
1 2 3 4 5 6 7 8 9 10 11 12 13 14 15 16 17 18 19 20 21 22 23 24 25 26 27 28 29 30 31 32 33 34 35 |
<# .Description This is a test file to demonstrate conflicting parameters. .PARAMETER database Determines if you are deploying to the Sales or Product database. Valid values are sales or product May not be used with the dbServer and region parameters .PARAMETER region Determines which region you are deploying to. Valid values are Europe, North America or All Must be used with the dbserver parameter. May not be used with the database parameter .PARAMETER Comment Allows you to add a comment to your deploy. .EXAMPLE PS> .\Conflicting_Parameters_Help3 -dbserver ProdDB_Server -region 'North America' -Comment 'deployment by server and region example!' .EXAMPLE PS> .\Conflicting_Parameters_Help3 -database Sales -Comment 'deployment by database example!' .SYNOPSIS Used to determine where files should be deployed. #> param([parameter(mandatory, ParameterSetName='ByEnvironment')] [validateset("ProdDB_Server","DevDB_Server")] # Determines if you are deploying to the Production or Dev DB server. Valid values are ProdDB_Server or DevDB_Server Must be used with the region parameter. May not be used with the database parameter [string] $dbserver, [parameter(mandatory, ParameterSetName='ByDatabase')] [validateset("sales","product")] [string] $database, [parameter(mandatory, ParameterSetName='ByEnvironment')] [validateset("Europe","North America","All")] [string] $region, [string] $comment) if ($dbserver) { Write-Host "Your code will be deployed to the $dbserver server in the $region region." } if ($database) { Write-Host "Your code will be deployed to the $database database" } if ($comment) { Write-host "Your comment was: $comment" } |
What you will notice is that I’ve removed the .PARAMETER help message for dbserver and moved it directly into the parameter definition.
As above, run this:
|
1 |
get-help .\Conflicting_Parameters_Help4.ps1 -Parameter dbserver |
You should get:

The advantage of writing parameter help this way is that the help can be entered as you’re creating the parameter. However, I find it a bit harder to read this way. There’s also an additional issue. If you take Conflicting_Parameters_Help4.ps1 and add the following lines to the help comment and save it as Conflicting_Parameters_Help5.ps1.
|
1 2 |
.PARAMETER dbserver Help here overrides what's in the parameter definition. |
Then run it.
|
1 |
get-help .\Conflicting_Parameters_Help5.ps1 -Parameter dbserver |
You will get:

While it can be handy to add the help message directly to the parameter definition, if you later go back and add a full comment-based help block, that will take precedence.
For the details on what you can add to your help block, I would recommend you read the Microsoft help for full details located here.
Conclusion
Hopefully, this article has helped you understand how to switch to better parameters and how to enable your users by adding a real PowerShell help to your scripts. As always, the scripts are available on GitHub.

Load comments