A Siebel CRM upgrade project typically consists of numerous iterations even before the actual development and bug fixes take effect. It is wise to follow the age old adage “measure twice, cut once”. It makes practical sense not to upgrade the development instance until the upgrade team is absolutely sure of the upgrade process itself, since there will be slight variations depending on the level of customization on the existing application. More importantly, since the upgrade itself is fairly time-consuming, there may still be development ongoing on the previous versions.
To minimize the risk, it is a good idea to create a new instance before the start of the upgrade project. This helps in two distinct ways:
- The new instance can be used as a sandbox instance with a pure vanilla version of Siebel running on it. This is important in order to identify how the existing customized application fares against this vanilla instance. The sandbox can also assist business analysts in demonstrating the vanilla functionality to the business groups. This assists in identifying unnecessary customizations to remove from the application.
- In the event that a decision is taken to perform an in-place upgrade, this instance should be the first place an upgrade is performed, so that the existing development instance can be shielded against the upgrade project.
To further reduce risks and minimize costs it is advisable to move towards a cloud-based provider to either:
- Prepare a sandbox
- Prepare an instance for the initial upgrade.
For the purpose of the Siebel sandbox or the temporary development instance we will require the following architecture:
- Server 1: Siebel Web Server, Siebel Gateway Server.
- Server 2: Siebel Database, Siebel Application Server.
- Server 3: Siebel Tools, Siebel Web Client, Siebel Application Server.
Going by past experience on multiple Siebel upgrade projects, the flexibility and cost benefit offered by the Amazon Web services (AWS) EC2 infrastructure cannot be ignored. This article focuses primarily on how to set up and configure an Amazon EC2 instance and prepare it to work with Siebel. That said, this article can also be used to setup Amazon instances for any application and not necessarily Siebel.
The first step, obviously, is to log on to http://aws.amazon.com and sign up. You will also be required to set up some kind of a payment method. Most corporate users will have logins provided by Amazon which should be used to set up the instances. Individual users on the other hand would definitely be required to set up a payment method before the instance can be set up.
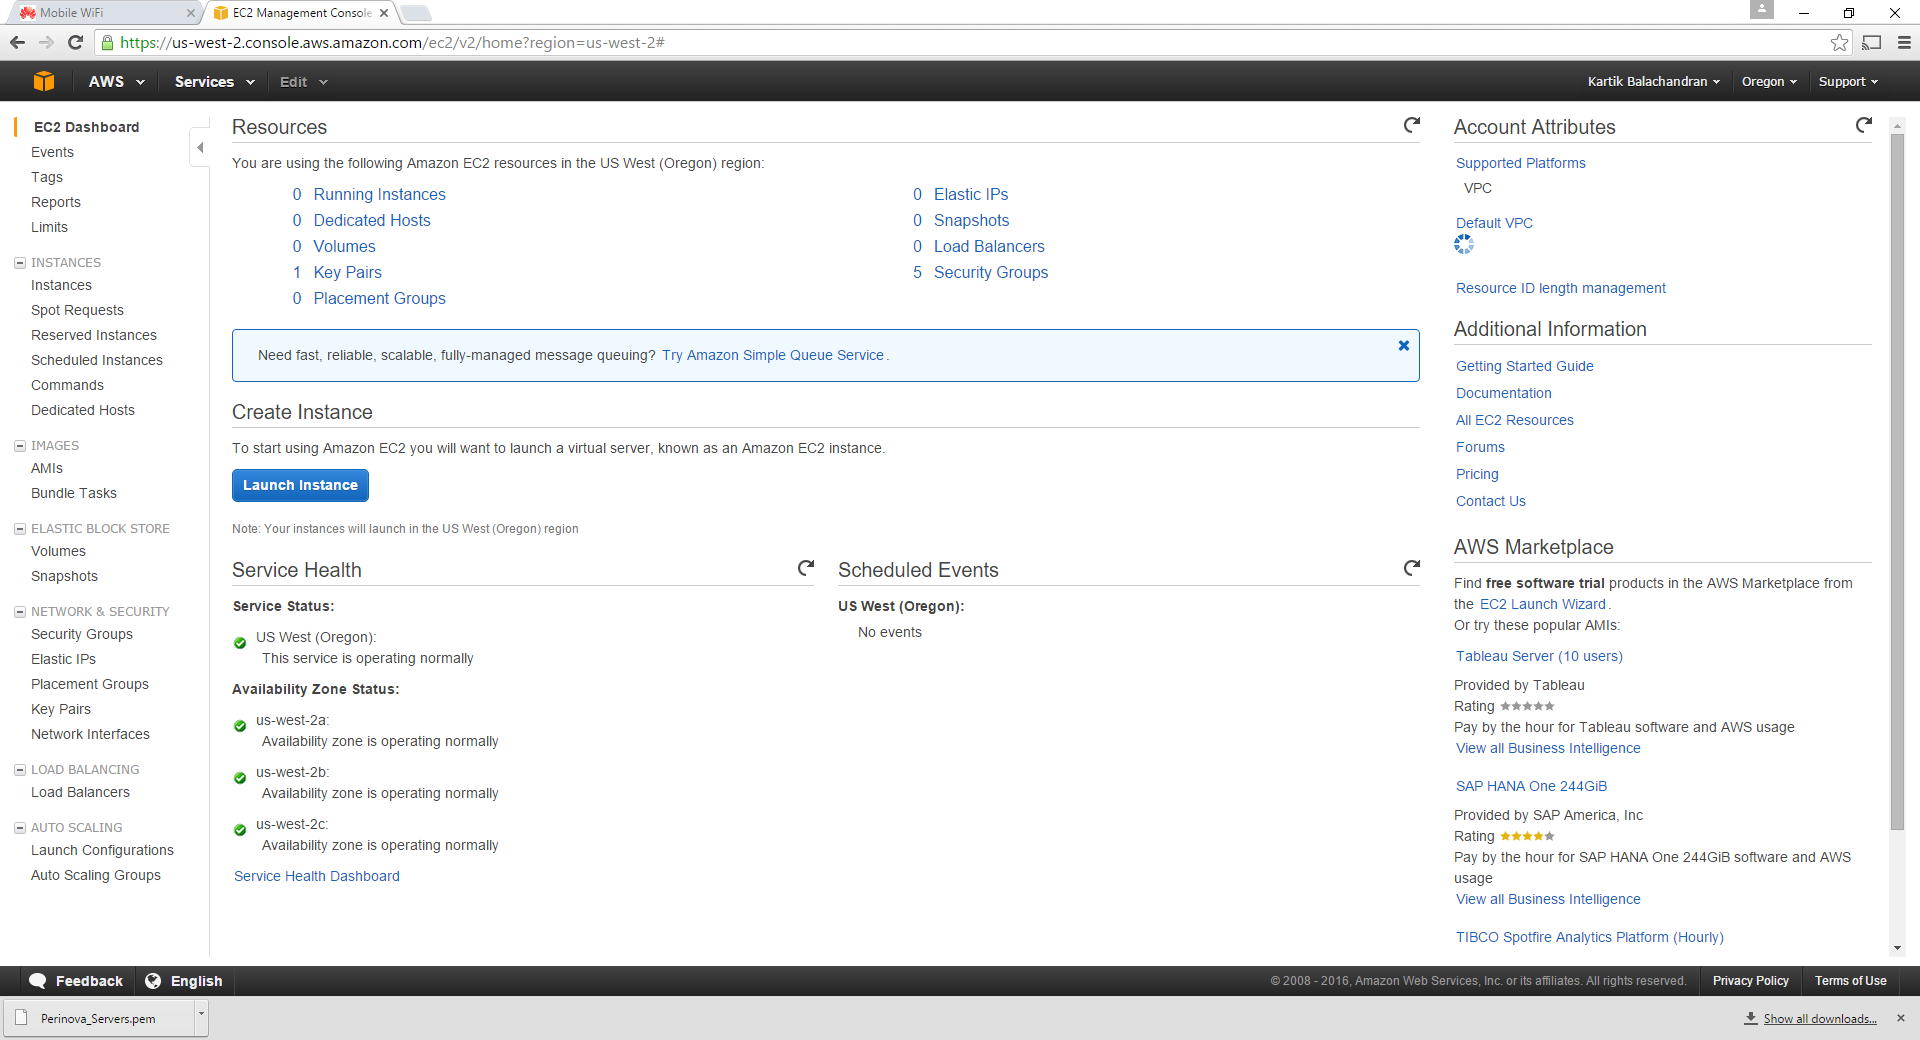
Once the login is complete, the AWS services page opens up.
Creation of the instances
Click on any of the images for more detail.
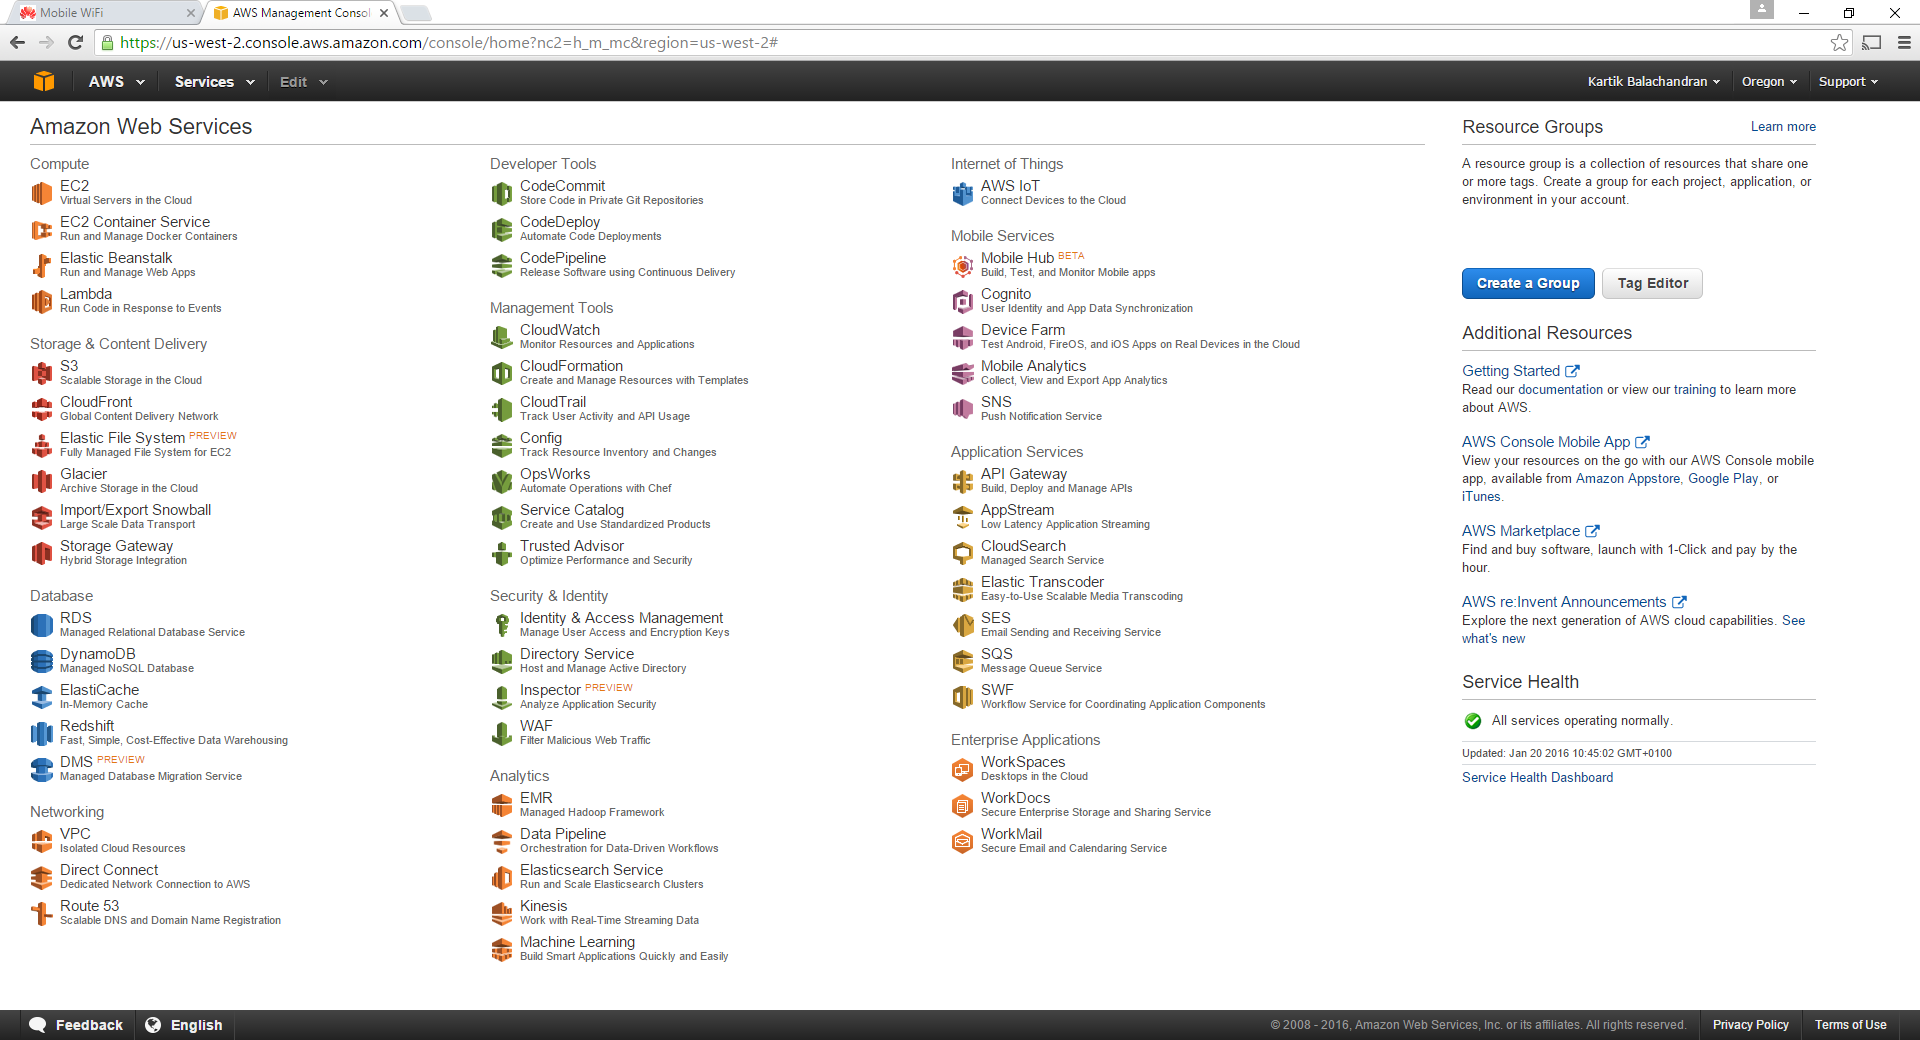
Click on EC2:

Click on Instances:

Click on Launch Instance. This is the first step in creating an Amazon Server for yourself.
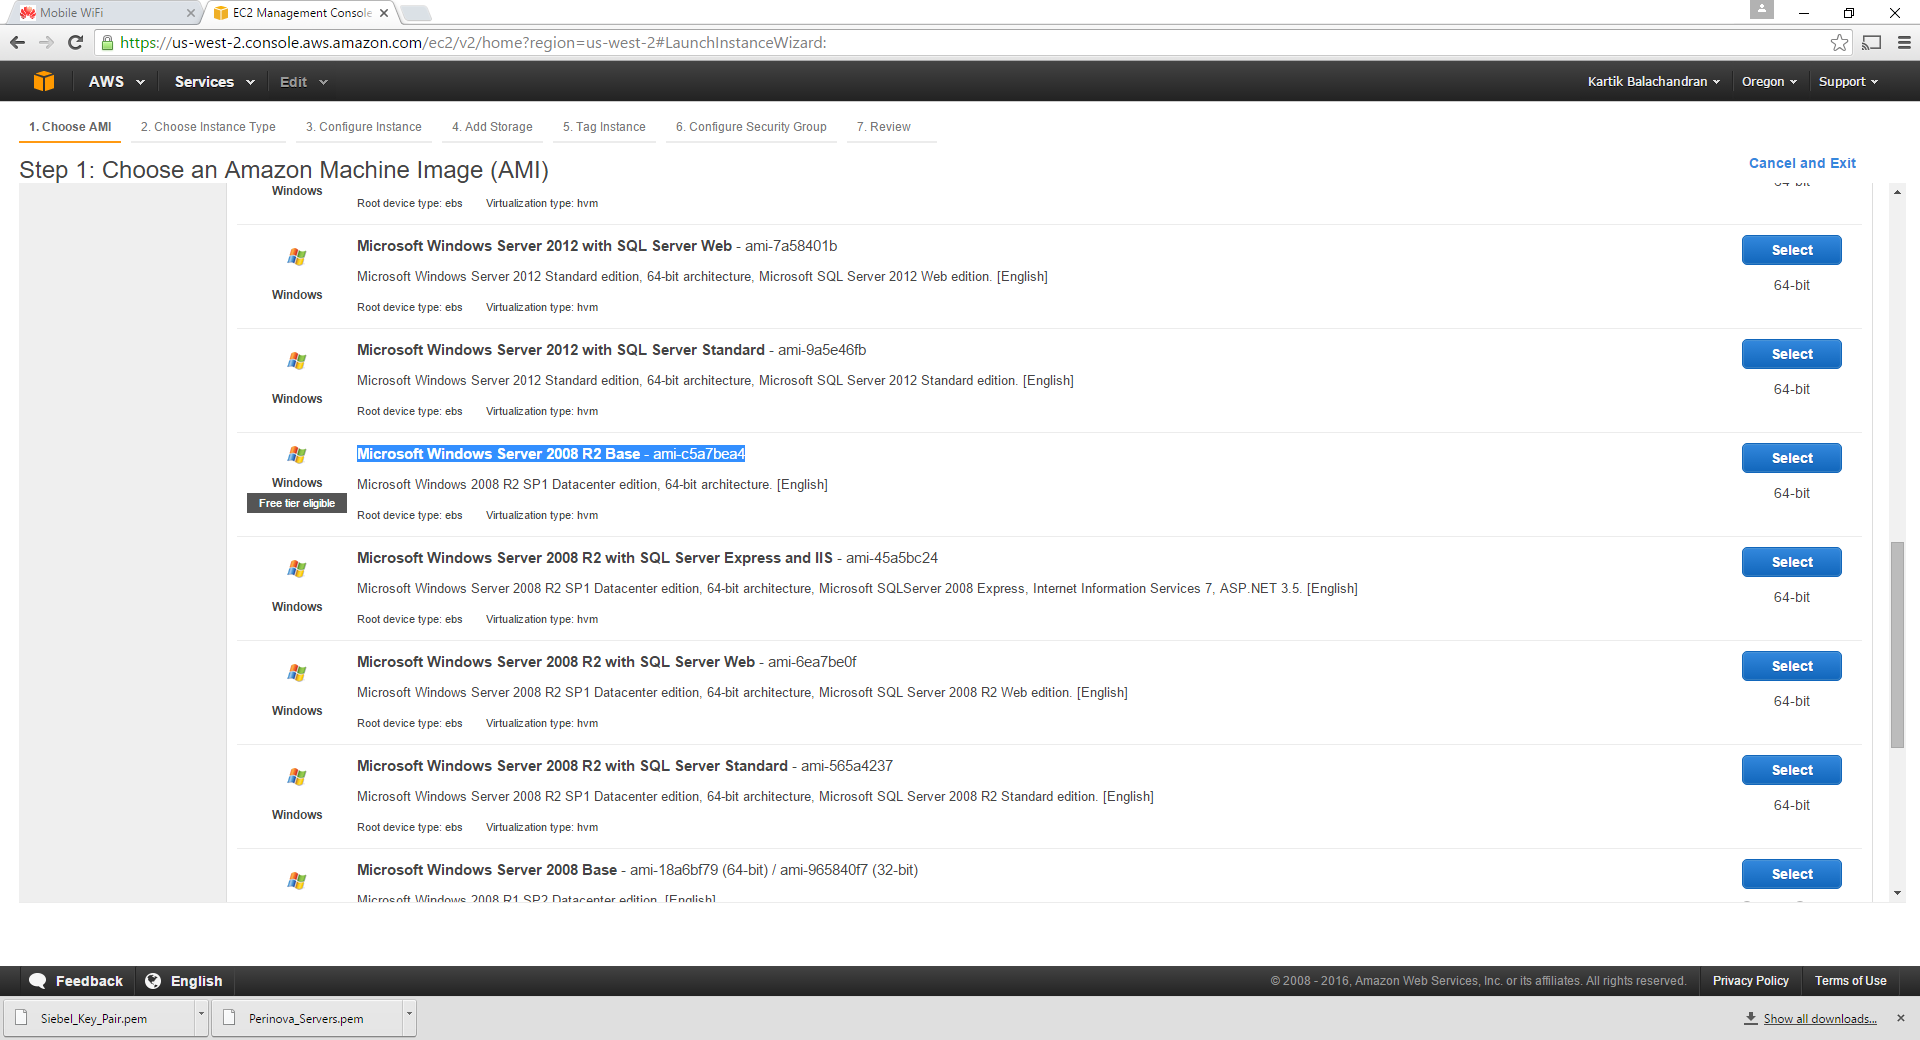
Scroll down to Microsoft Server 2008 R2 Base. We need to choose Windows 2008 R2 since Windows 2012 R2 is still not supported by Siebel IP 2015.

Click Select:
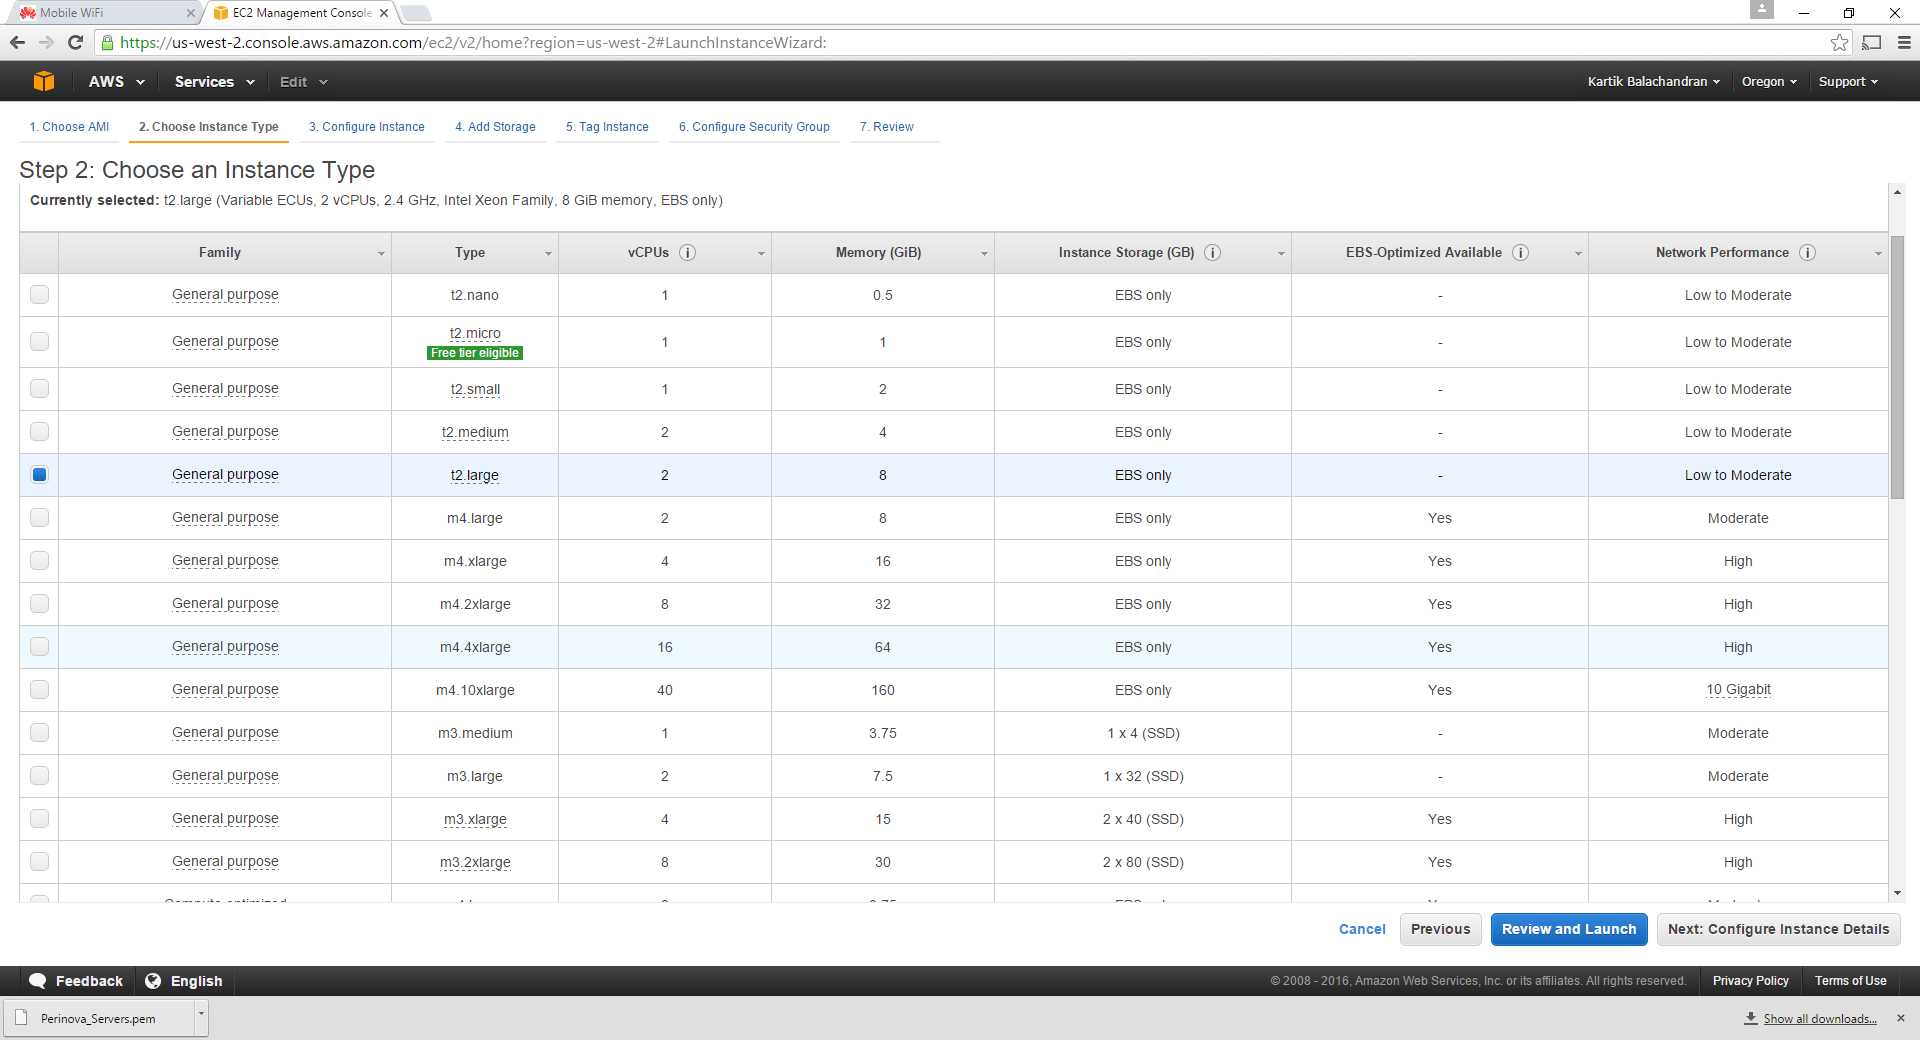
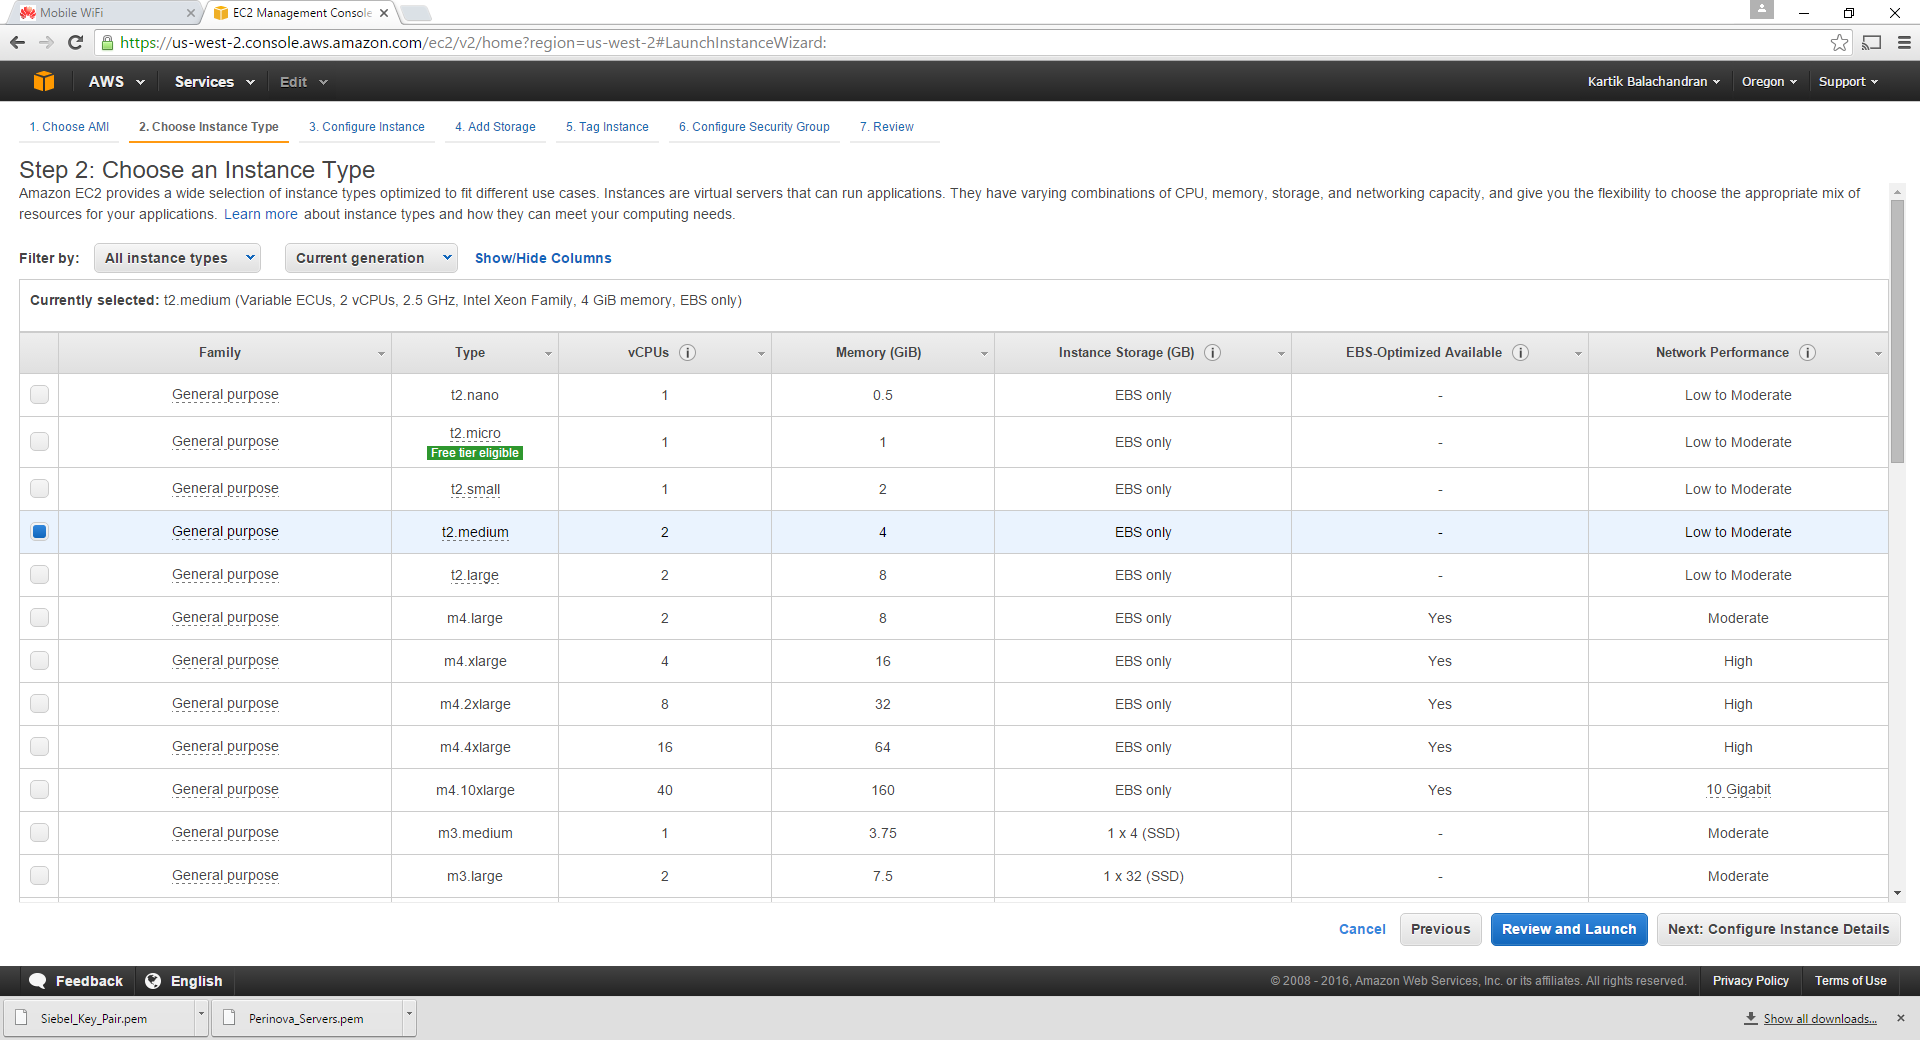
Select T2 Large and click Configure Instance Details. This will be the database server or the Server hosting the Oracle Database which the Siebel servers will run on.
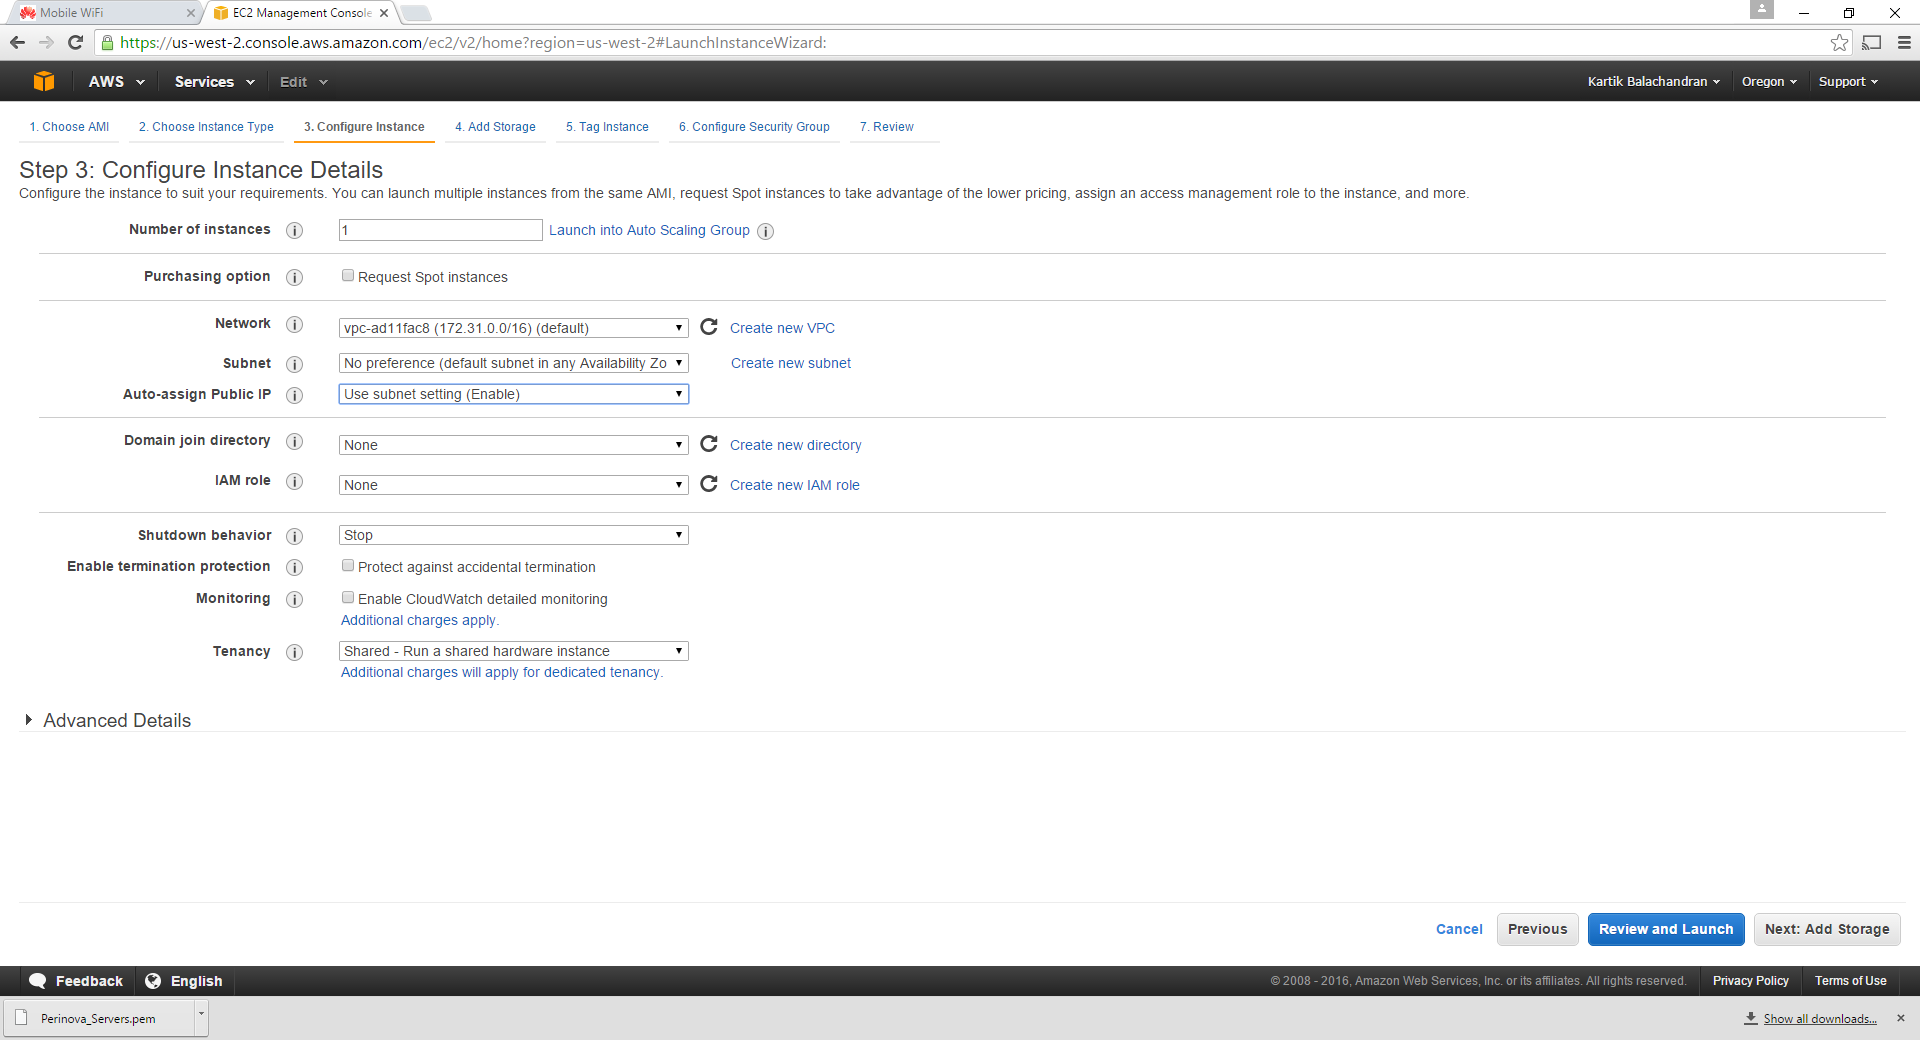
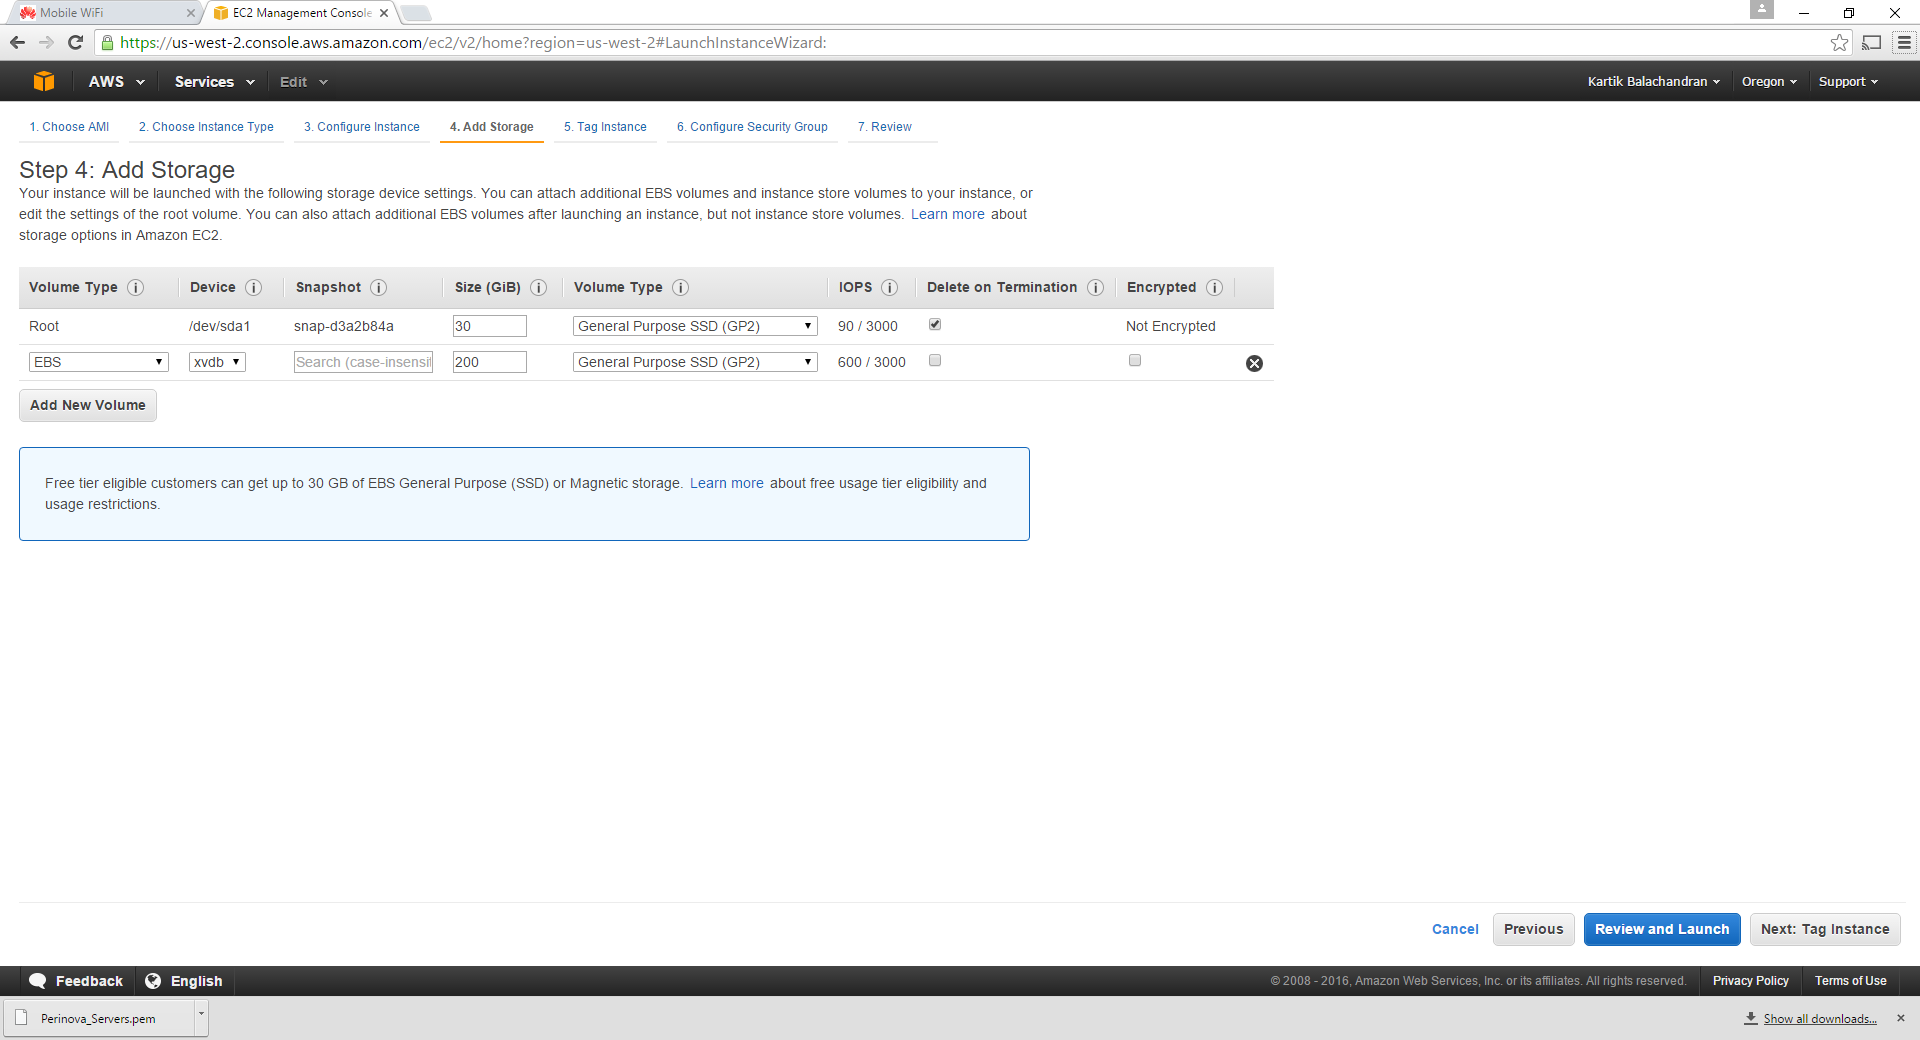
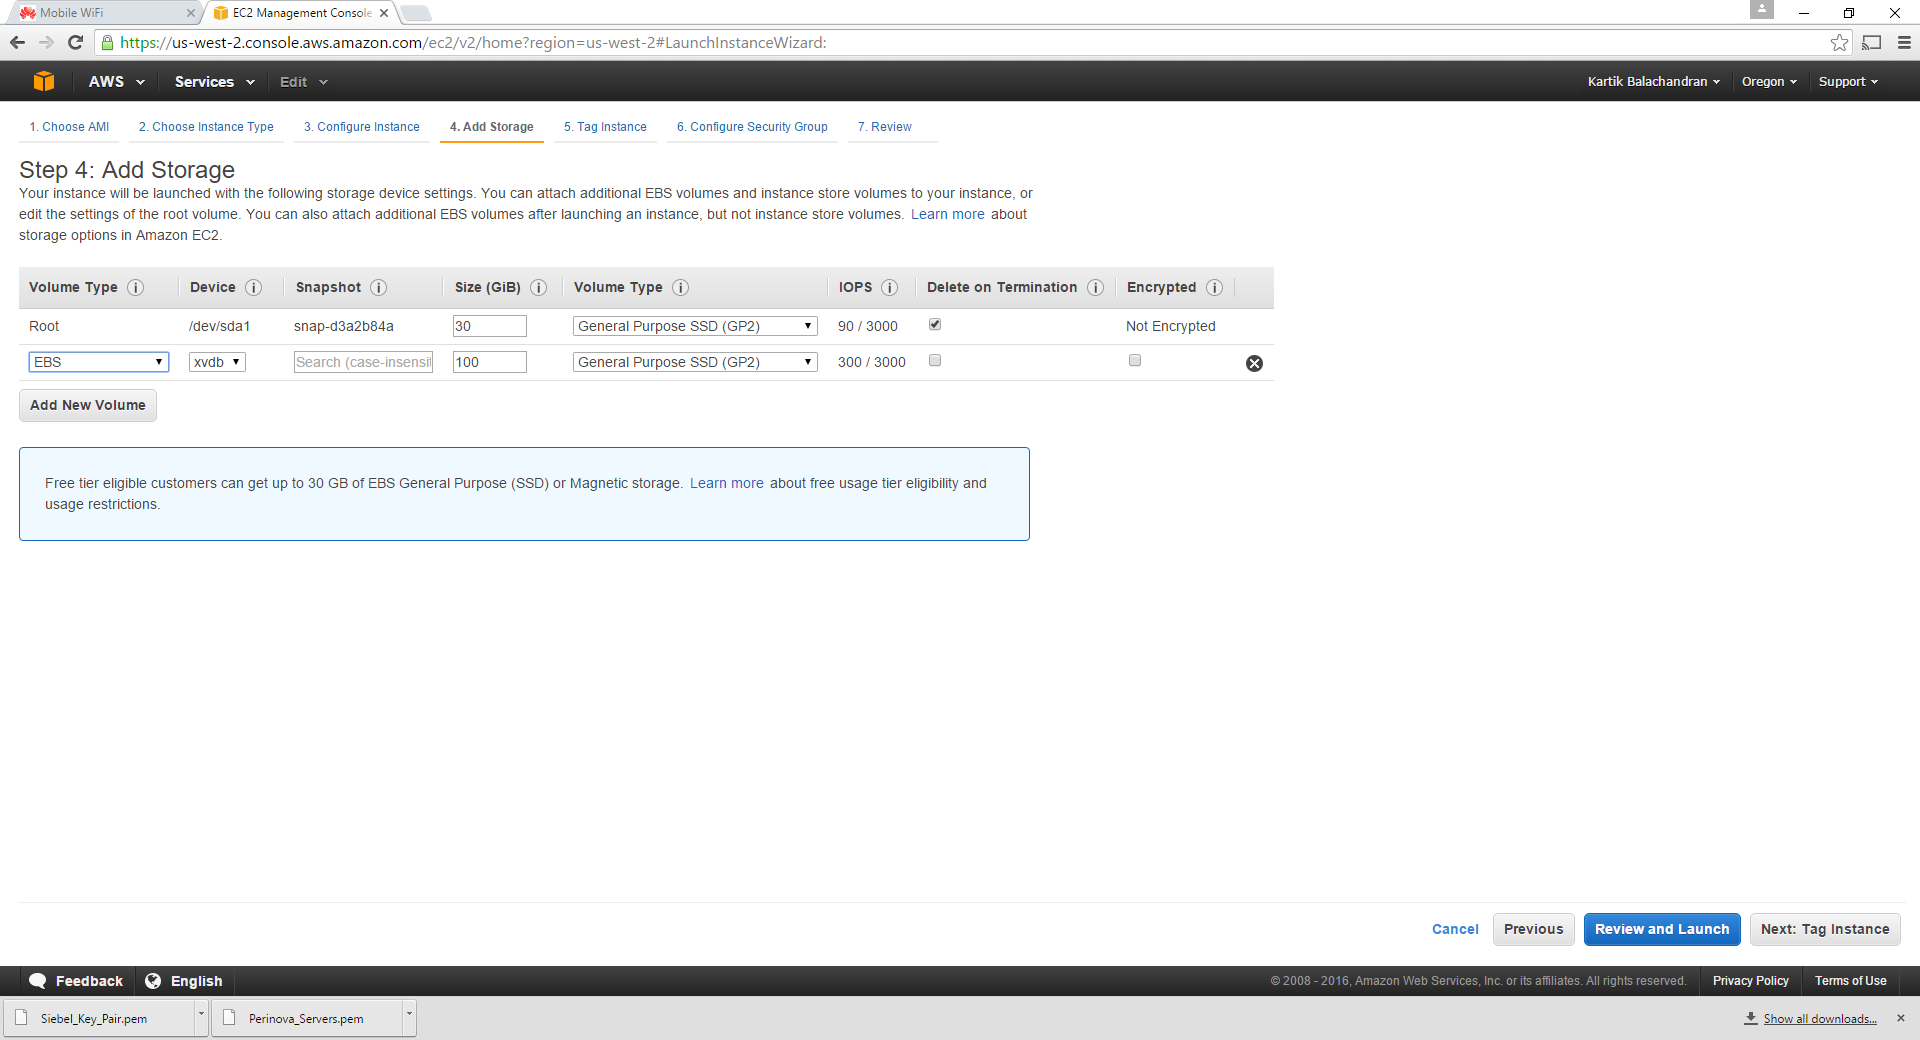
Keep the defaults and click Add Storage:
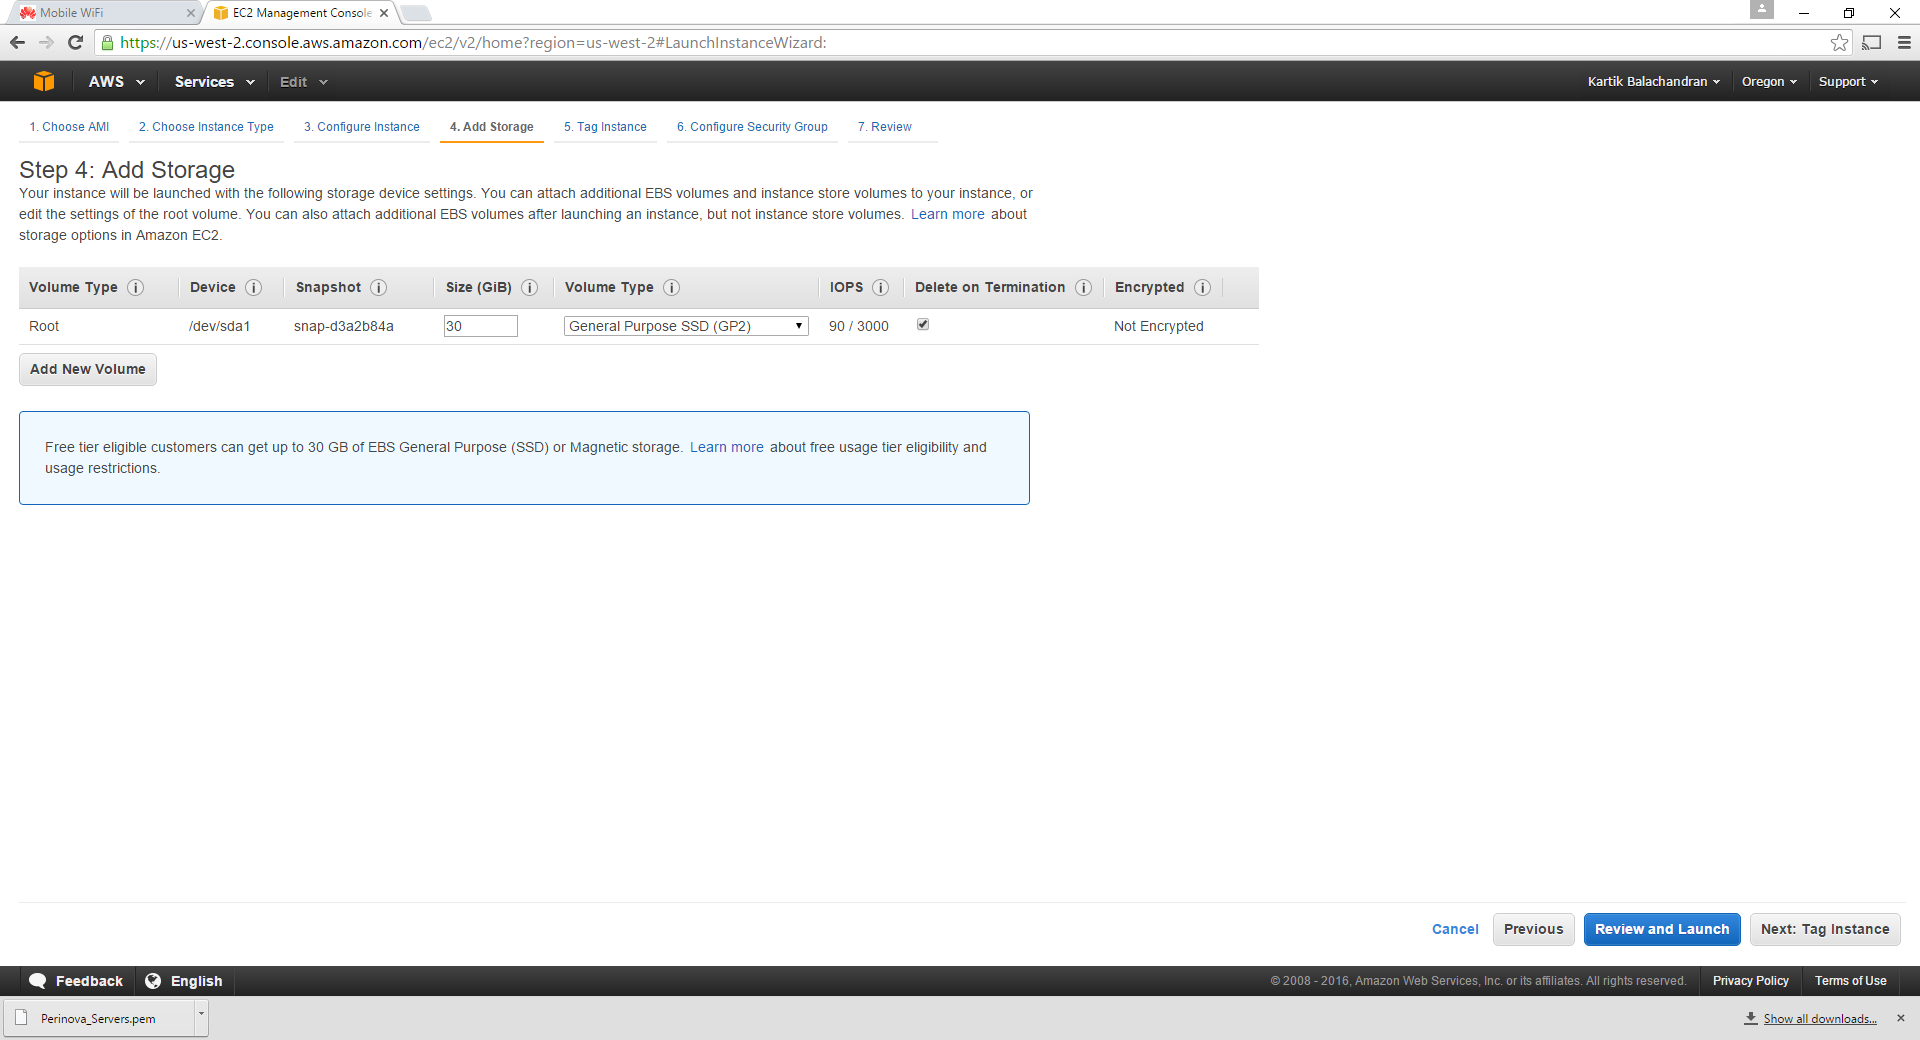
Click Add New Volume and add a 200 GB volume. For most databases this should be sufficient. 200 GB is more than sufficient for a sandbox environment. In the event that an in-place upgrade is being performed, most development databases rarely reach 200 GB.
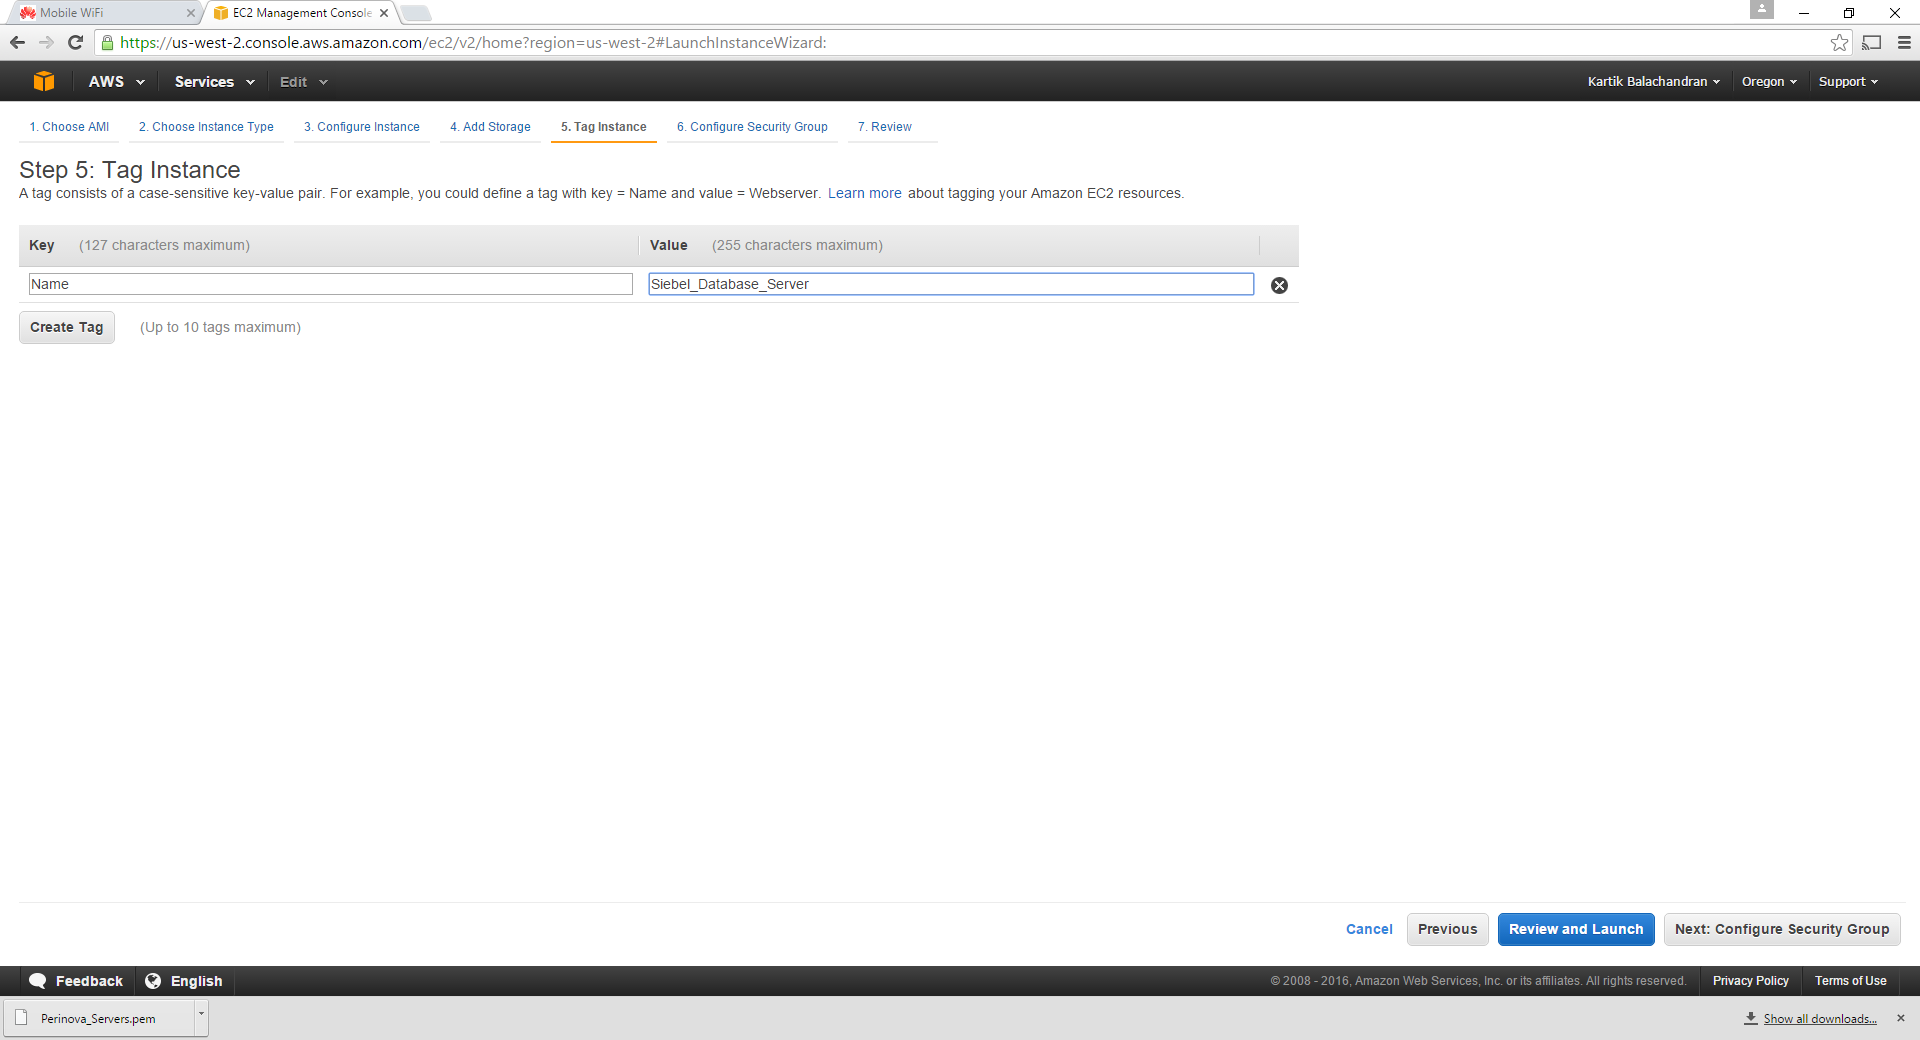
Click Tag Instance to set up a meaningful name for the instance.
Click Next on Configure security Group. This is critical for multiple reasons:
- The security group ensures that access between the servers is free.
- Since AWS instances can be accessed by anyone across the globe, it makes sense to restrict access to specific IP addresses only.

Type in a name for a new security group and click Review and Launch:

Click on Launch:
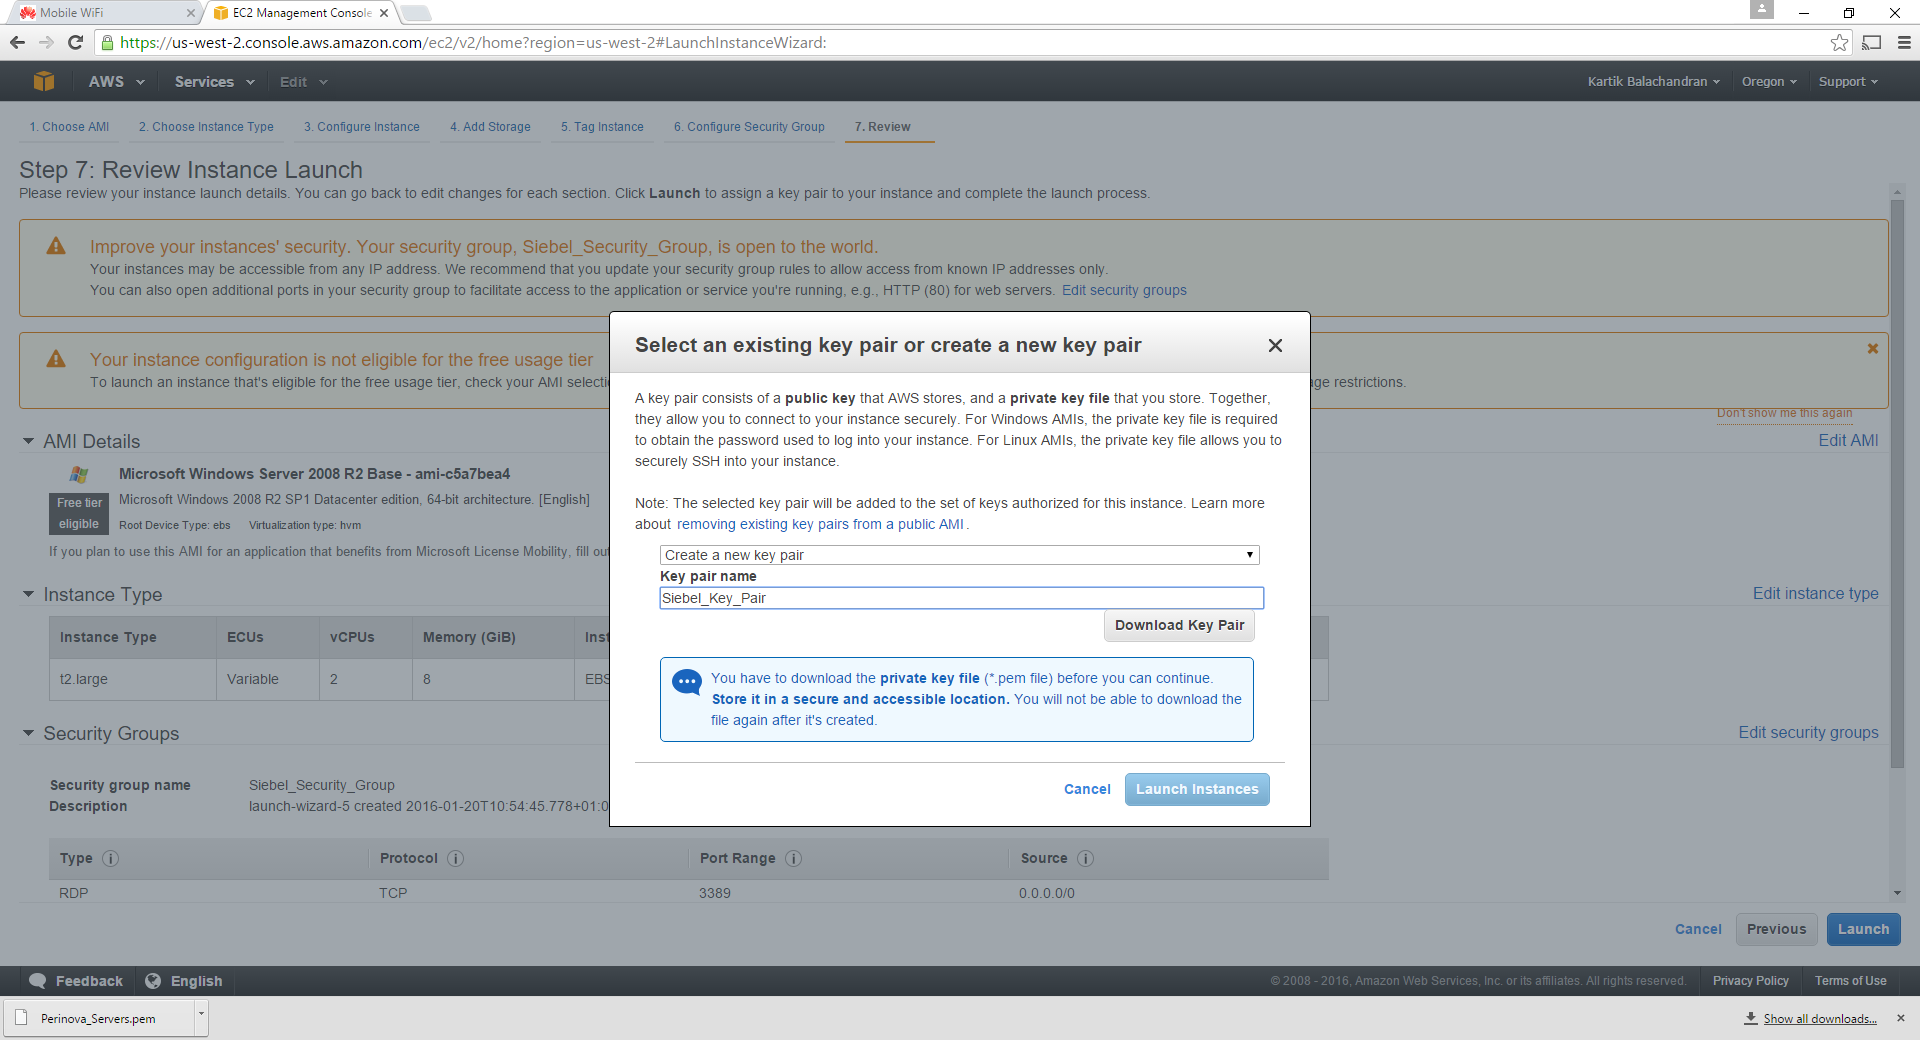
Download the key pair. The key pair is important for getting access to the instance. Please ensure that this file is saved and stored somewhere secure. Once this has downloaded, launch the instance.

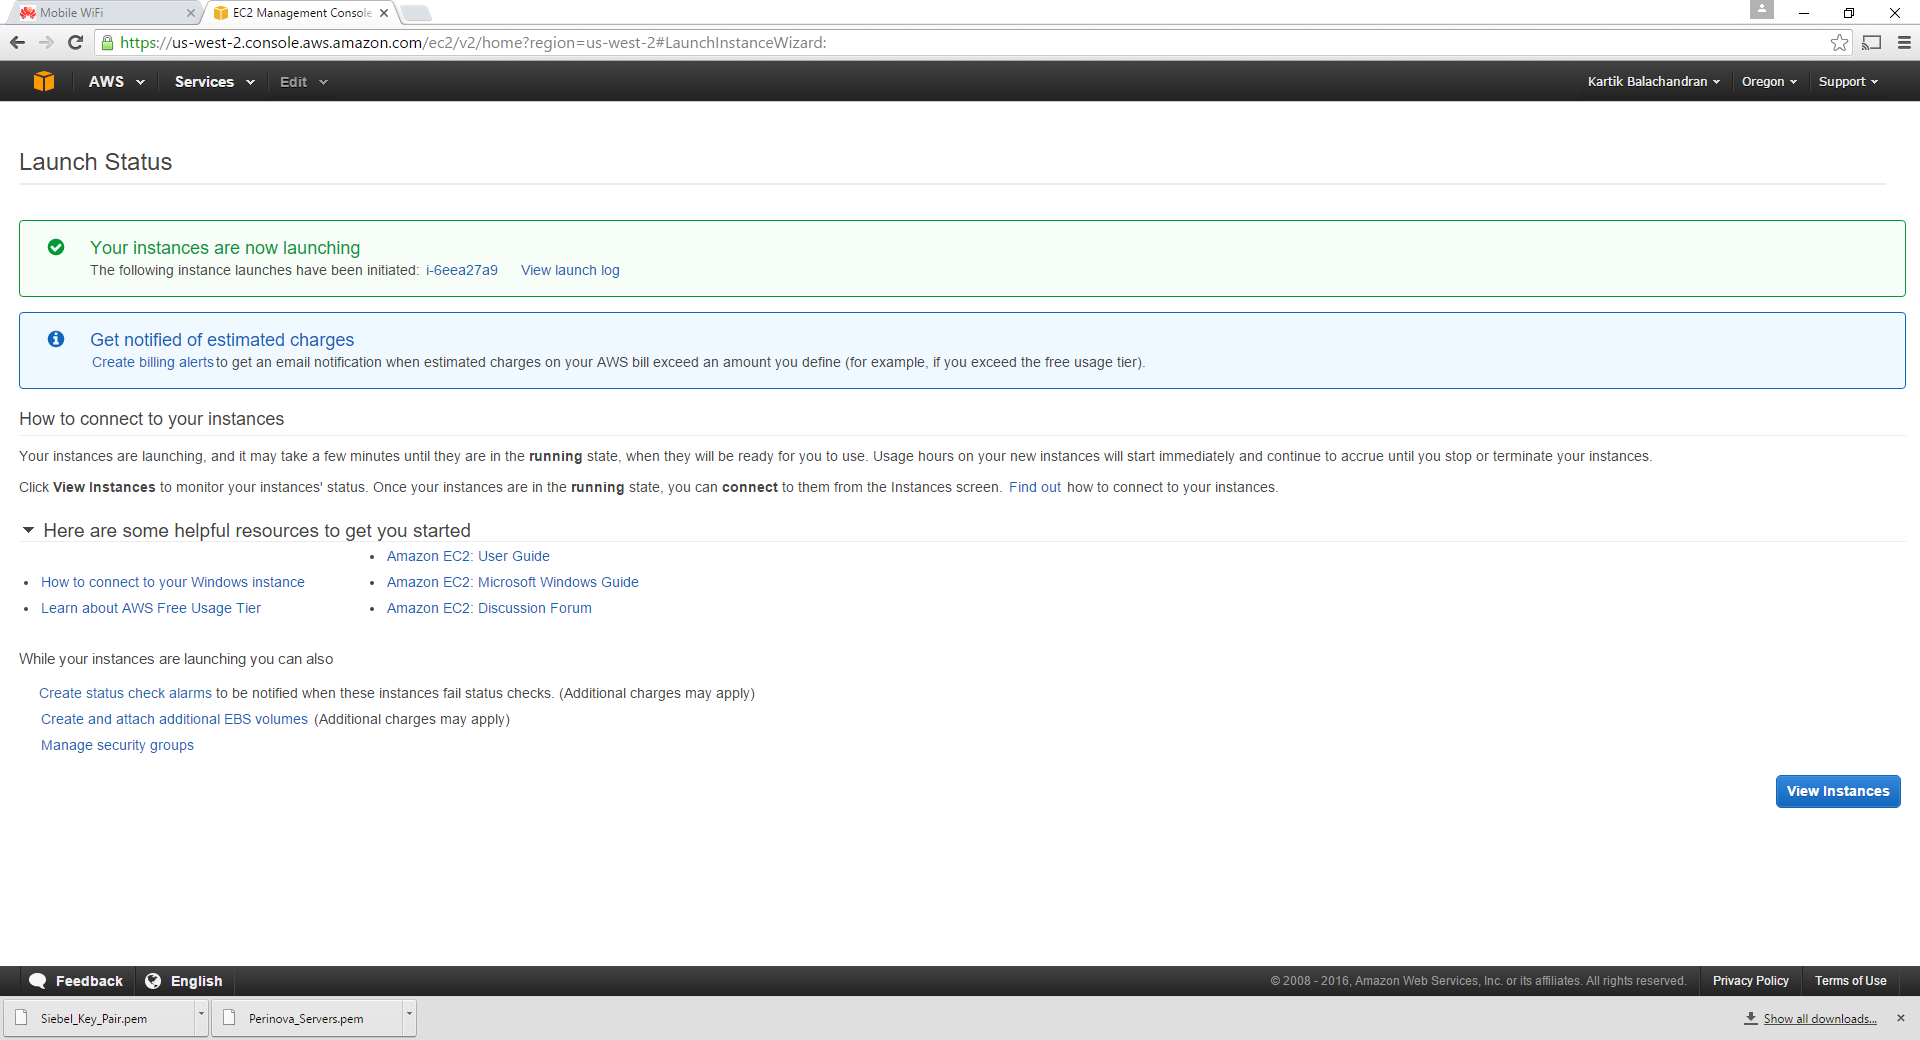
This will launch the instance.

The steps need to be repeated for 2 more servers. However the specifications can be slightly lower for them. Click on Launch instance again.

Choose T2 medium, since the other two servers on the instance do not need an extremely high processing power or memory.

Since these servers are lower end, 100 GB of disk space is more than sufficient. Please note that the virtual disks are charged separately and hence we should use only as much as necessary.
Tag the instance as required.

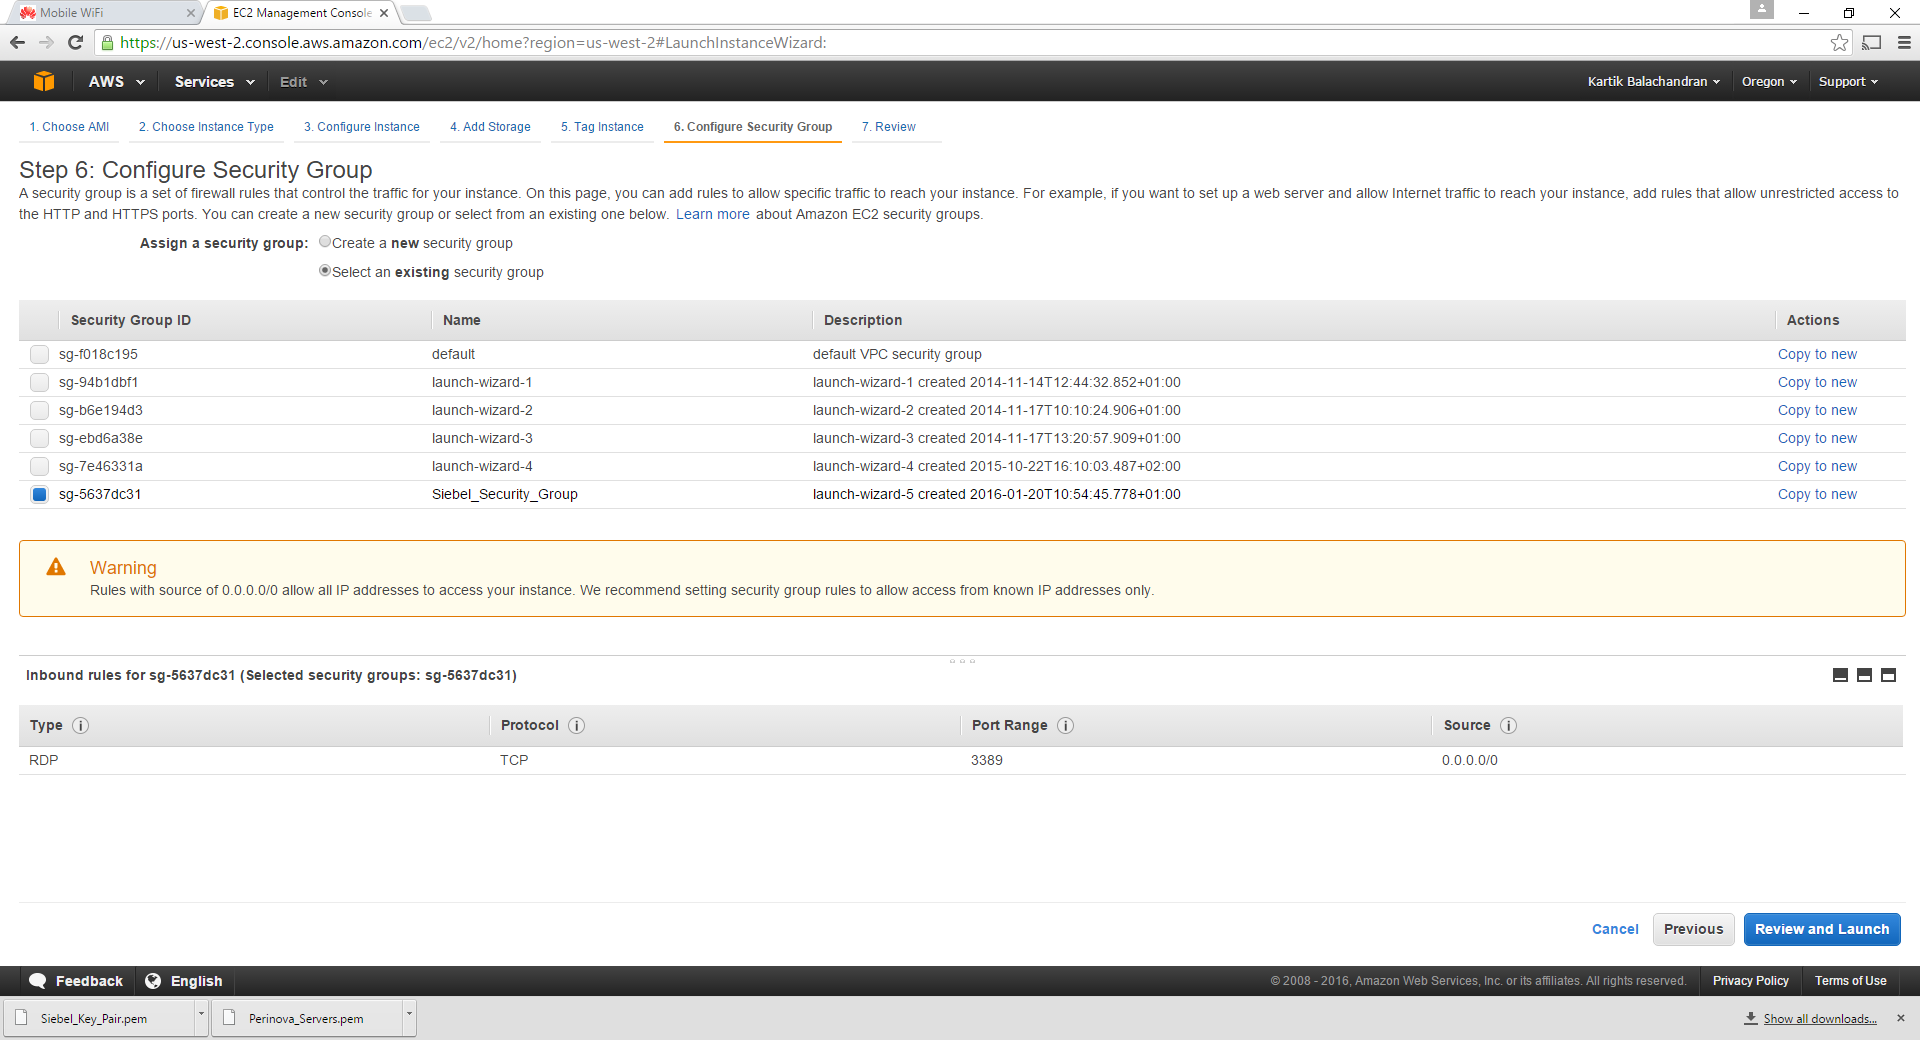
While configuring the security group for the next 2 servers, we pick the security group created during the first server setup instead of creating a new one. We need to ensure that we select “Select an existing security group” so that all the security groups are displayed.
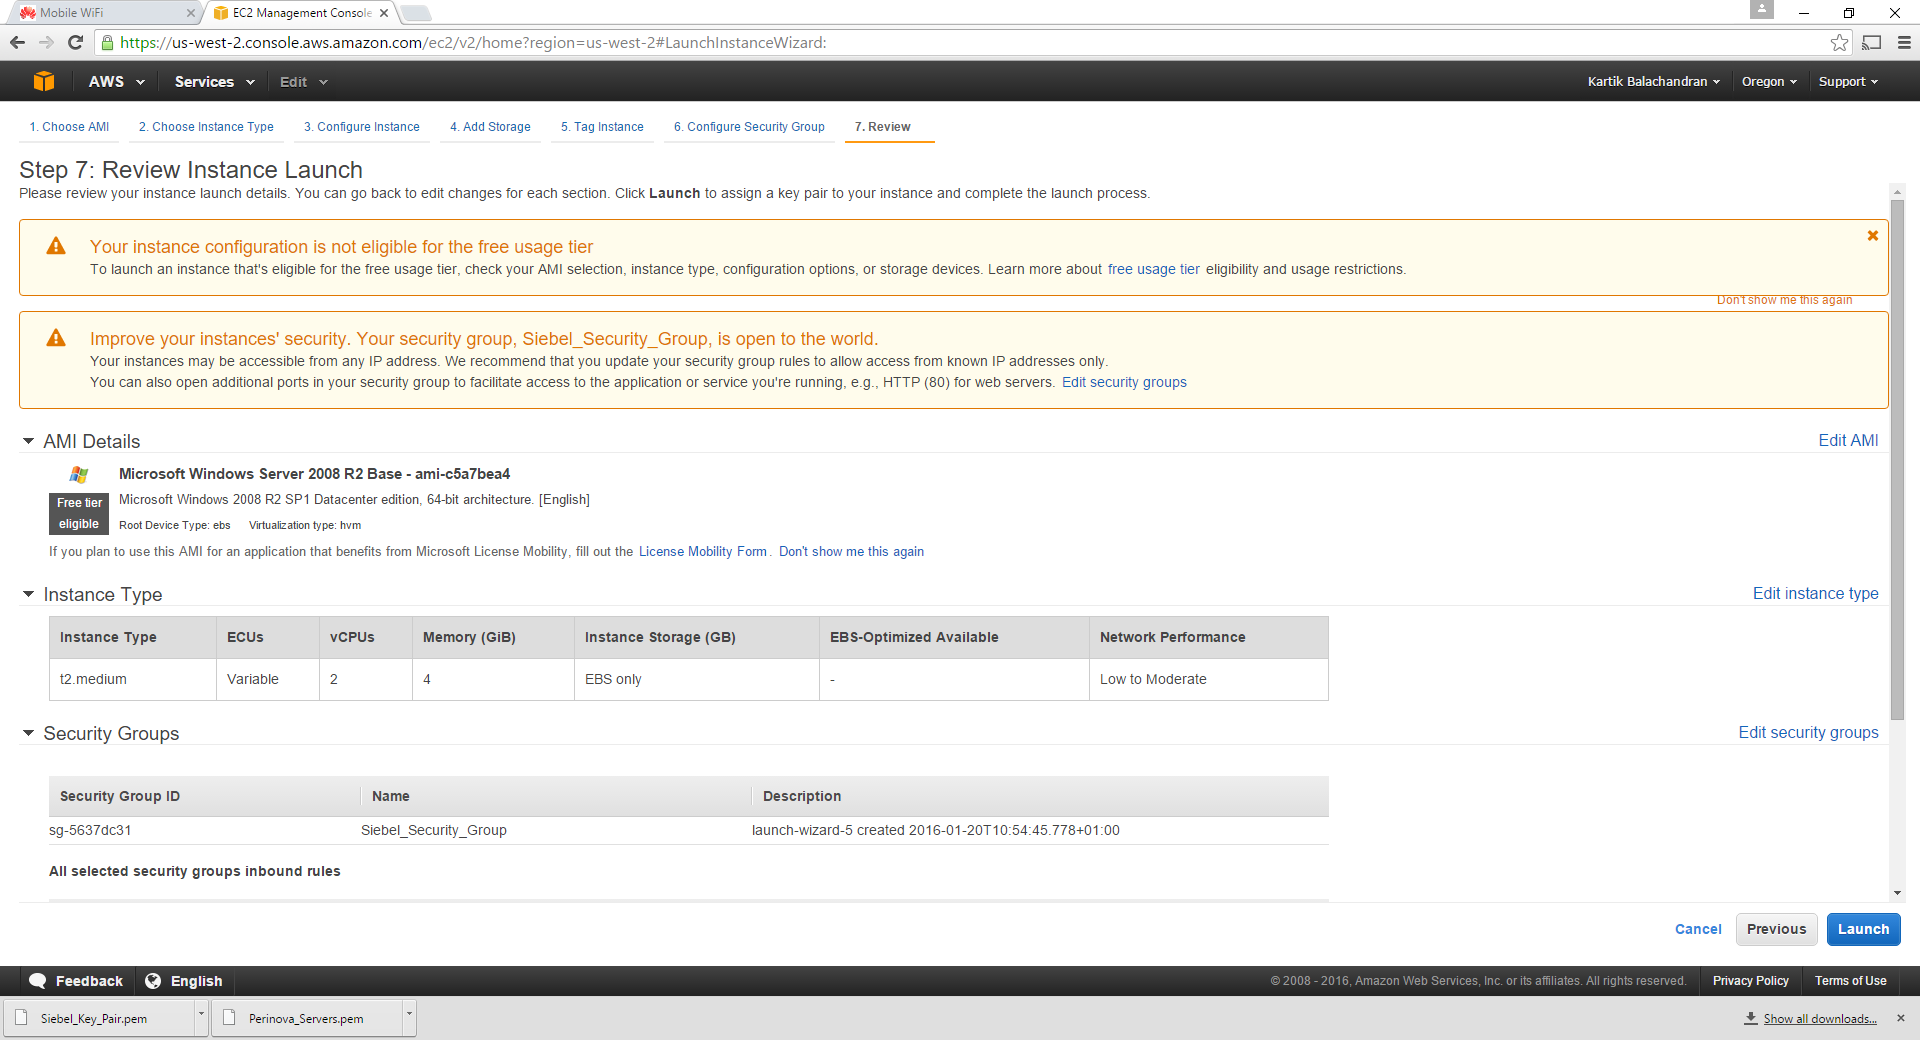
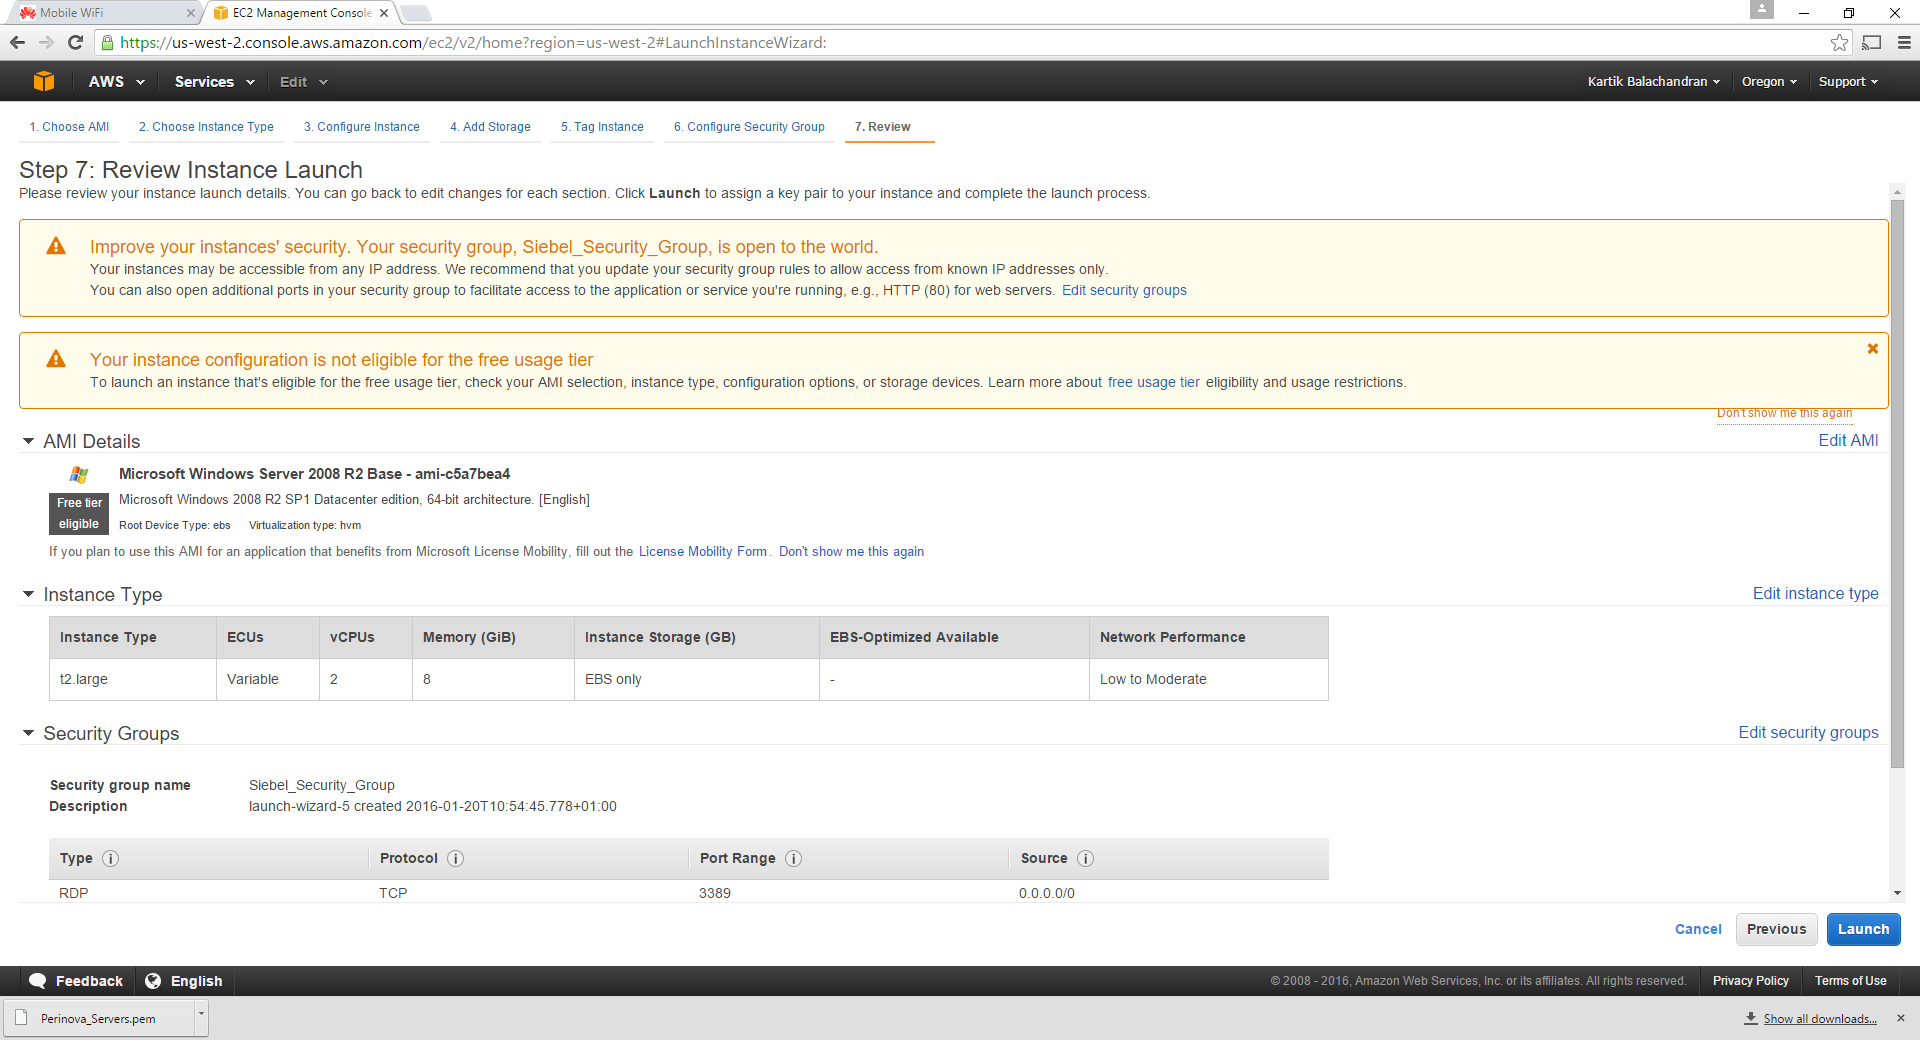
Once done, we will review the configuration.
Click on Launch. This time around, we do not create a new key pair and instead select choose an existing key pair, using the key pair we saved earlier.
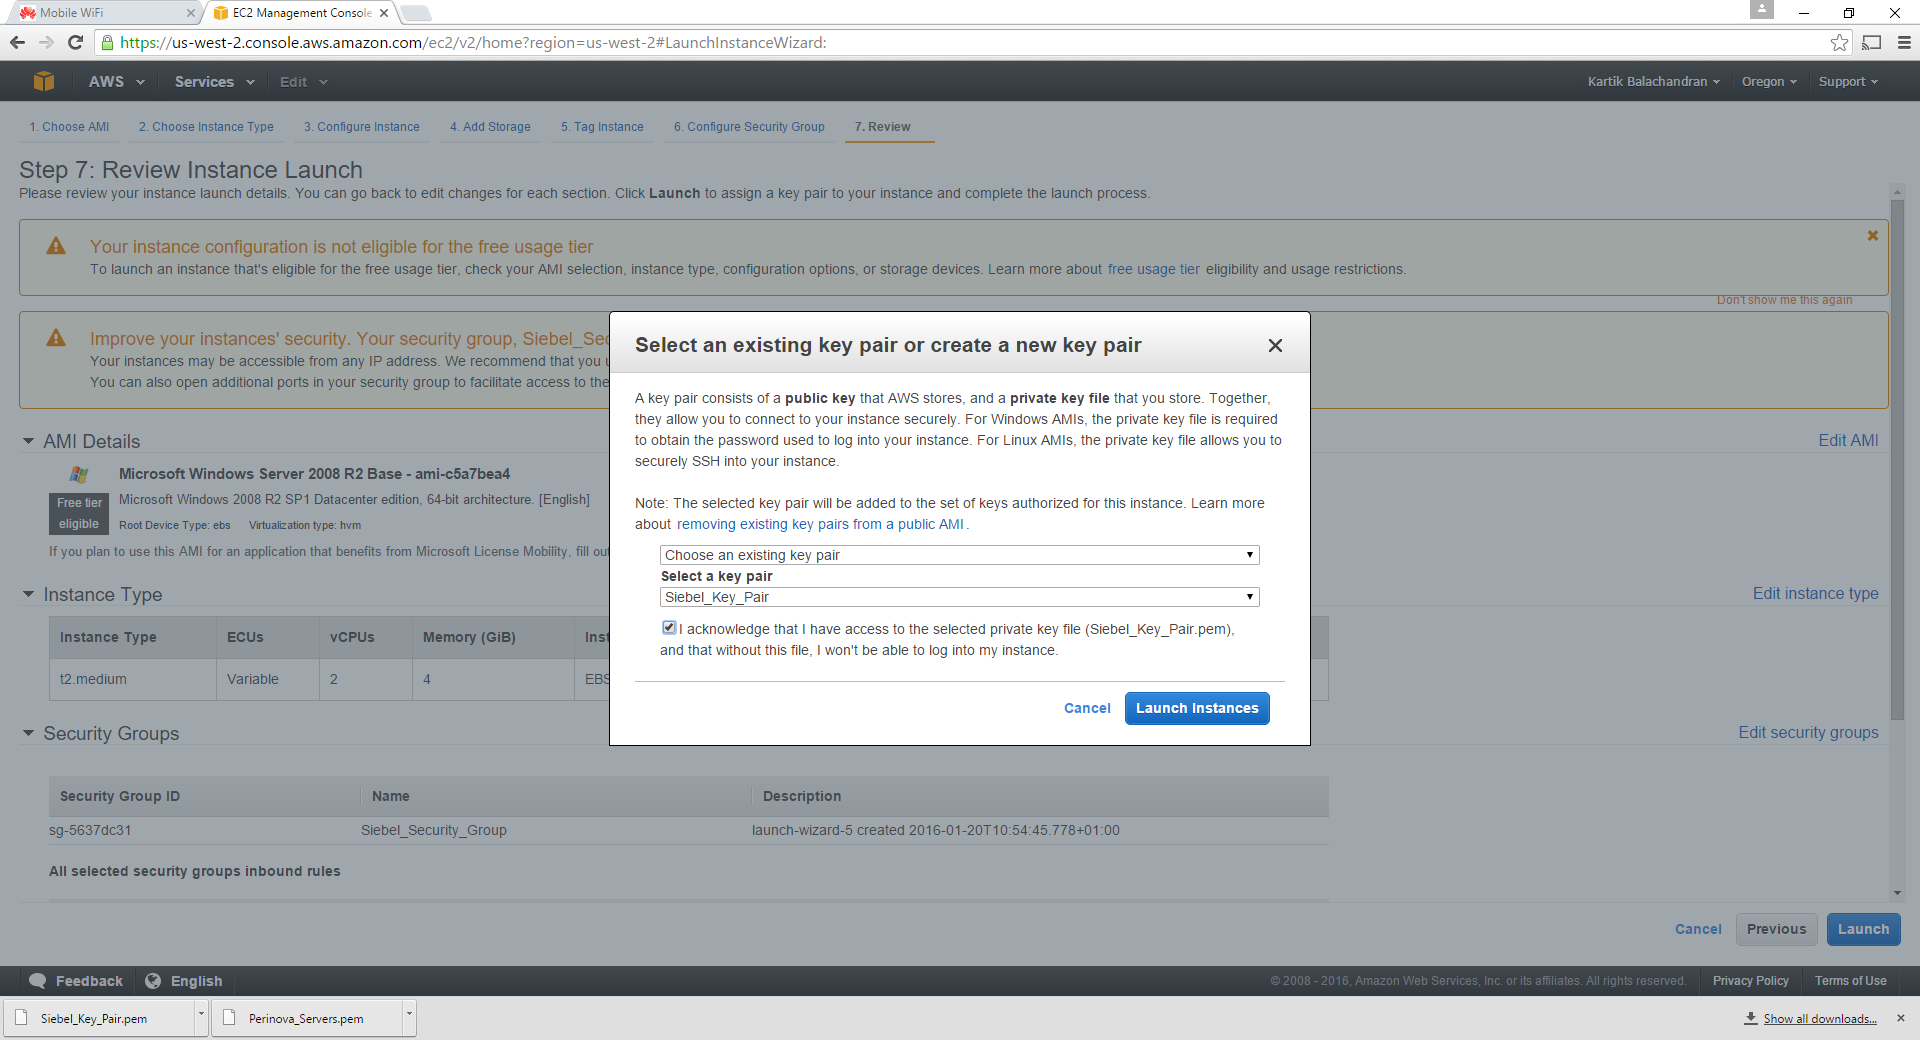
Now we can launch the instance.

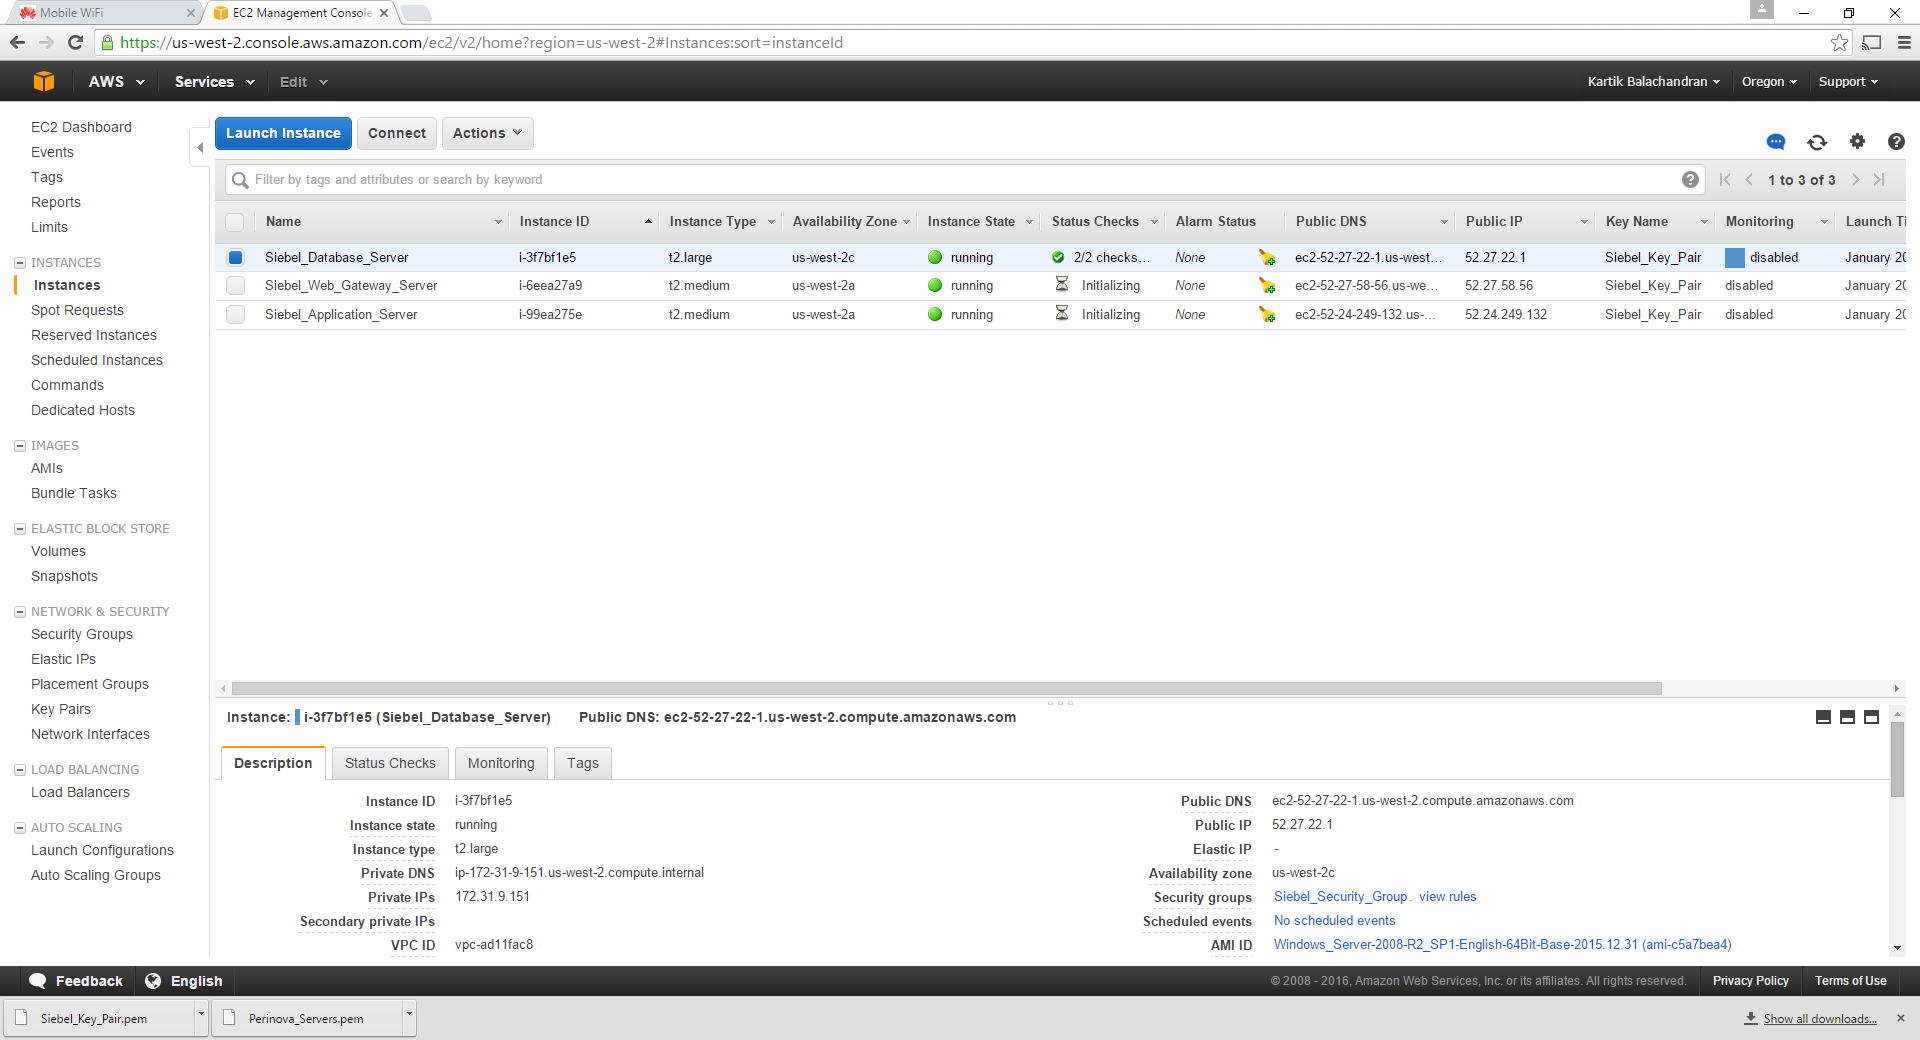
We need to repeat these steps for another instance which will be the last server. At the end of the exercise there should be 3 servers.
- Siebel Database Server
- Siebel Web_Gateway_Server
- Siebel_Application_Server
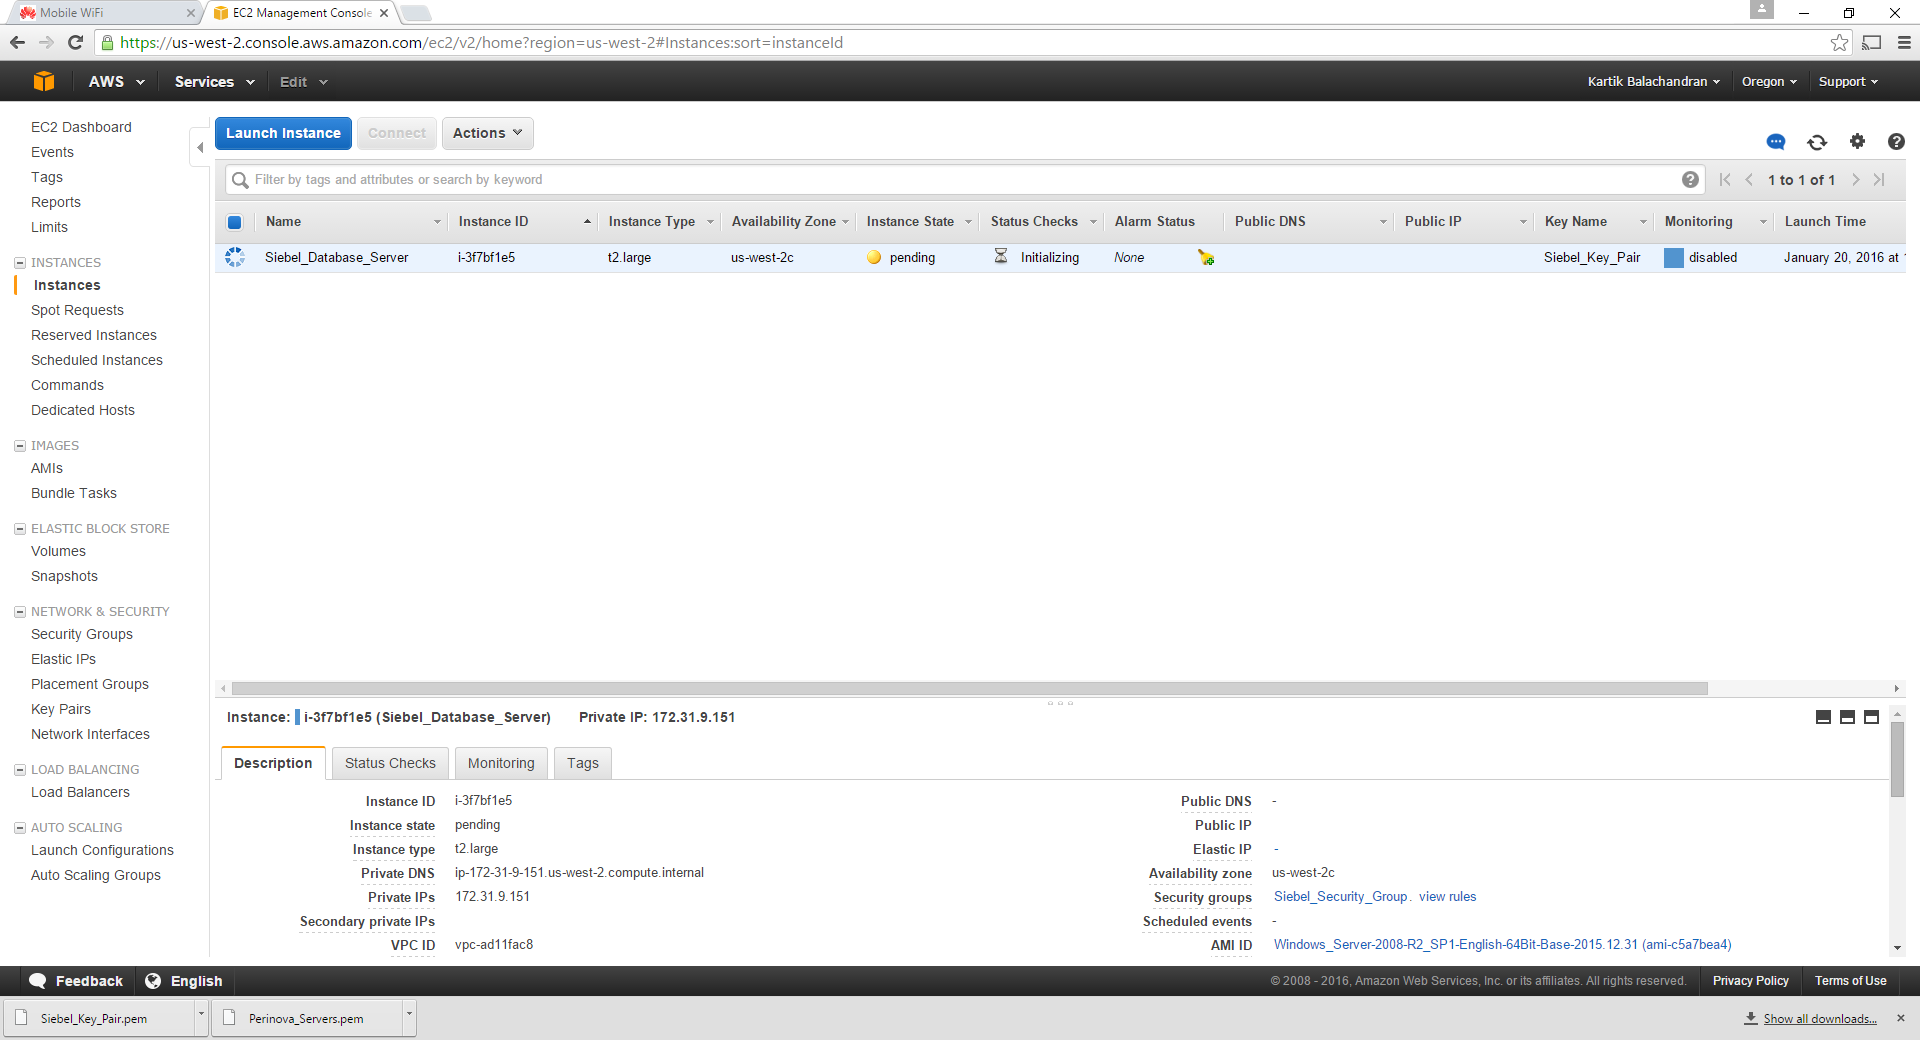
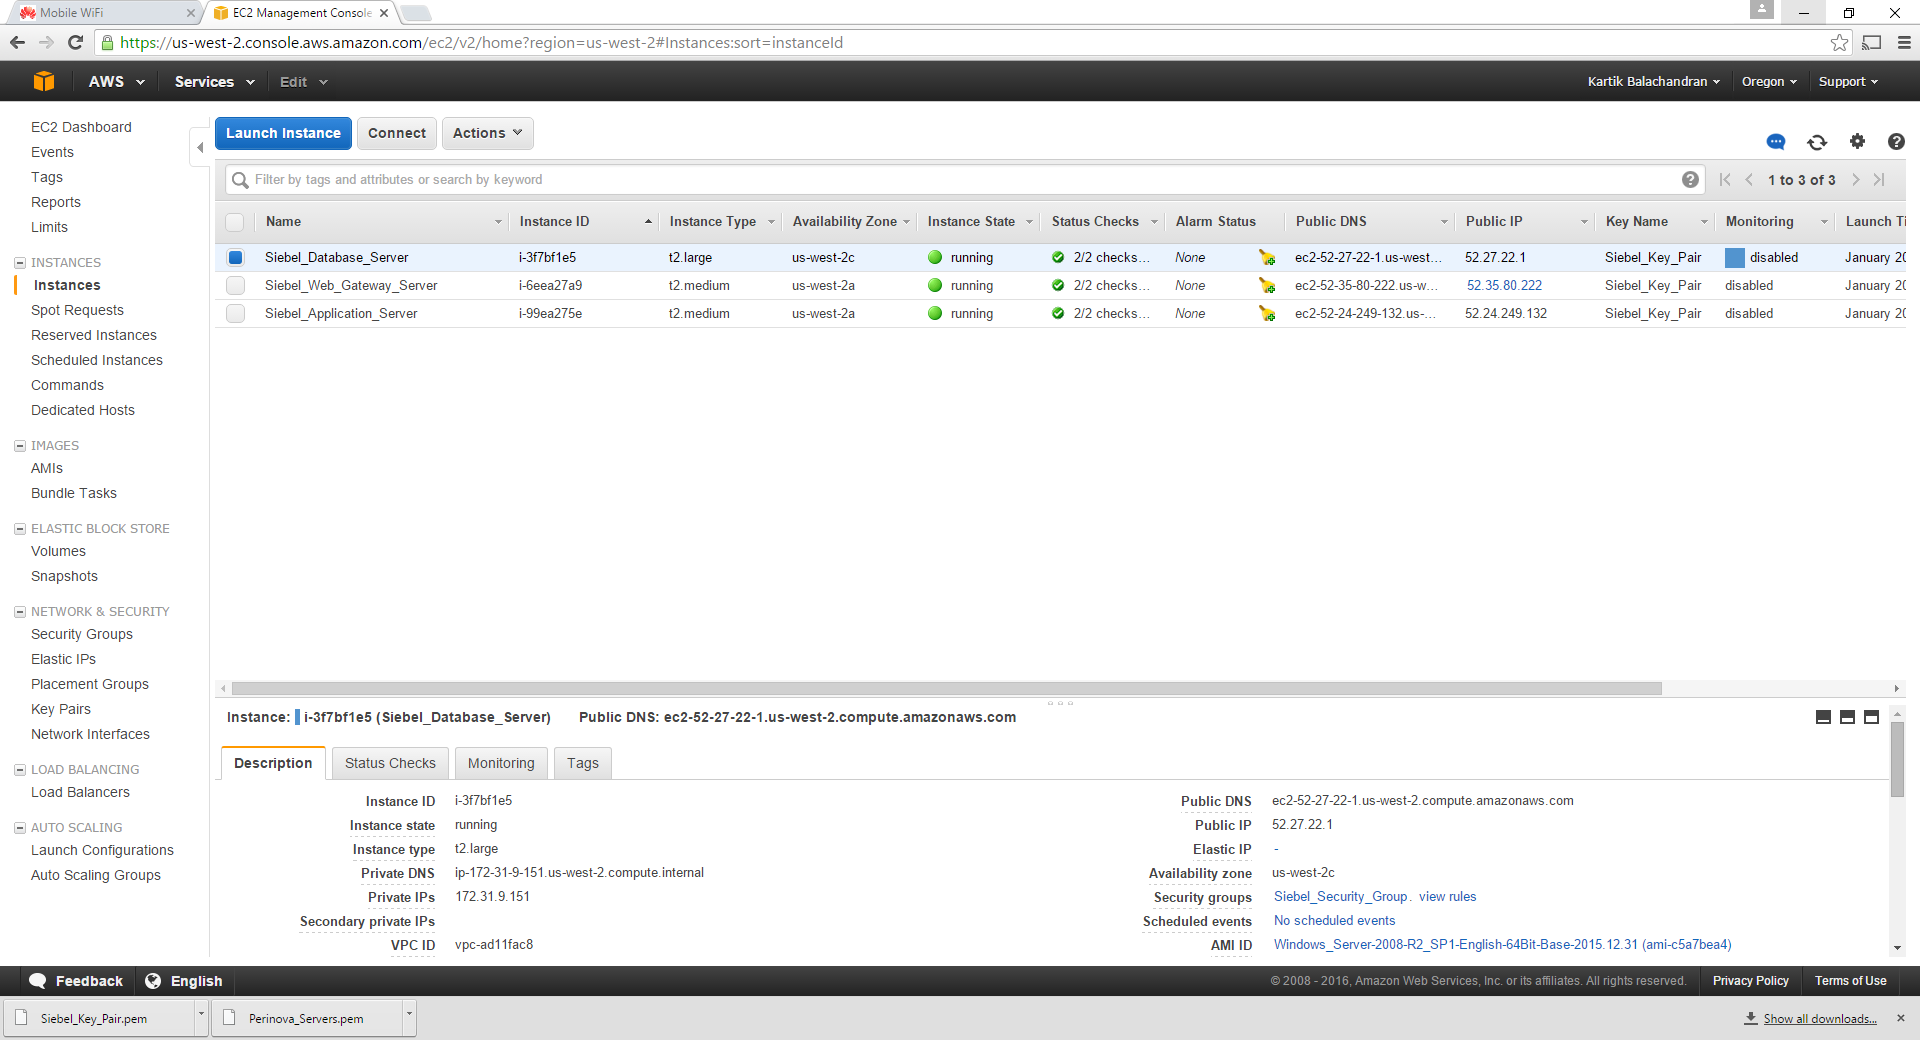
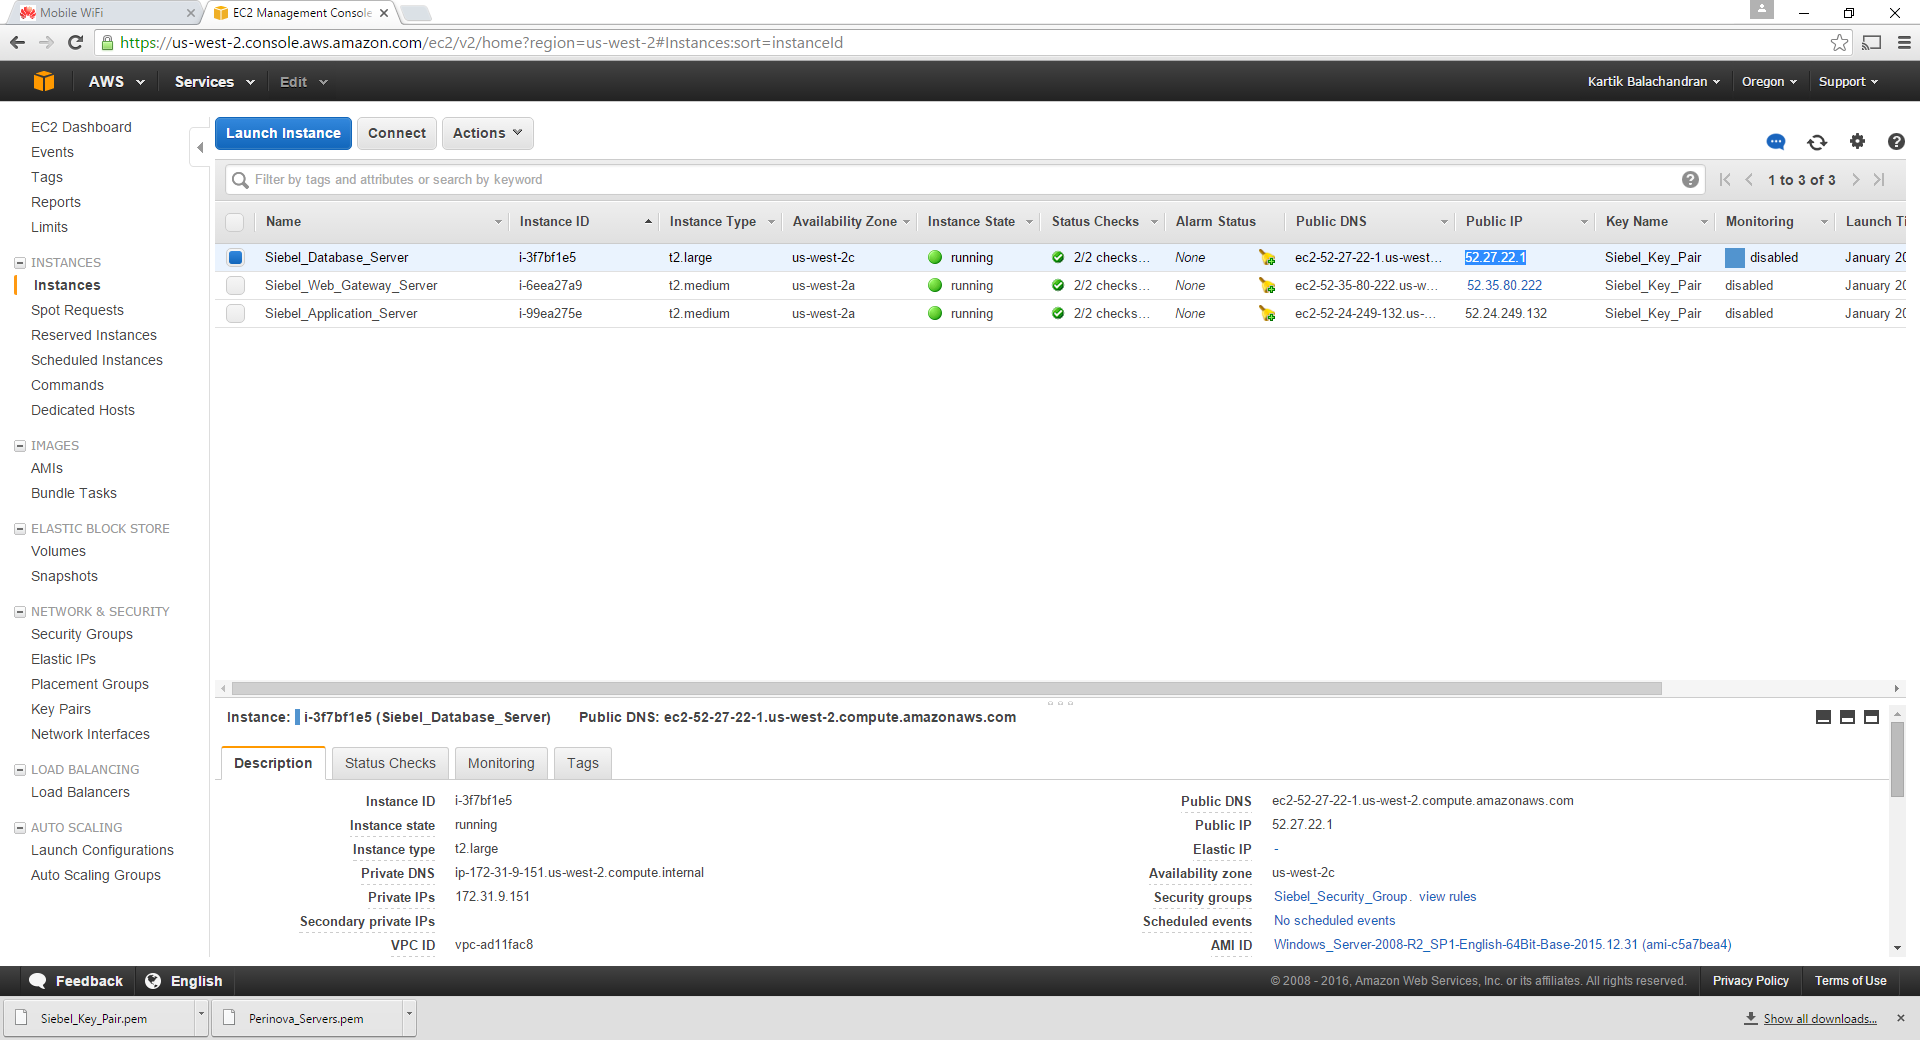
These will be visible in the Instances screen.

Wait for all of the servers to start running.
This concludes the creation of the instances.
Setting up of the Elastic IP
The elastic IP is a static public IP address allocated to your instance. This is mandatory for at least the web server. While all servers by default have public IP addresses allocated, these change with every reboot. Elastic IP addresses on the other hand do not change.
Click on Elastic IPs:
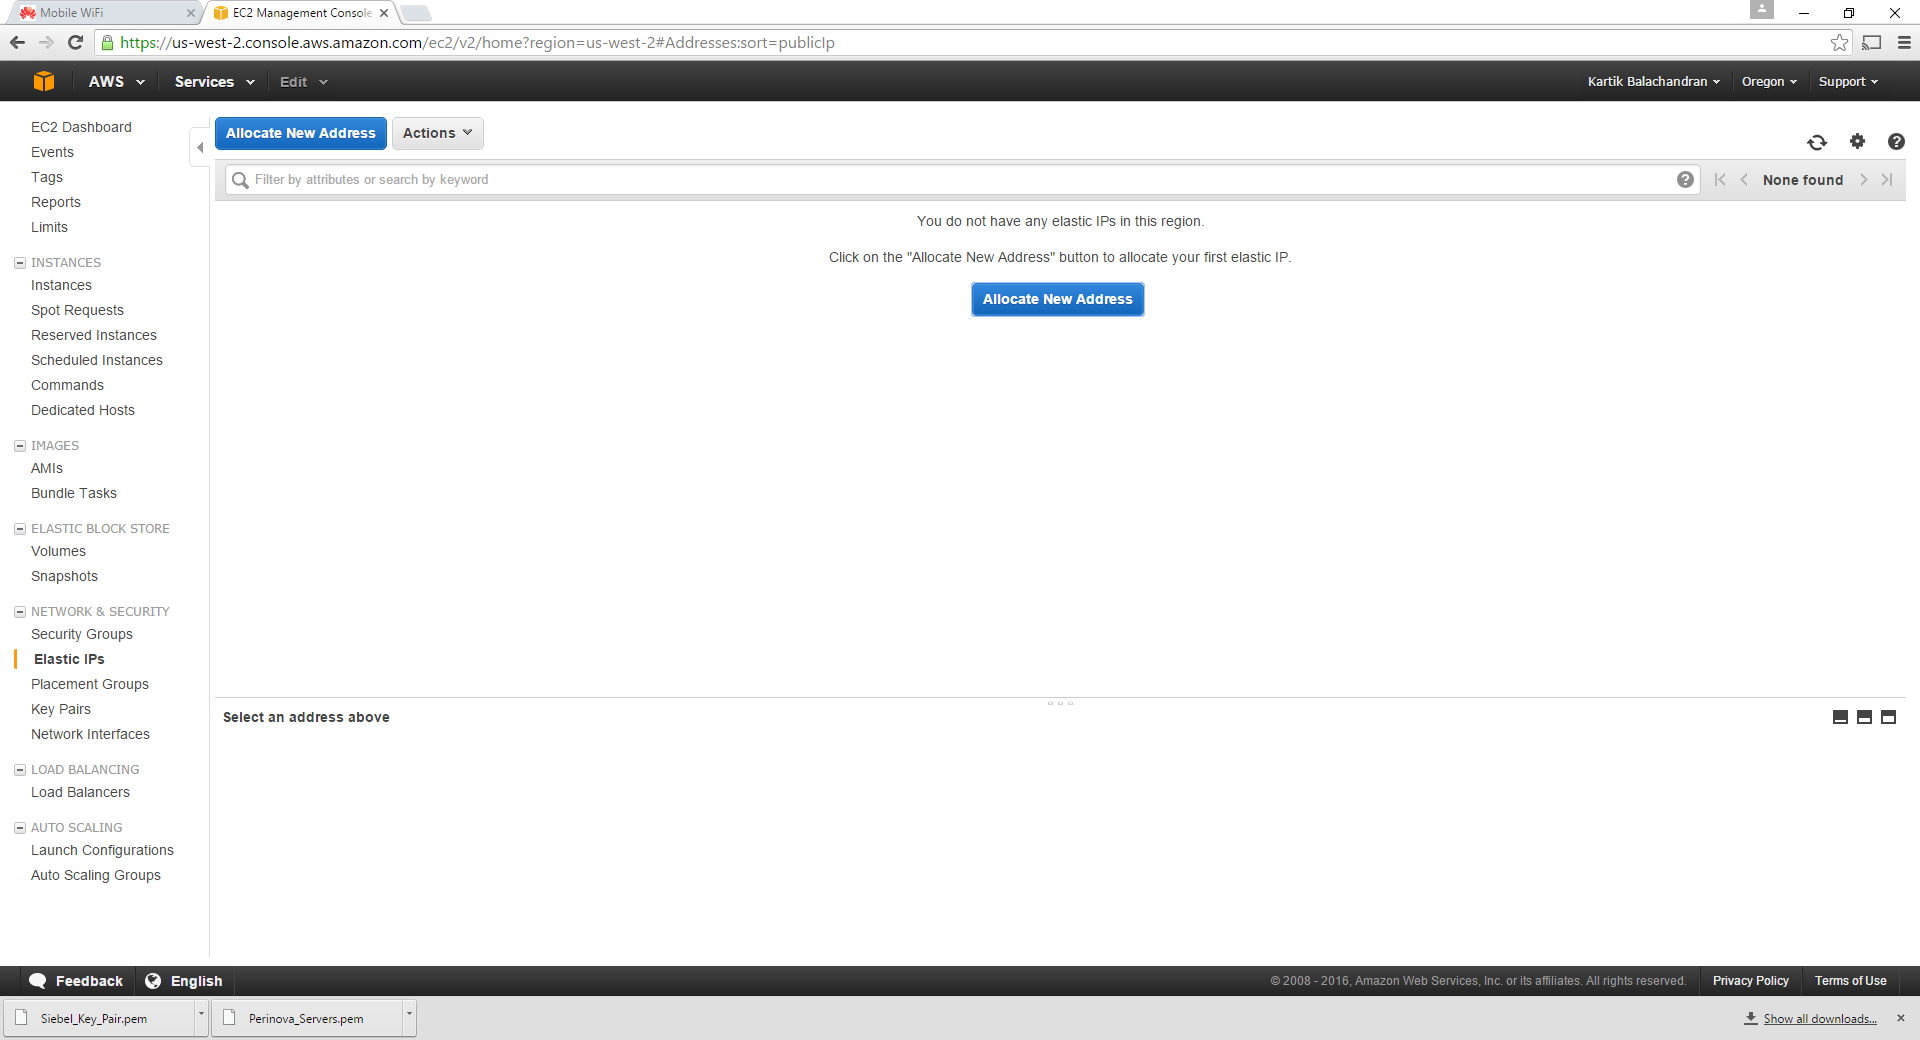
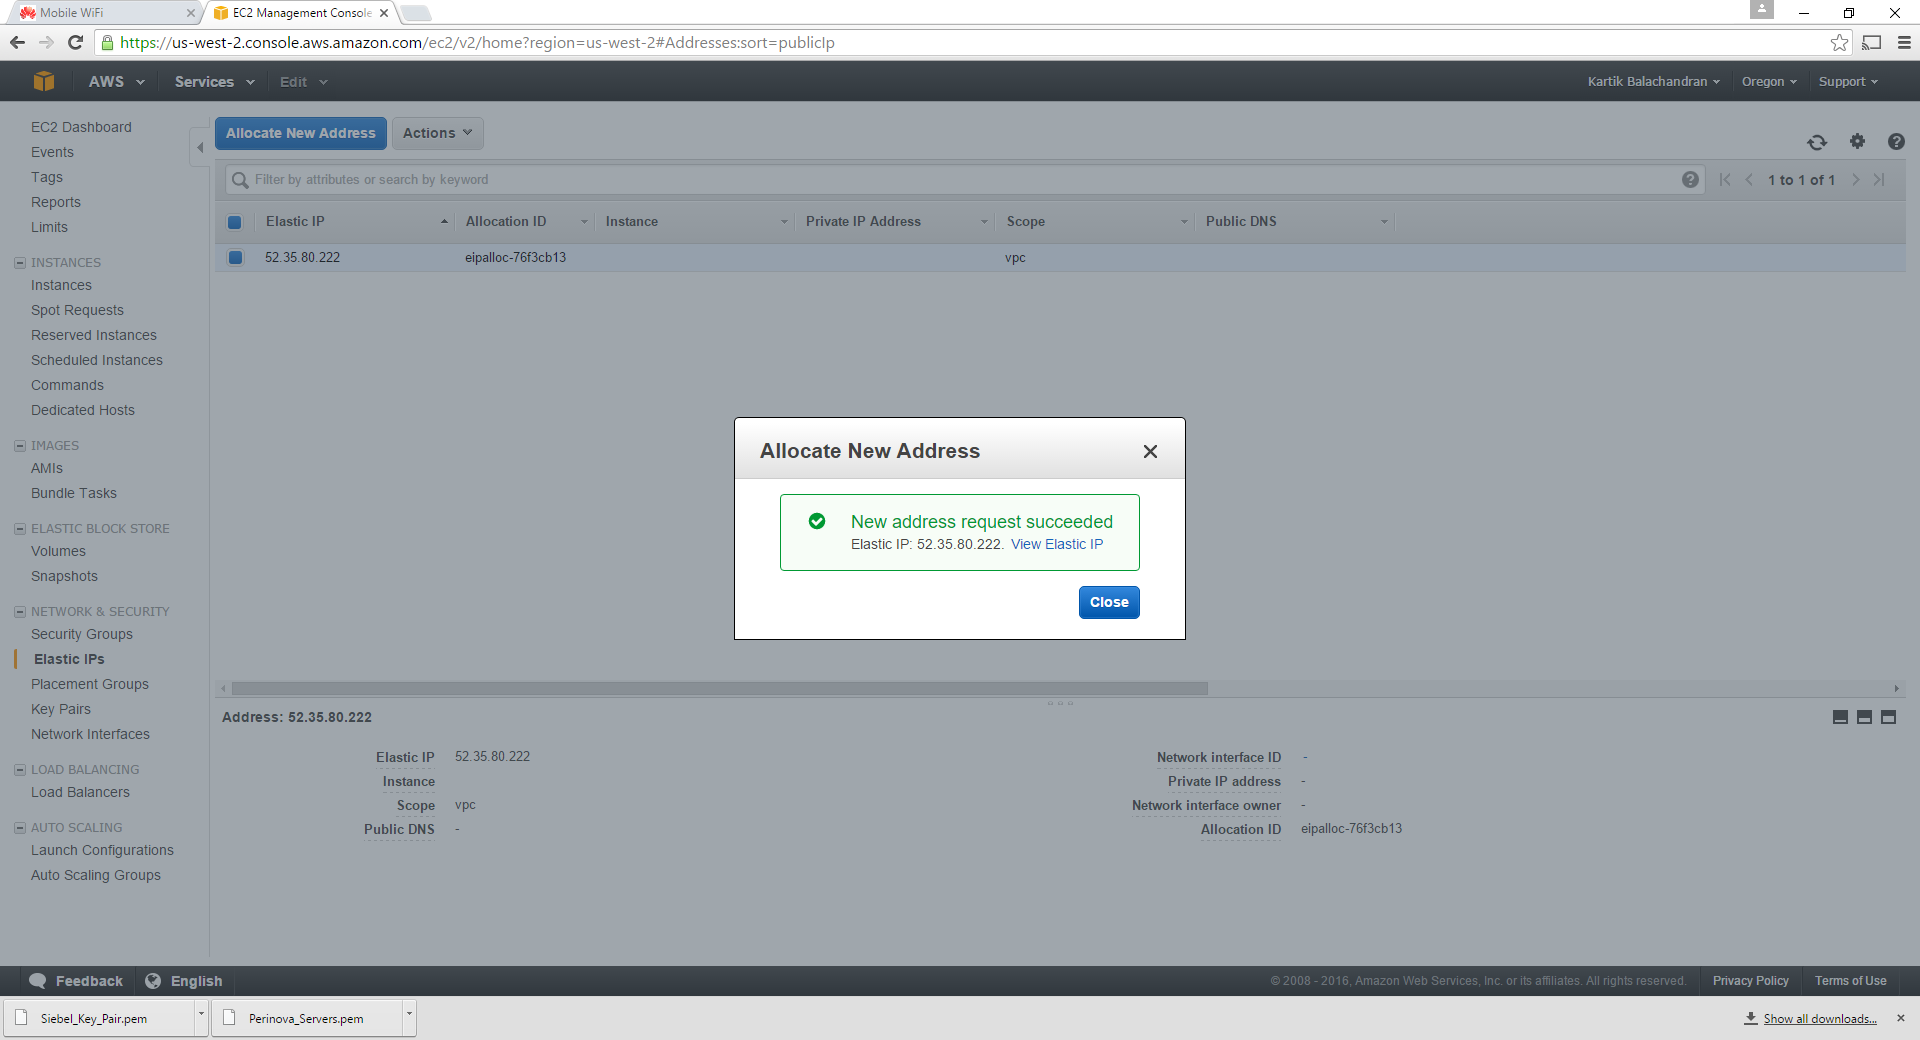
Click on Allocate New Address:

Click Yes:
We now need to associate the newly-created elastic IP address with the server designated as the webserver.

Right click and click on Associate IP Address:

Click on Instance. This gives a list of all the instances created in the first steps.
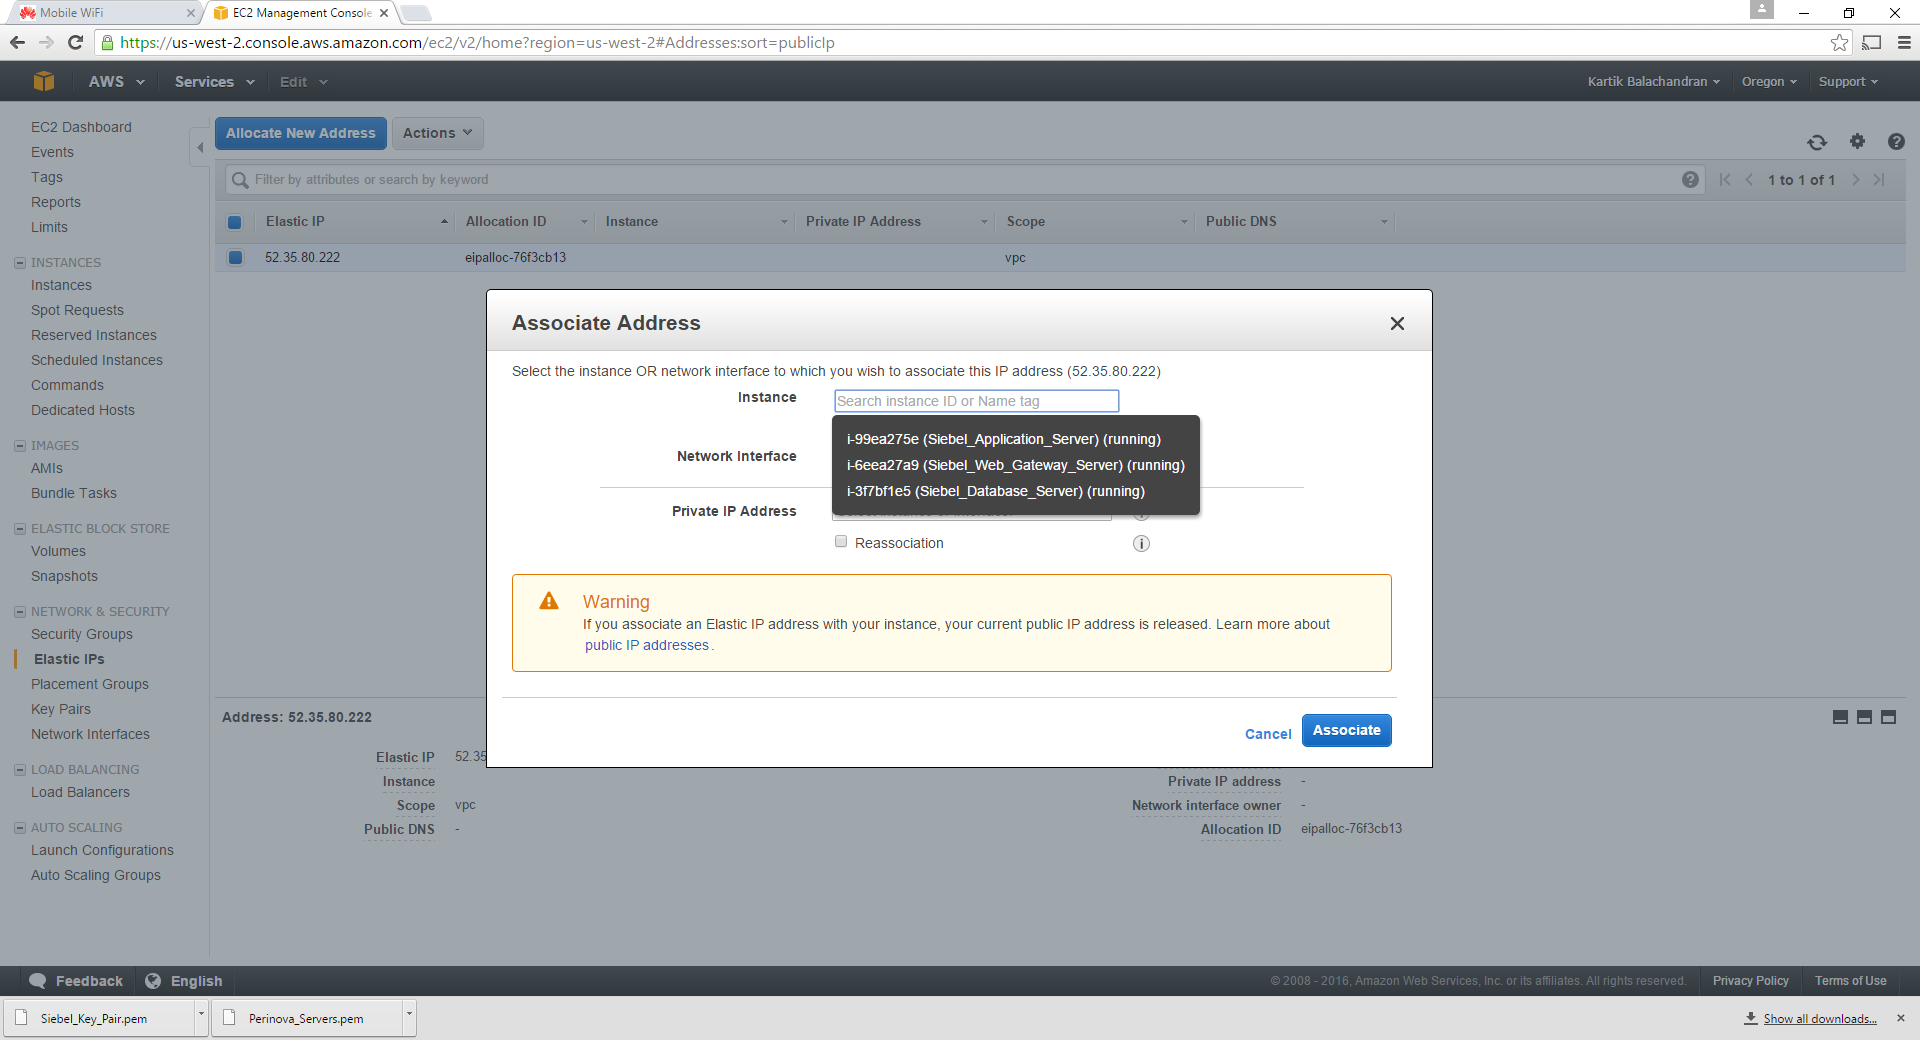
Select the server tagged as the webserver.
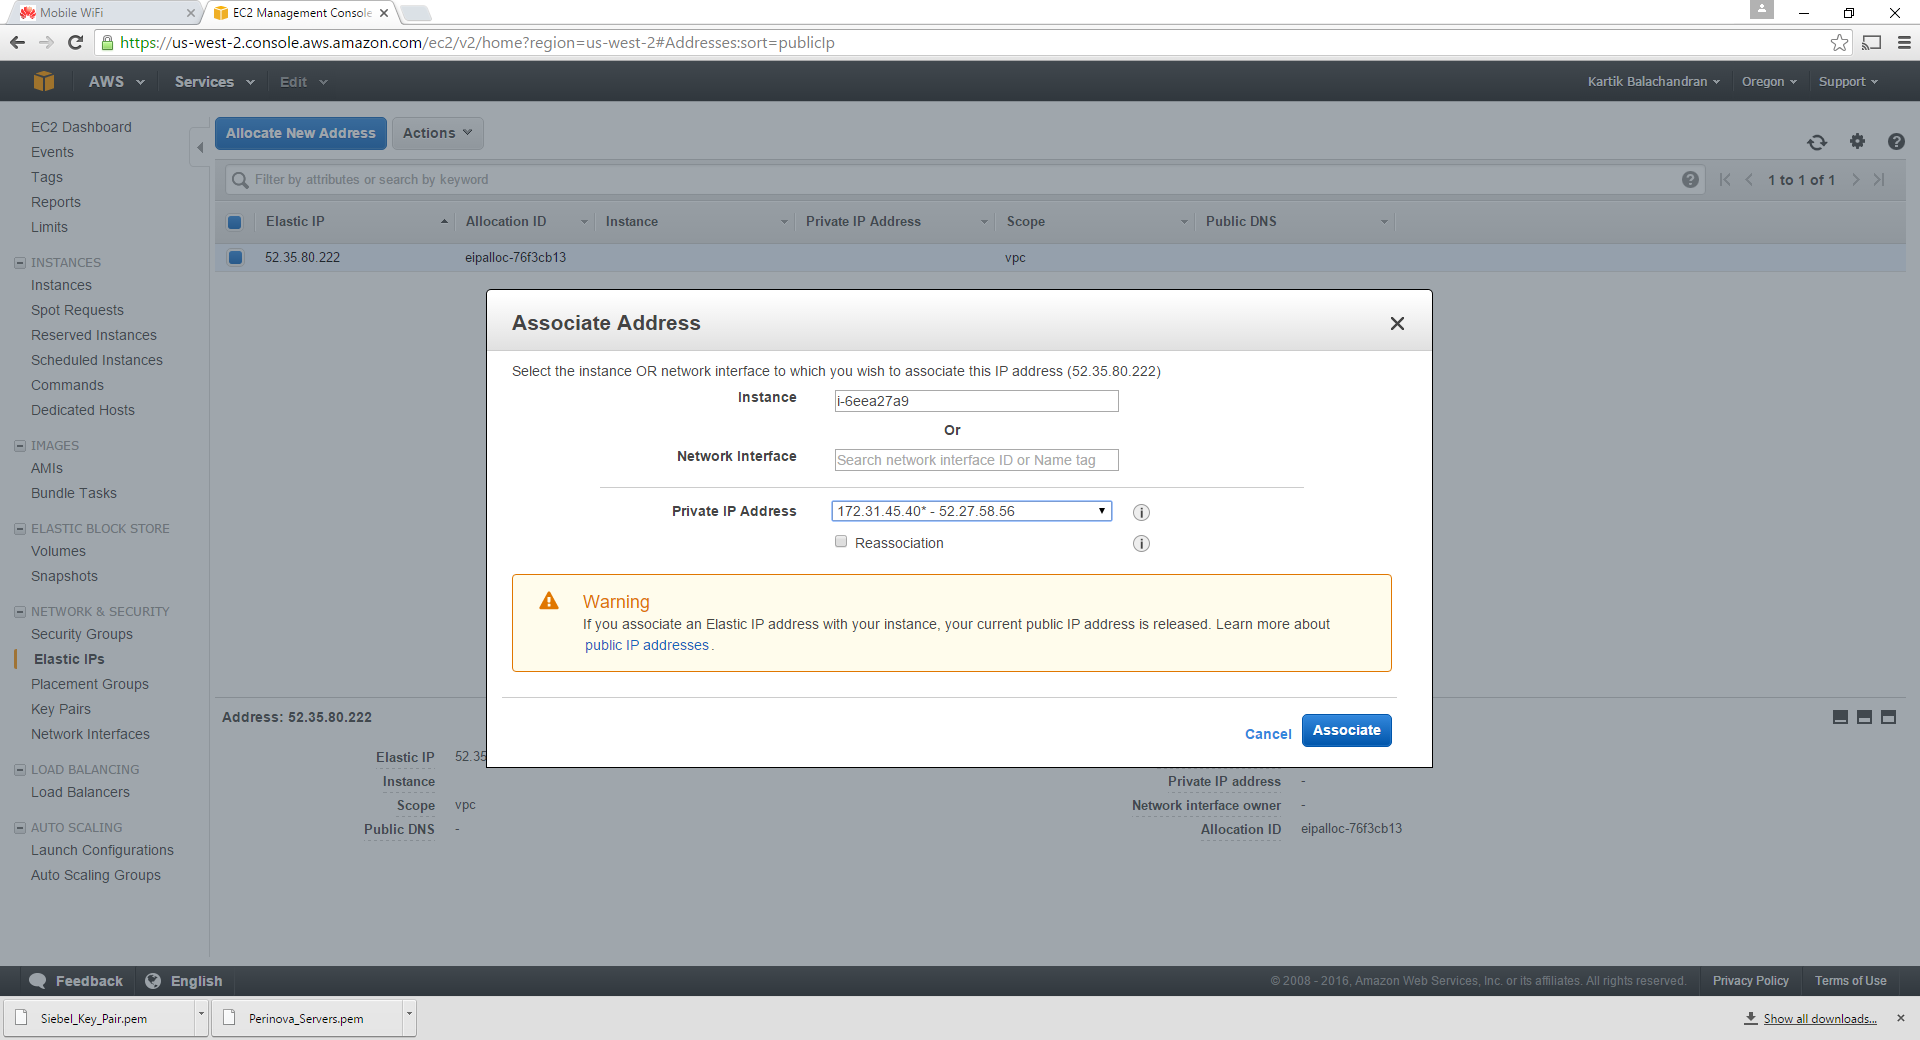
Click on Associate.
This concludes the association of the Elastic IP address with the webserver.
Documentation
Navigate to instances:

Note down the Name, the Instance ID and the Private IP address of each instance. The private IP address can be found by selecting the instance. Please note that the private IP addresses do not change with reboots and these are important since the servers communicate amongst each other using the private IP addresses.

Configuring the security group.
Navigate to Security Group:

Select the security group and copy the group ID as shown below.
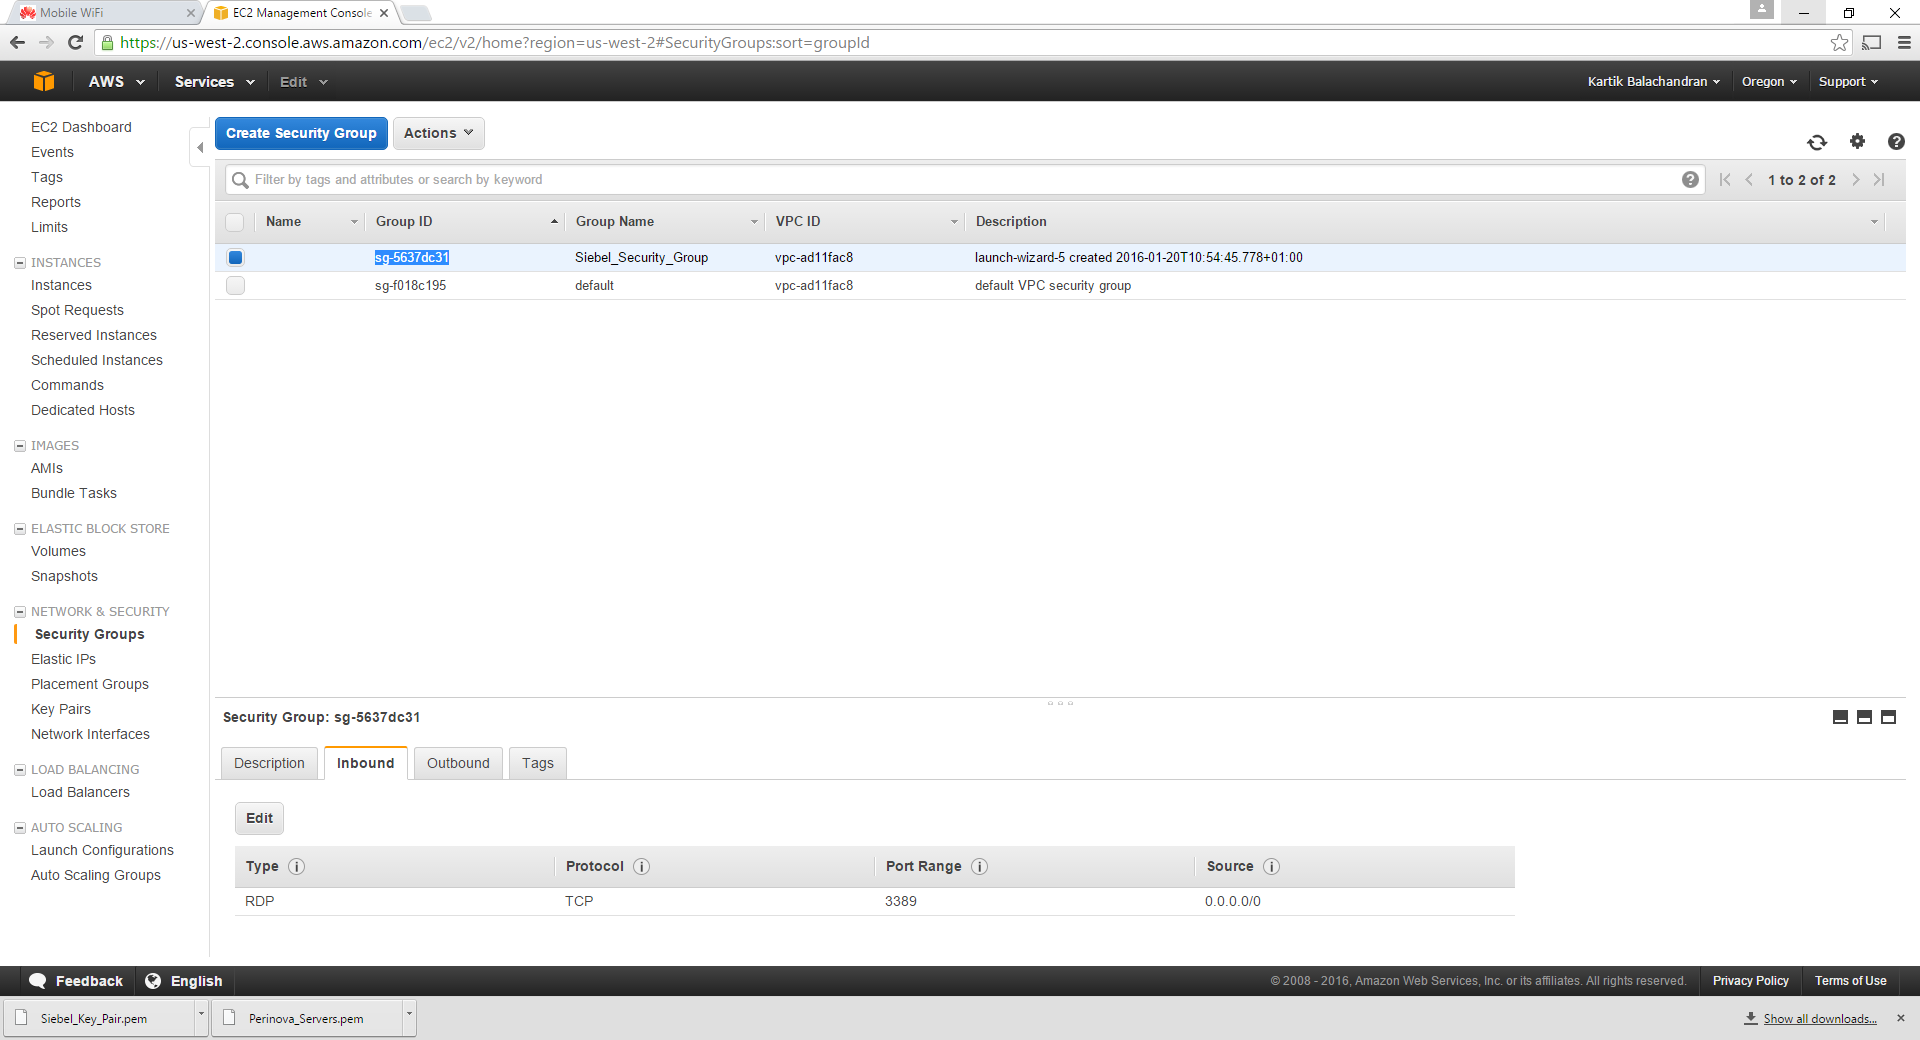
Choose inbound and click on Edit:

Click on Add Rule:

Choose All Traffic in type and Custom IP in source as shown below. Paste the security group name as shown.
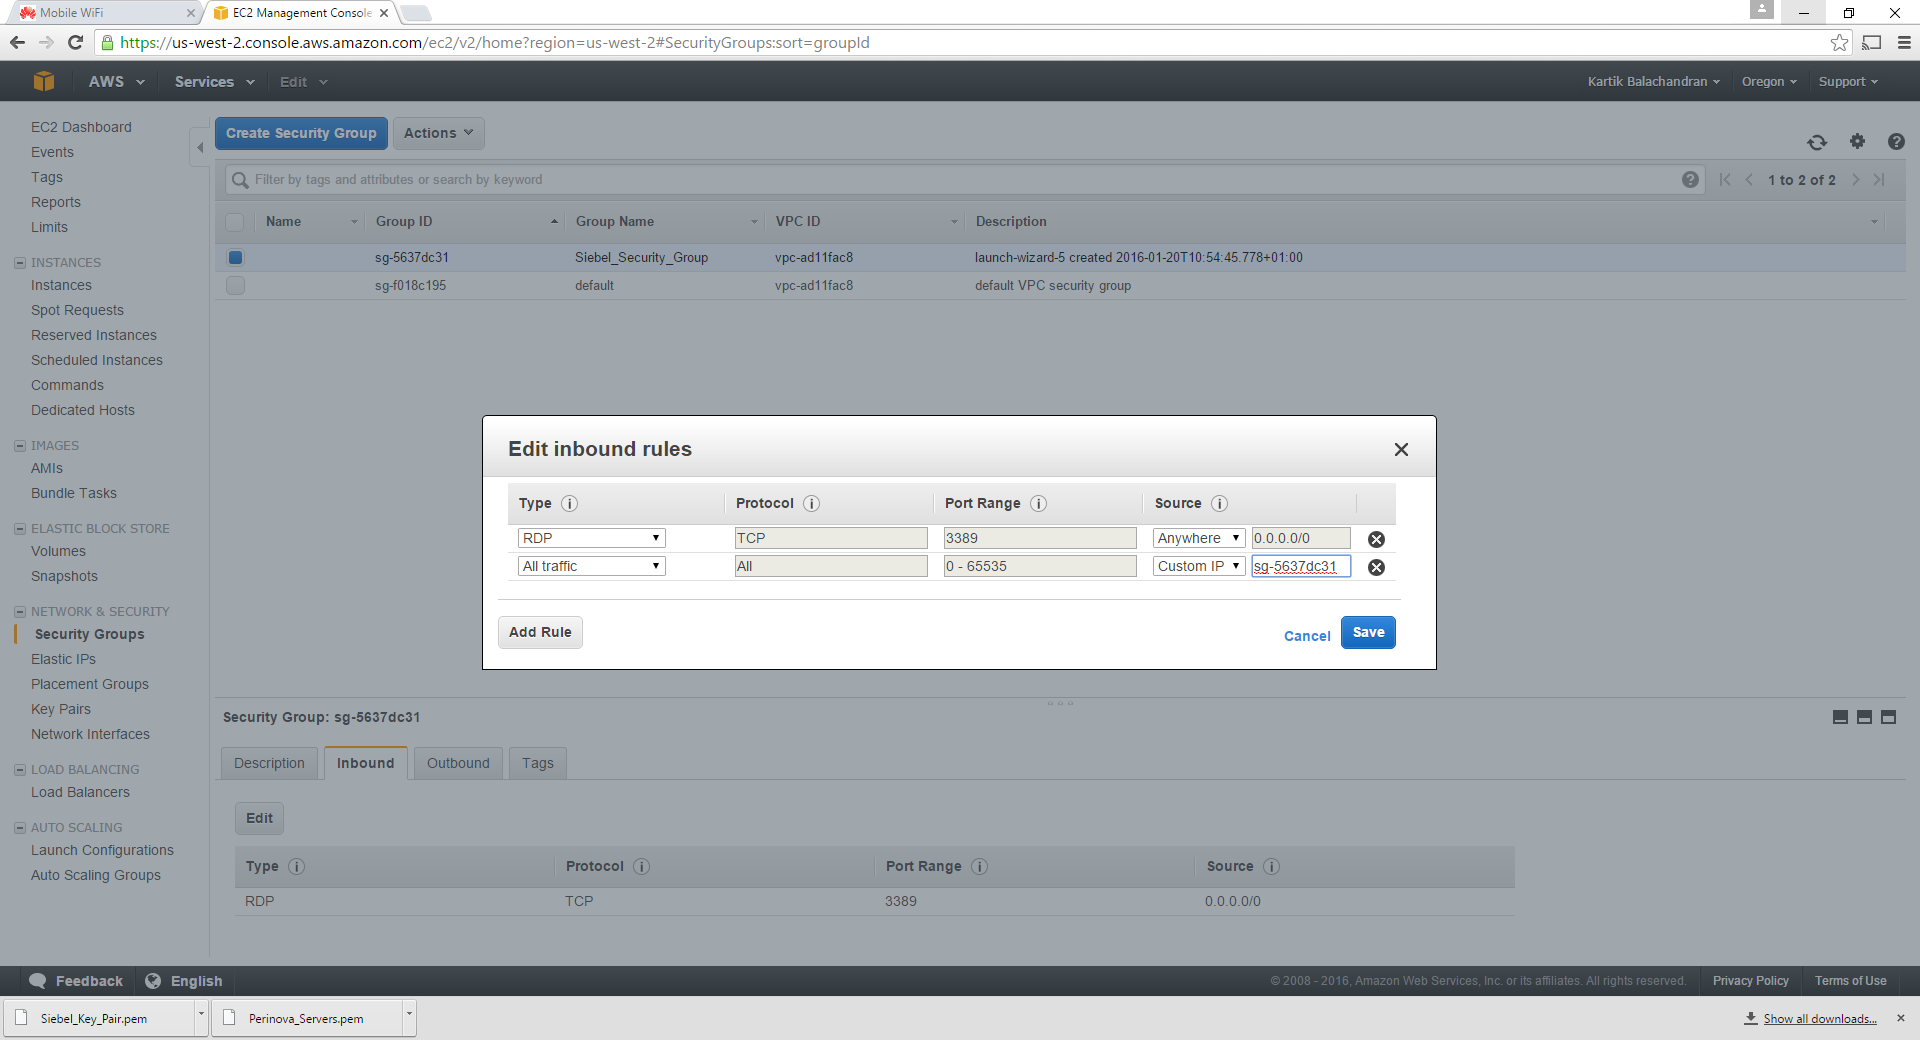
Click on Save. This will allow traffic between the servers. The outbound traffic is set by default to all IPs.
Add similar rules for HTTP and HTTPS, but from all IP addresses. Please do keep in mind that this will allow traffic from everywhere to the servers. You can also restrict access if required here.
Once completed the structure should look like the below:
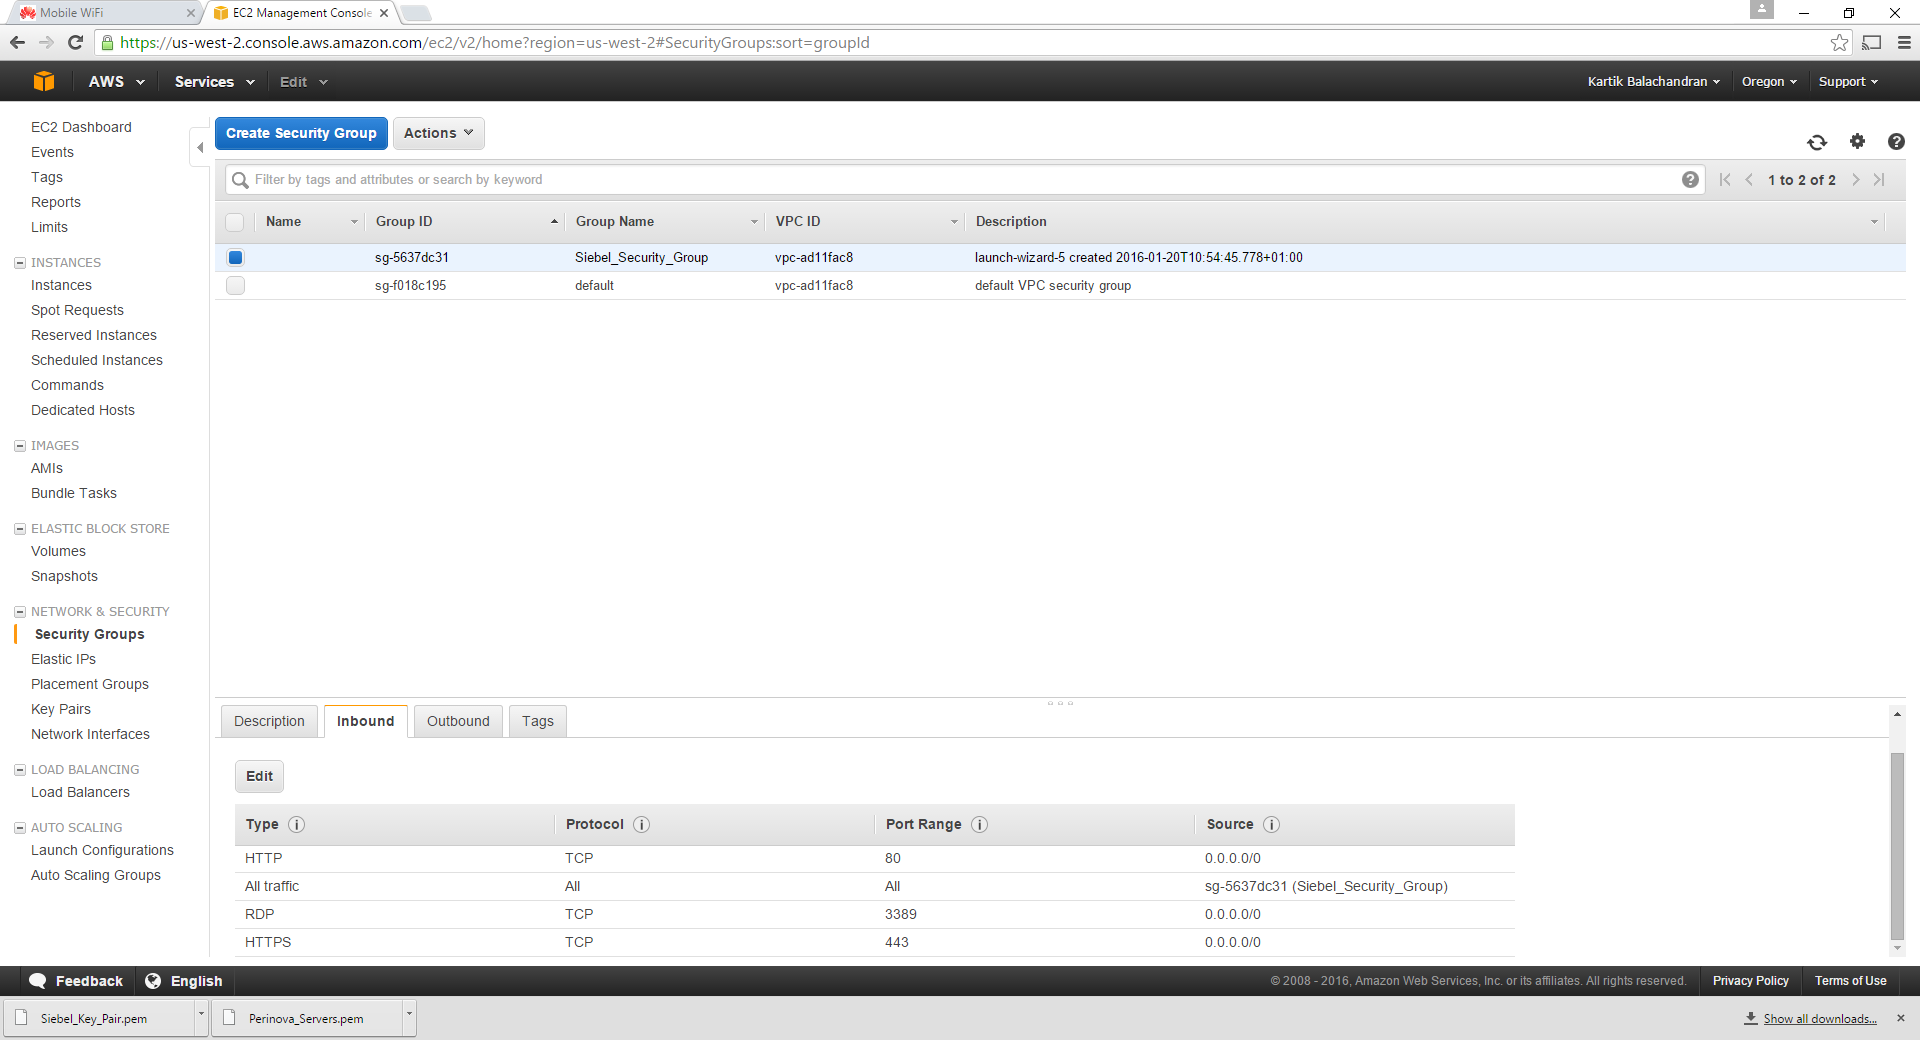
This structure will ensure HTTP, HTTPS and RDP traffic from anywhere and will block all other traffic.
This concludes the configuration of the security group.
Getting the Windows password and Logging On
Go back to the Instances:

Right click on a single instance:
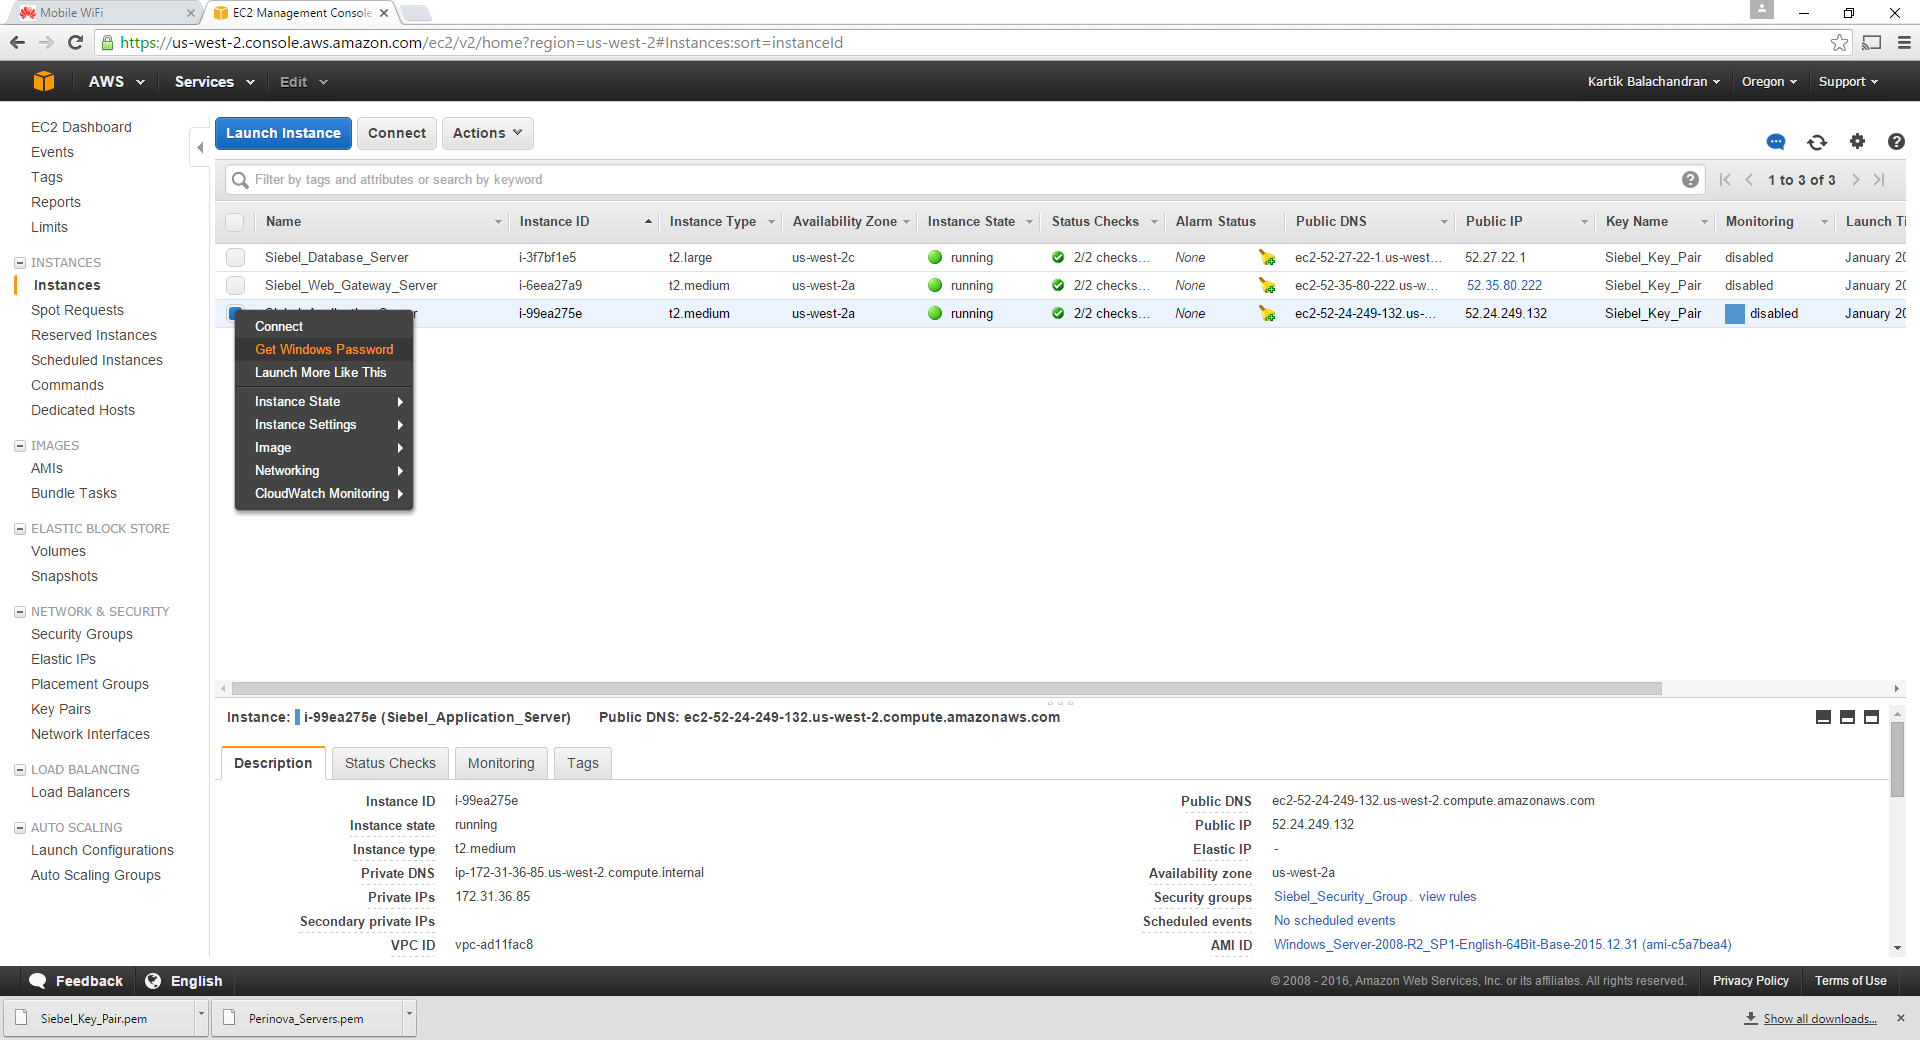
Choose Get Windows Password:
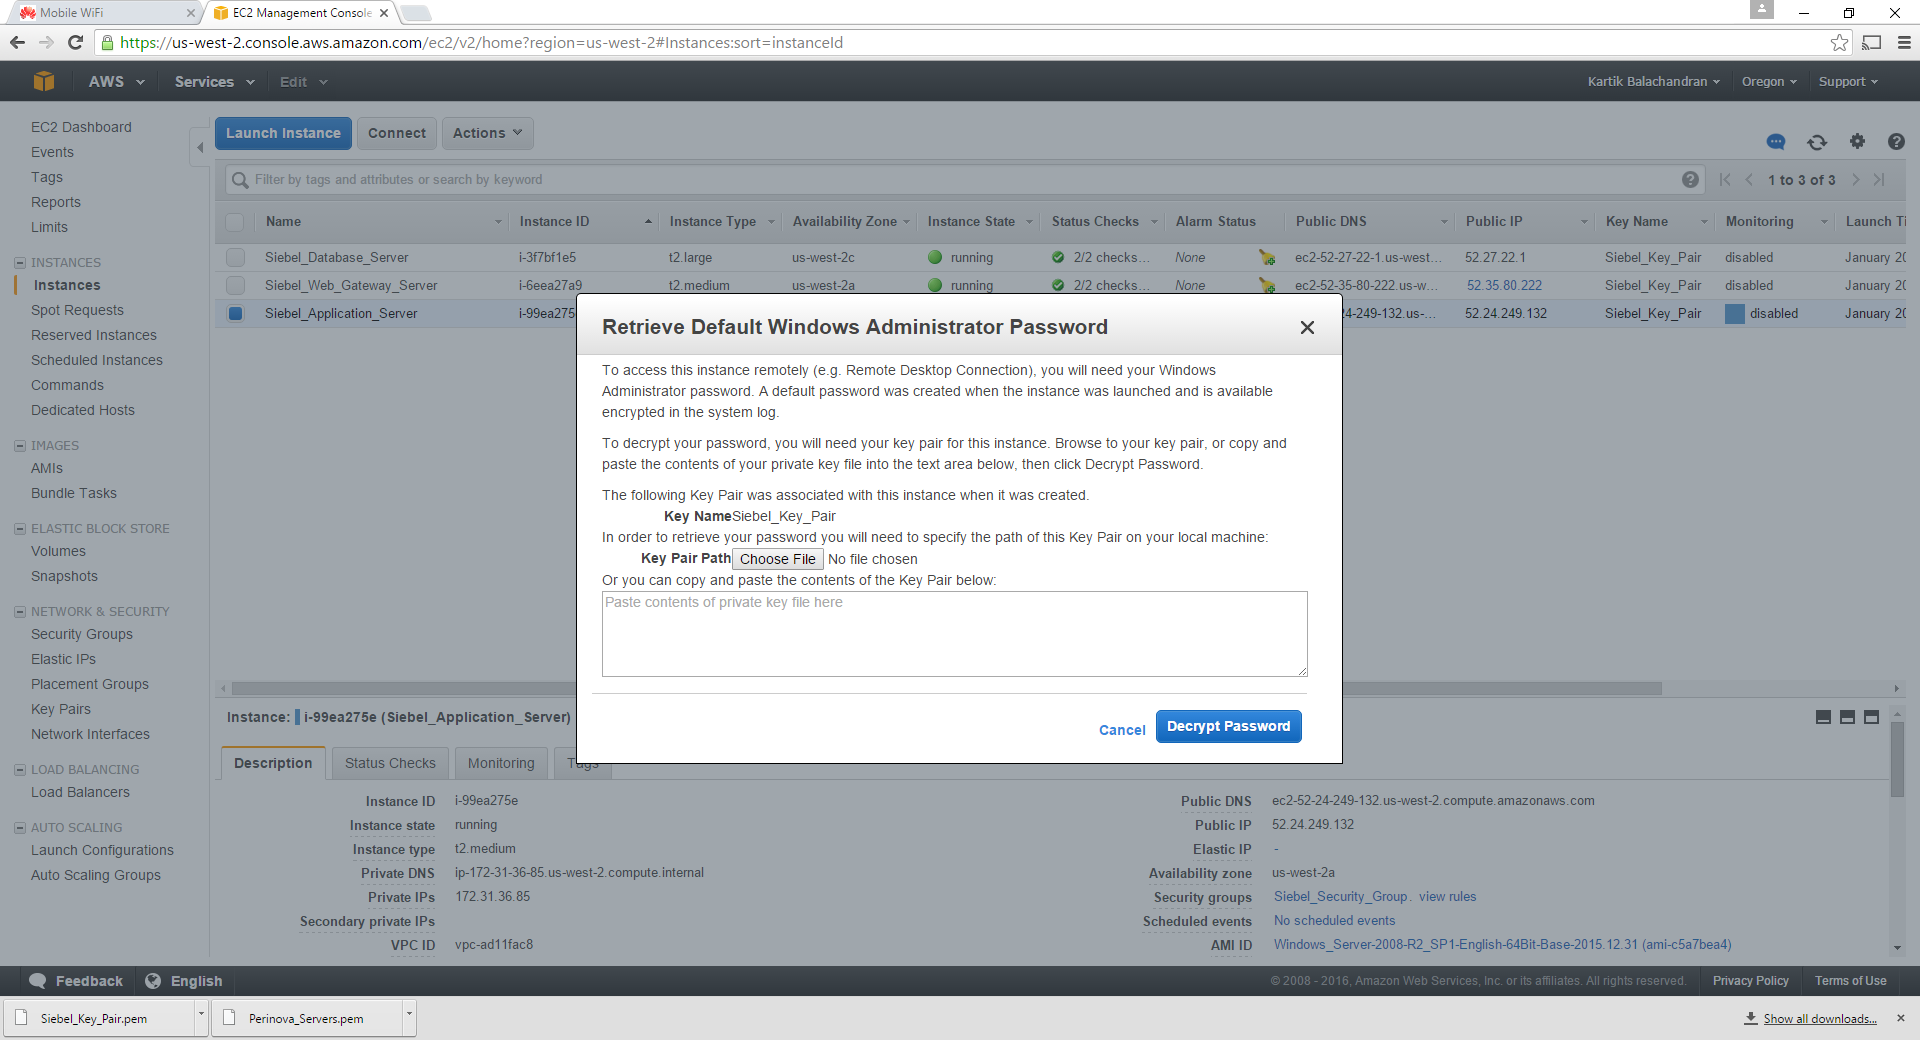
Choose the path to the key pair created earlier:

Click on Decrypt Password:

This will give you the Administrator password. Make sure this is saved in the documentation created earlier.
Repeat the same steps for the other servers to retrieve the relevant windows administrative passwords.
Connection to the Servers
Open a terminal services connection:
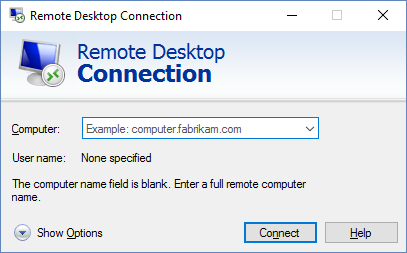
Put the Public IP address for the elastic IP created.
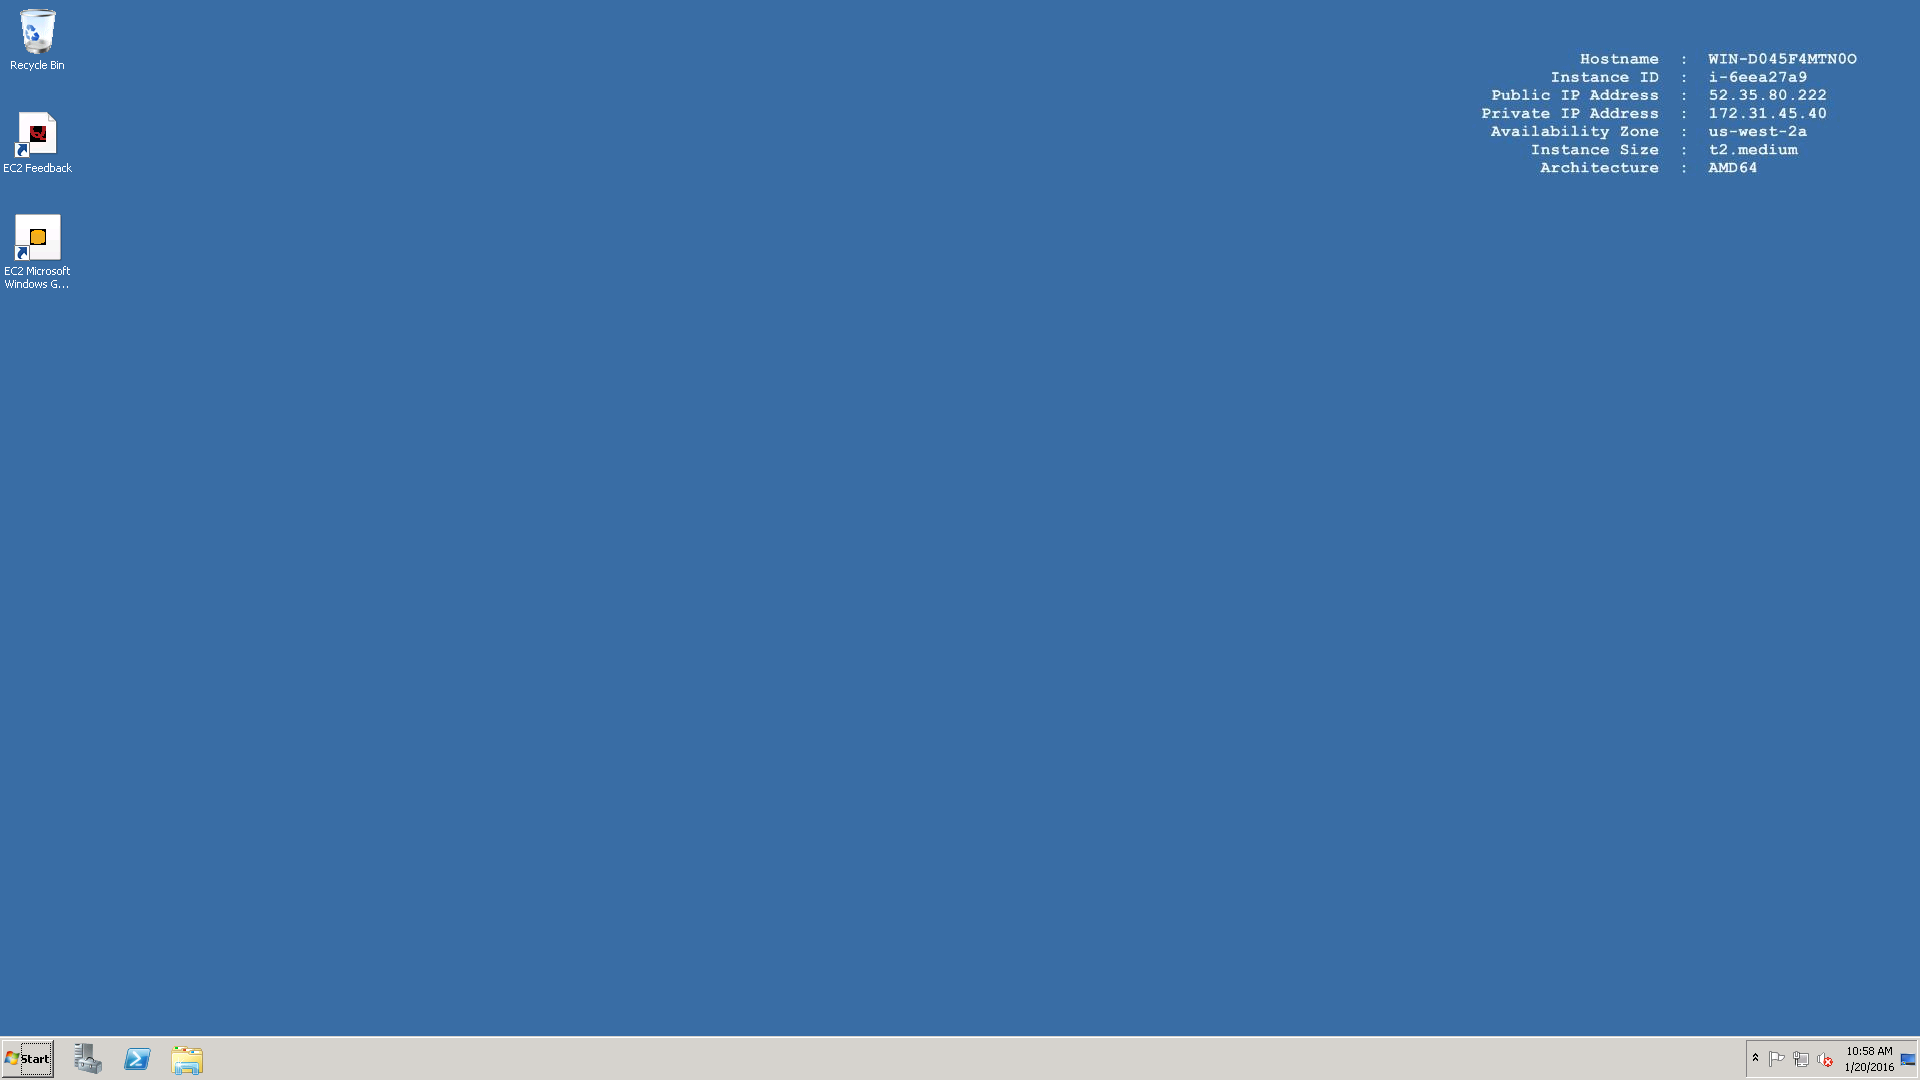
Log on as Administrator and use the password which was created. Once logged on, note the hostname for the server as well. This will be required for future steps.

Now connect to the other servers using terminal services and their Public IP addresses. The current Public IP can be found from the console. Please note that this IP address, since it is not an elastic IP will change every time the servers are rebooted.

After you have successfully logged on to all the servers, it makes sense to change the Windows administrator password to the same one for all servers. While this is a security hazard, it helps to maps shared folders without putting in the administrative password every time.
Configuring the Windows Firewall
The following steps are required so that the servers can communicate amongst each other. By default the Windows Firewall is switched on and blocks pretty much all ports between the servers, so it will not be possible for the Siebel Application servers to communicate amongst each other.
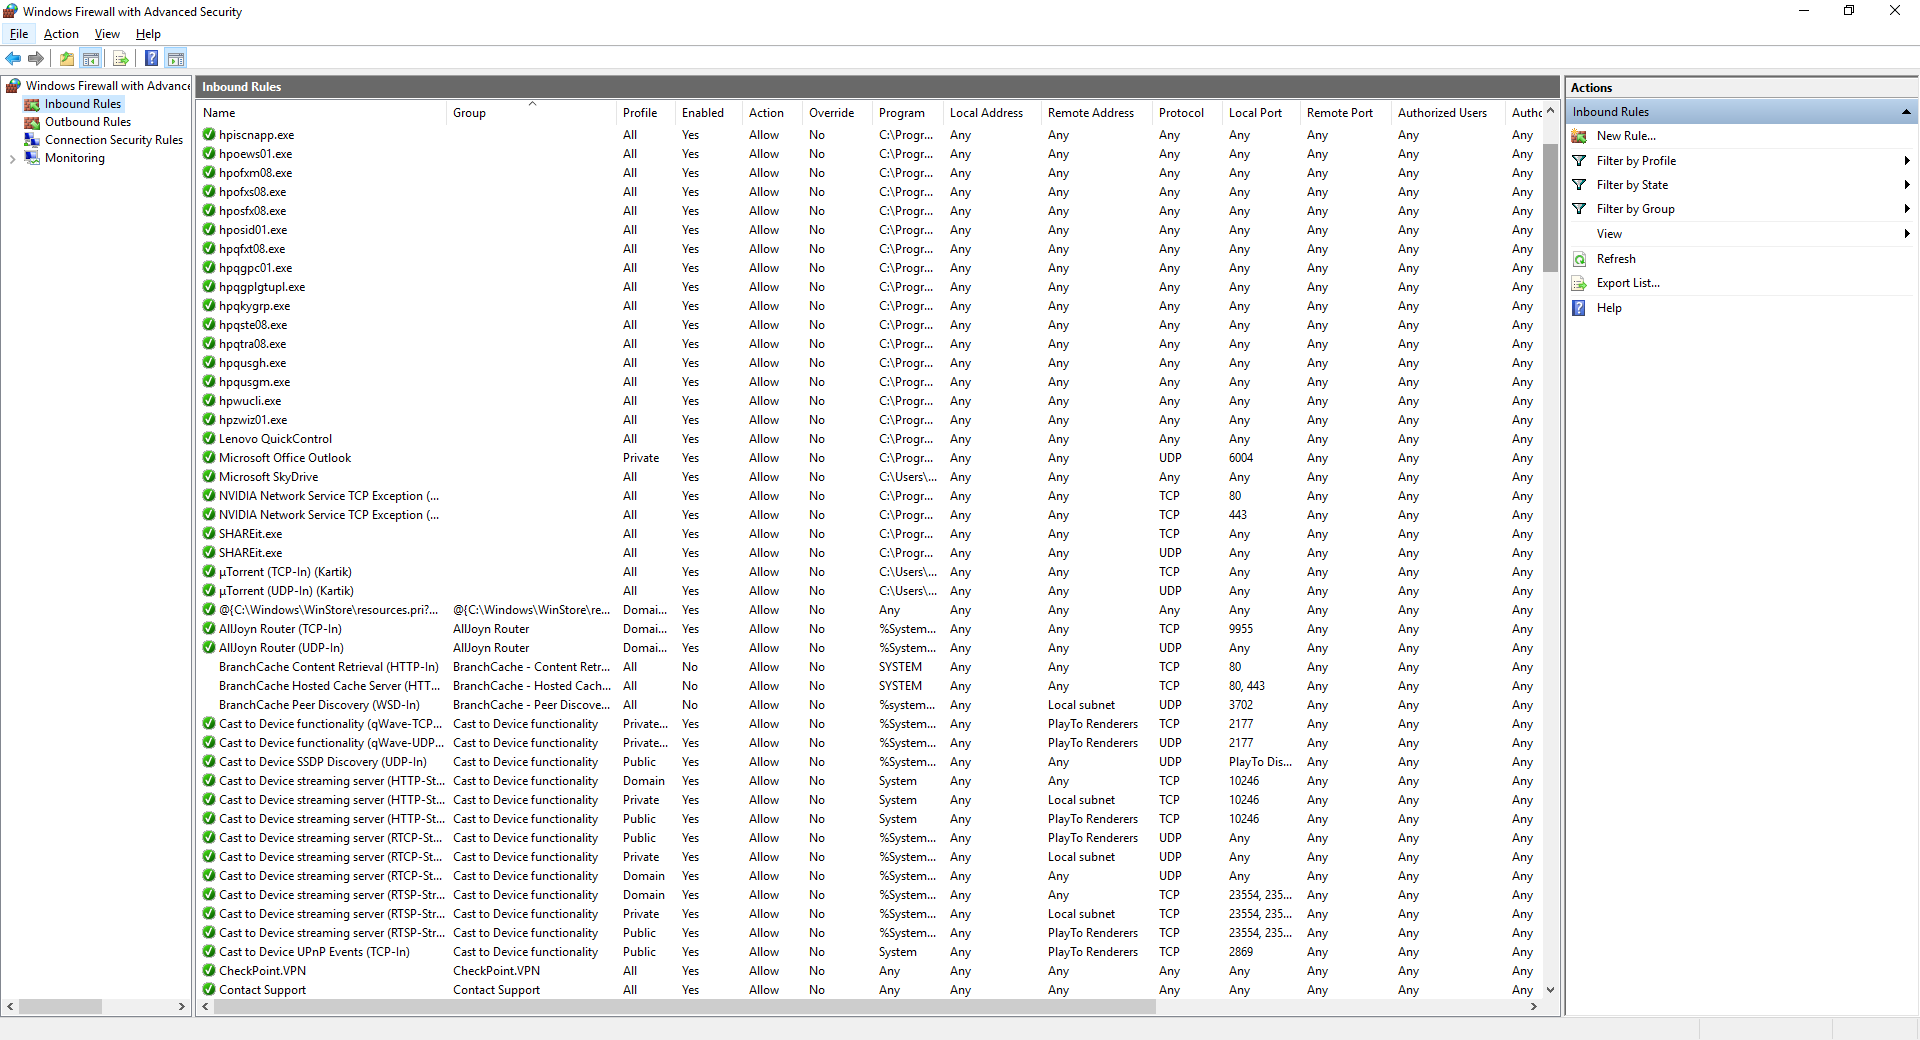
Bring up the Windows Firewall Administration:
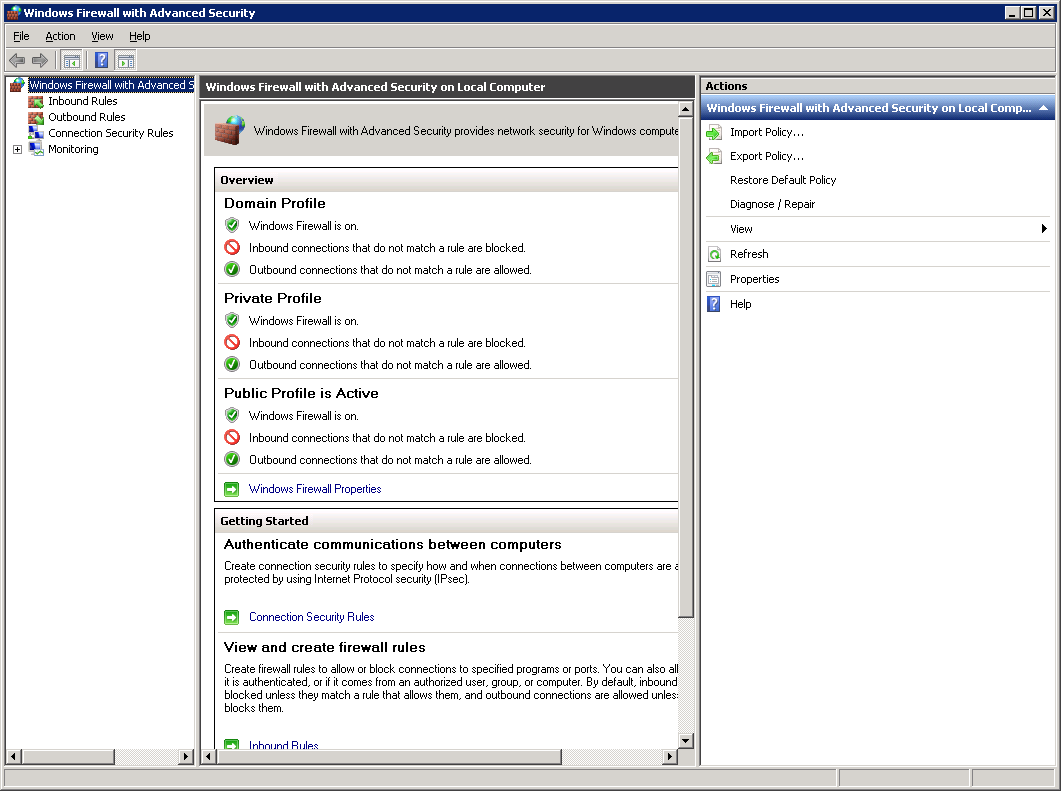
Select inbound rules:

Click on New Rule:

Select Custom and then click Next:


Choose All programs and click Next:
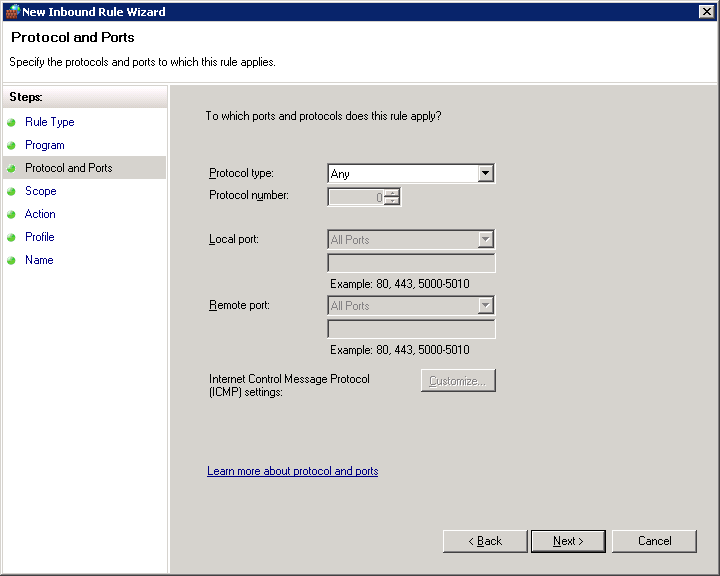
Choose “Any” for Protocol Type and click on Next.

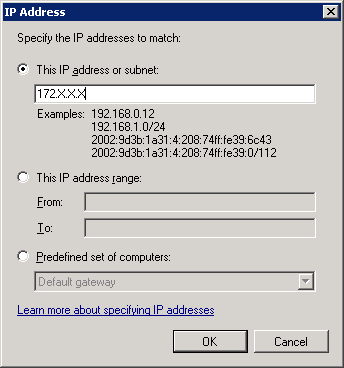
For security purposes choose “These IP addresses” for the remote IP and click on Add:

Input the 172.X.X.X IP addresses which were noted down during the initial documentation. The same step needs to be repeated for all the internal IP addresses which exist in the environment.
Once done, click on Next.

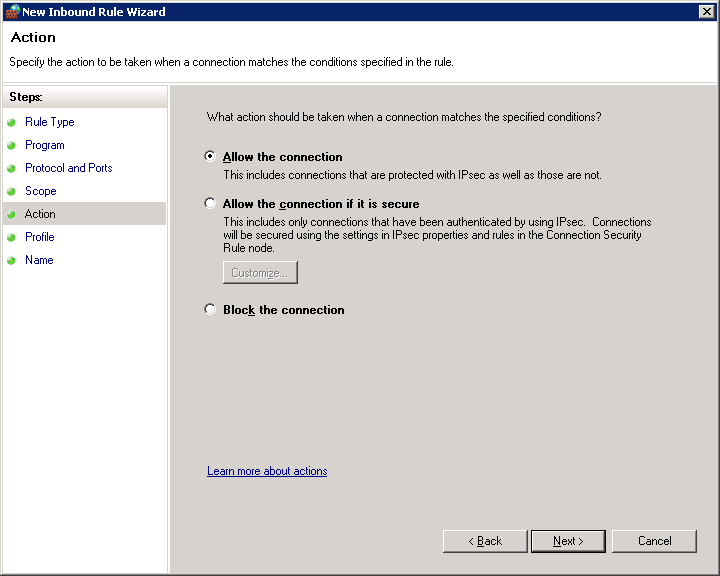
Choose Allow the Connection and click on Next.
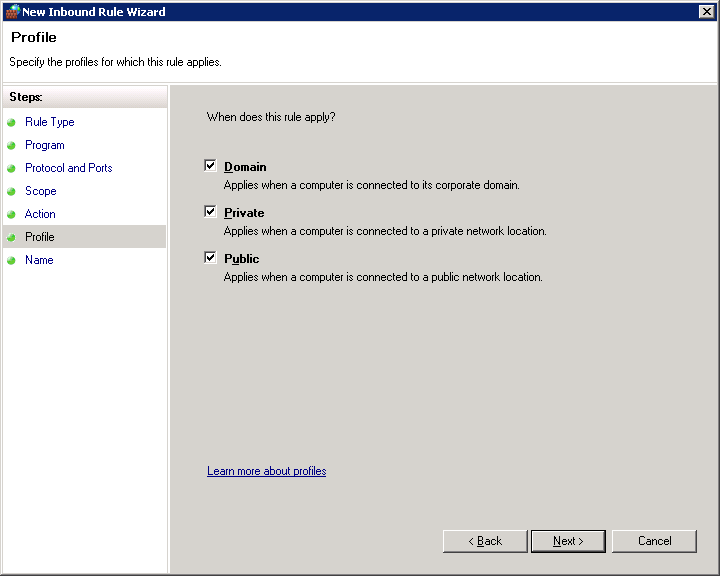
Choose all 3 options and click on Next.
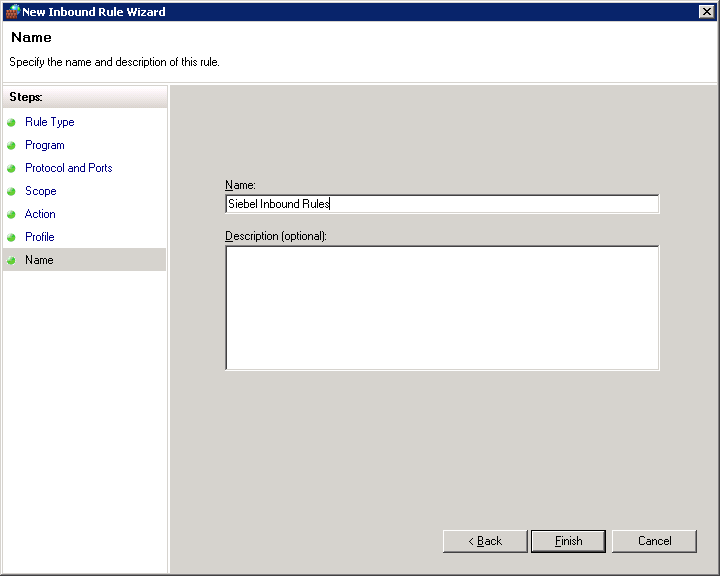
Type a meaningful name for the rule and click Finish.
The same steps above need to be completed for outbound rules.
These rules need to be created across all servers. The easy way is to create the rules on one server and just copy it across to the other servers (the ideal use of a CTRL+C and CTRL+V).
Once these steps are completed. The servers will be able to communicate amongst each other across all the ports.
Editing the Hosts File
Since the Amazon EC2 instances are automatically assigned their internal IP addresses and there is no DNS setup involved, we need to go back to basics to ensure that the servers can be accessed by their hostname or IP address and are capable of translating the two.
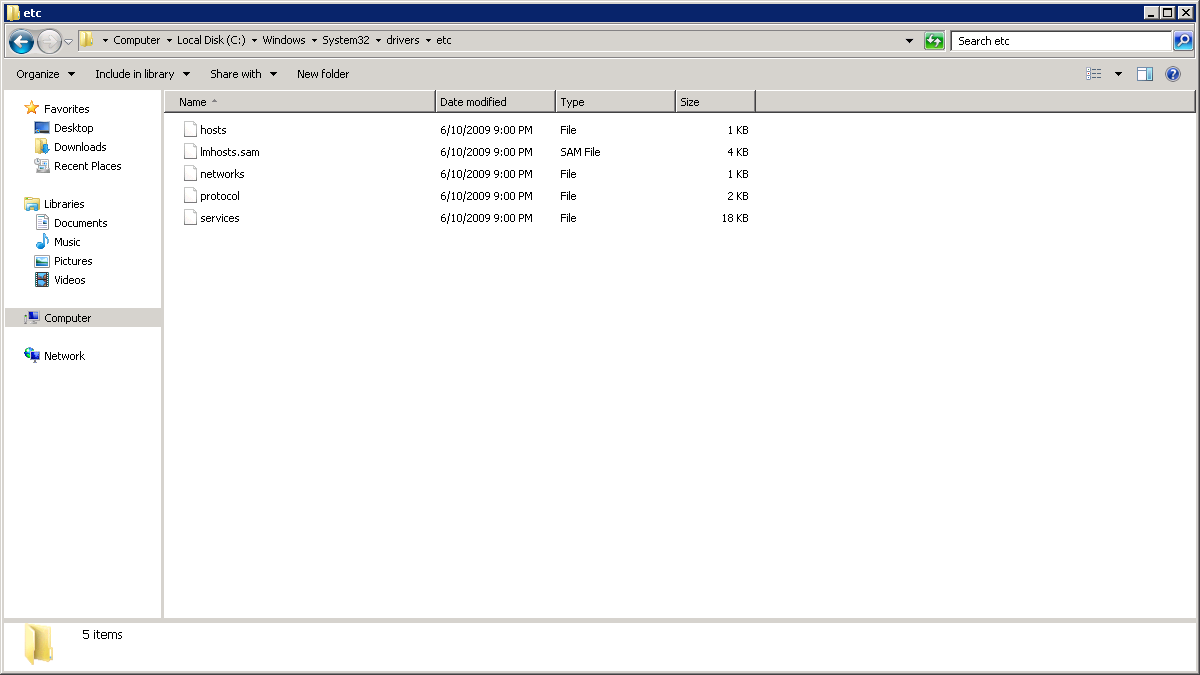
Navigate to C:\Windows\system32\drivers\etc:

Double-click on the hosts file. This file can be opened in Notepad.
The hosts file has the following structure:
|
1 2 3 4 5 6 7 8 9 10 11 12 13 14 15 16 17 18 19 20 |
<span style="color: red;"># Copyright (c) 1993-2009 Microsoft Corp.</span> <span style="color: red;">#</span> <span style="color: red;"># This is a sample HOSTS file used by Microsoft TCP/IP for Windows.</span> <span style="color: red;">#</span> <span style="color: red;"># This file contains the mappings of IP addresses to host names. Each</span> <span style="color: red;"># entry should be kept on an individual line. The IP address should</span> <span style="color: red;"># be placed in the first column followed by the corresponding host name.</span> <span style="color: red;"># The IP address and the host name should be separated by at least one</span> <span style="color: red;"># space.</span> <span style="color: red;">#</span> <span style="color: red;"># Additionally, comments (such as these) may be inserted on individual</span> <span style="color: red;"># lines or following the machine name denoted by a '#' symbol.</span> <span style="color: red;">#</span> <span style="color: red;"># For example:</span> <span style="color: red;">#</span> <span style="color: red;"># 102.54.94.97 rhino.acme.com # source server</span> <span style="color: red;"># 38.25.63.10 x.acme.com # x client host</span> <span style="color: red;"># localhost name resolution is handled within DNS itself.</span> <span style="color: red;"># 127.0.0.1 localhost</span> <span style="color: red;"># ::1 localhost</span> |
Edit the file so that at the end of the file the IP address and the host names for all the servers documented earlier are entered. Once edited, the hosts file should look like the example below:
|
1 2 3 4 5 6 7 8 9 10 11 12 13 14 15 16 17 18 19 20 21 22 23 |
<span style="color: red;"># Copyright (c) 1993-2009 Microsoft Corp.</span> <span style="color: red;">#</span> <span style="color: red;"># This is a sample HOSTS file used by Microsoft TCP/IP for Windows.</span> <span style="color: red;">#</span> <span style="color: red;"># This file contains the mappings of IP addresses to host names. Each</span> <span style="color: red;"># entry should be kept on an individual line. The IP address should</span> <span style="color: red;"># be placed in the first column followed by the corresponding host name.</span> <span style="color: red;"># The IP address and the host name should be separated by at least one</span> <span style="color: red;"># space.</span> <span style="color: red;">#</span> <span style="color: red;"># Additionally, comments (such as these) may be inserted on individual</span> <span style="color: red;"># lines or following the machine name denoted by a '#' symbol.</span> <span style="color: red;">#</span> <span style="color: red;"># For example:</span> <span style="color: red;">#</span> <span style="color: red;"># 102.54.94.97 rhino.acme.com # source server</span> <span style="color: red;"># 38.25.63.10 x.acme.com # x client host</span> <span style="color: red;"># localhost name resolution is handled within DNS itself.</span> <span style="color: red;"># 127.0.0.1 localhost</span> <span style="color: red;"># ::1 localhost</span> <span style="color: red;">172.X.X.X WIN-ABCD</span> <span style="color: red;">172.X.Y.Z WIN-DEFG</span> <span style="color: red;">172.X.Z.Y WIN-JKLM</span> |
Replace the IP Addresses and the hostnames with the relevant entries. Copy the edited hosts files to all servers to the same location so that all servers have the same copy of the hosts file.
If this step is completed successfully, you should be able to ping the hostname for all the servers.
This completes the Amazon instance setup. The next part in the series will cover the download and extraction of the Siebel installation files. While this seems easy enough, the process is time-consuming and not all of the zip files are actually required.
Siebel CRM: Initial Upgrade and Setup of an Amazon Instance.
A Siebel CRM upgrade project typically consists of numerous iterations even before the actual development and bug fixes take effect. It is wise to follow the age old adage “measure twice, cut once”. It makes practical sense not to upgrade the development instance until the upgrade team is absolutely sure of the upgrade process itself, since there will be slight variations depending on the level of customization on the existing application. More importantly, since the upgrade itself is fairly time-consuming, there may still be development ongoing on the previous versions.
To minimize the risk, it is a good idea to create a new instance before the start of the upgrade project. This helps in two distinct ways:
- The new instance can be used as a sandbox instance with a pure vanilla version of Siebel running on it. This is important in order to identify how the existing customized application fares against this vanilla instance. The sandbox can also assist business analysts in demonstrating the vanilla functionality to the business groups. This assists in identifying unnecessary customizations to remove from the application.
- In the event that a decision is taken to perform an in-place upgrade, this instance should be the first place an upgrade is performed, so that the existing development instance can be shielded against the upgrade project.
To further reduce risks and minimize costs it is advisable to move towards a cloud-based provider to either:
- Prepare a sandbox
- Prepare an instance for the initial upgrade.
For the purpose of the Siebel sandbox or the temporary development instance we will require the following architecture:
- Server 1: Siebel Web Server, Siebel Gateway Server.
- Server 2: Siebel Database, Siebel Application Server.
- Server 3: Siebel Tools, Siebel Web Client, Siebel Application Server.
Going by past experience on multiple Siebel upgrade projects, the flexibility and cost benefit offered by the Amazon Web services (AWS) EC2 infrastructure cannot be ignored. This article focuses primarily on how to set up and configure an Amazon EC2 instance and prepare it to work with Siebel. That said, this article can also be used to setup Amazon instances for any application and not necessarily Siebel.
The first step, obviously, is to log on to http://aws.amazon.com and sign up. You will also be required to set up some kind of a payment method. Most corporate users will have logins provided by Amazon which should be used to set up the instances. Individual users on the other hand would definitely be required to set up a payment method before the instance can be set up.
Once the login is complete, the AWS services page opens up.
Creation of the instances

Click on EC2:
Click on Instances: 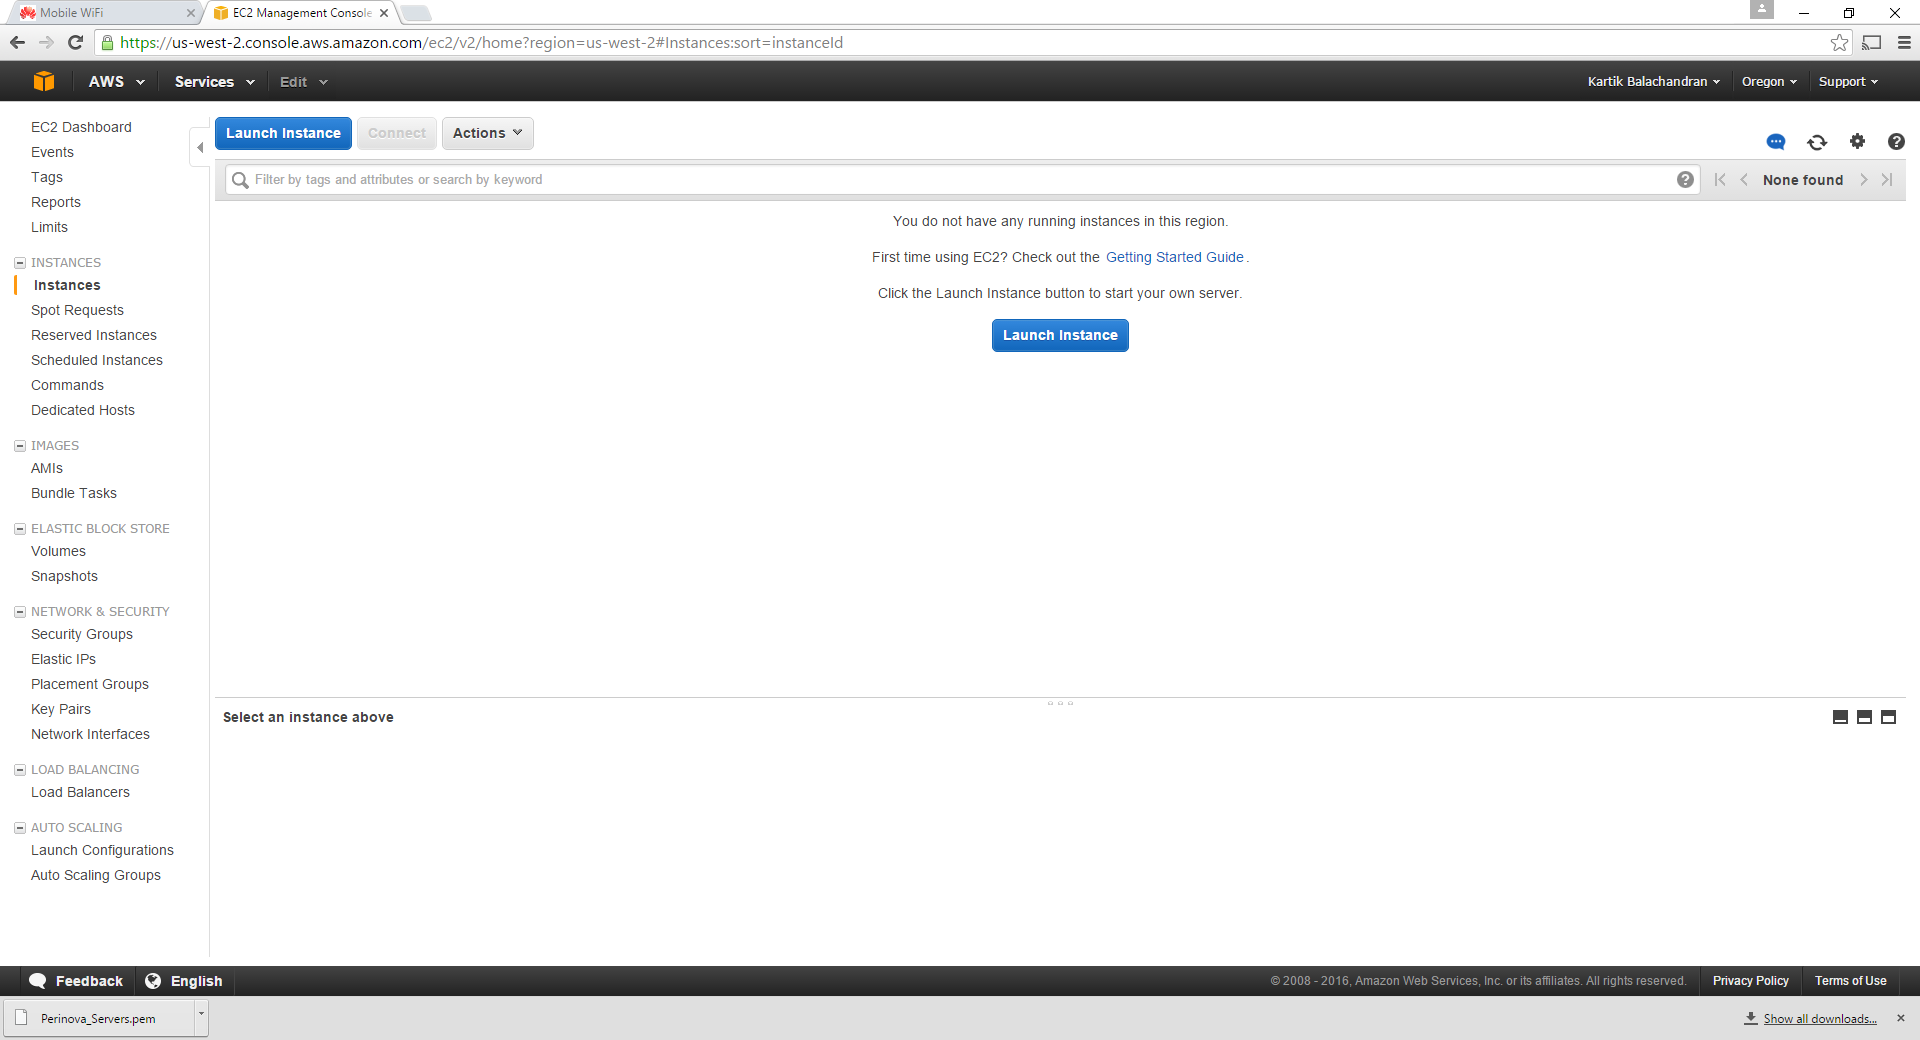
Click on Launch Instance. This is the first step in creating an Amazon Server for yourself.
Scroll down to Microsoft Server 2008 R2 Base. We need to choose Windows 2008 R2 since Windows 2012 R2 is still not supported by Siebel IP 2015.
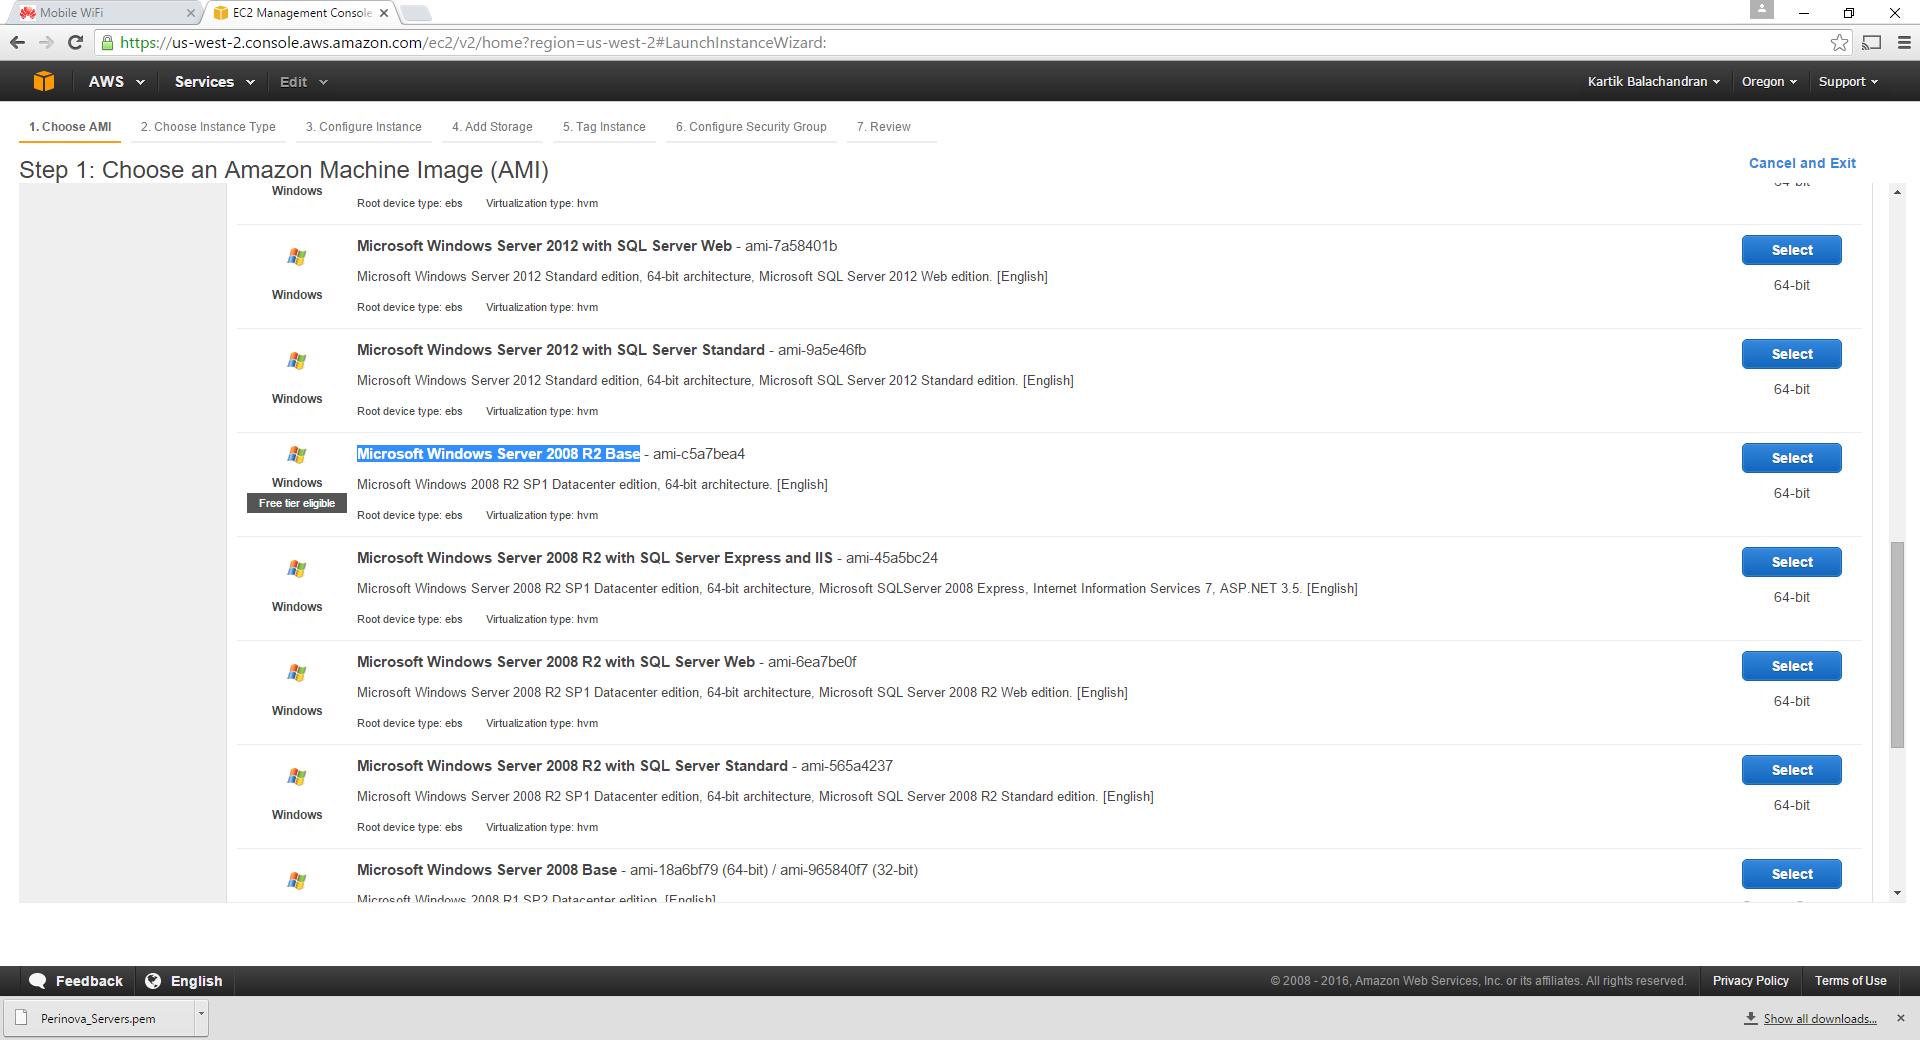
Click Select:

Select T2 Large and click Configure Instance Details. This will be the database server or the Server hosting the Oracle Database which the Siebel servers will run on.

Keep the defaults and click Add Storage:

Click Add New Volume and add a 200 GB volume. For most databases this should be sufficient. 200 GB is more than sufficient for a sandbox environment. In the event that an in-place upgrade is being performed, most development databases rarely reach 200 GB.

Click Tag Instance to set up a meaningful name for the instance.

Click Next on Configure security Group. This is critical for multiple reasons:
- The security group ensures that access between the servers is free.
- Since AWS instances can be accessed by anyone across the globe, it makes sense to restrict access to specific IP addresses only.
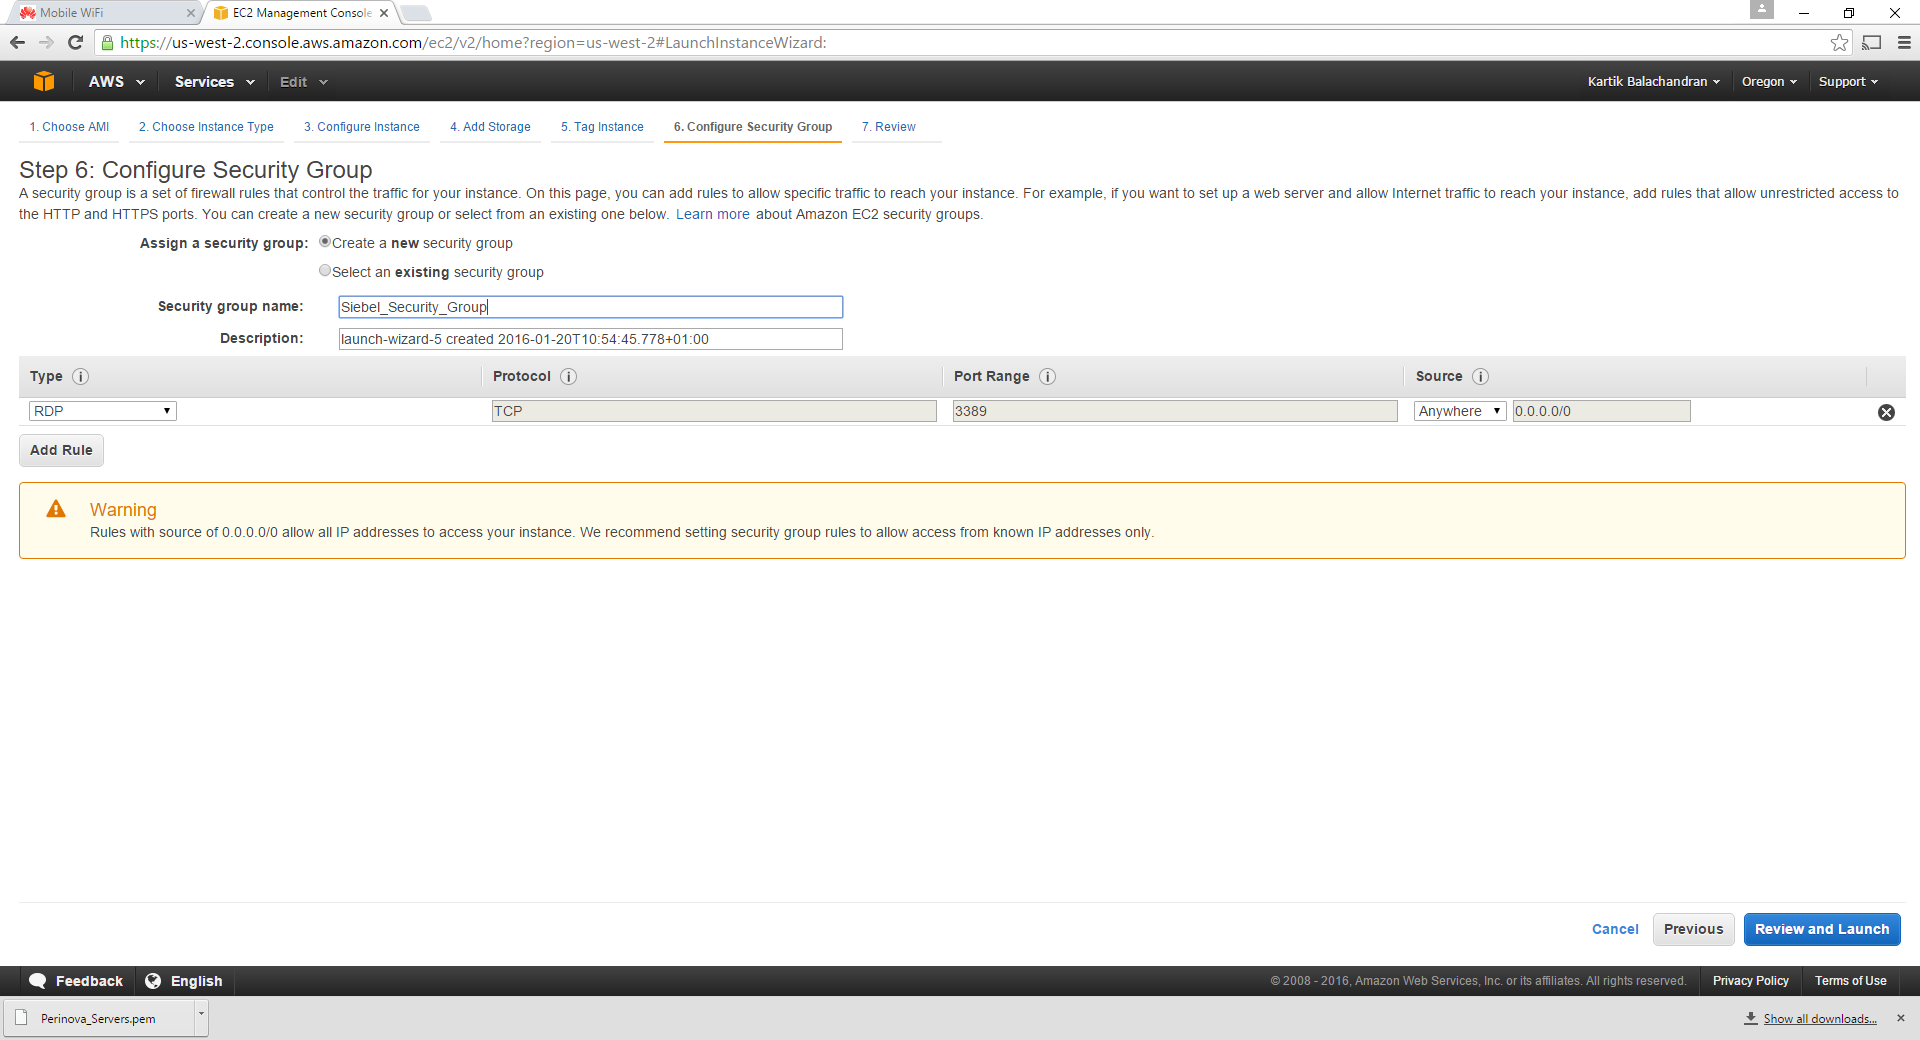
Type in a name for a new security group and click Review and Launch:
Click on Launch:

Download the key pair. The key pair is important for getting access to the instance. Please ensure that this file is saved and stored somewhere secure. Once this has downloaded, launch the instance.

This will launch the instance.
The steps need to be repeated for 2 more servers. However the specifications can be slightly lower for them. Click on Launch instance again.

Choose T2 medium, since the other two servers on the instance do not need an extremely high processing power or memory.
Since these servers are lower end, 100 GB of disk space is more than sufficient. Please note that the virtual disks are charged separately and hence we should use only as much as necessary.
Tag the instance as required.

While configuring the security group for the next 2 servers, we pick the security group created during the first server setup instead of creating a new one. We need to ensure that we select “Select an existing security group” so that all the security groups are displayed.

Once done, we will review the configuration.

Click on Launch. This time around, we do not create a new key pair and instead select choose an existing key pair, using the key pair we saved earlier.

Now we can launch the instance.
We need to repeat these steps for another instance which will be the last server. At the end of the exercise there should be 3 servers.
- Siebel Database Server
- Siebel Web_Gateway_Server
- Siebel_Application_Server
These will be visible in the Instances screen.
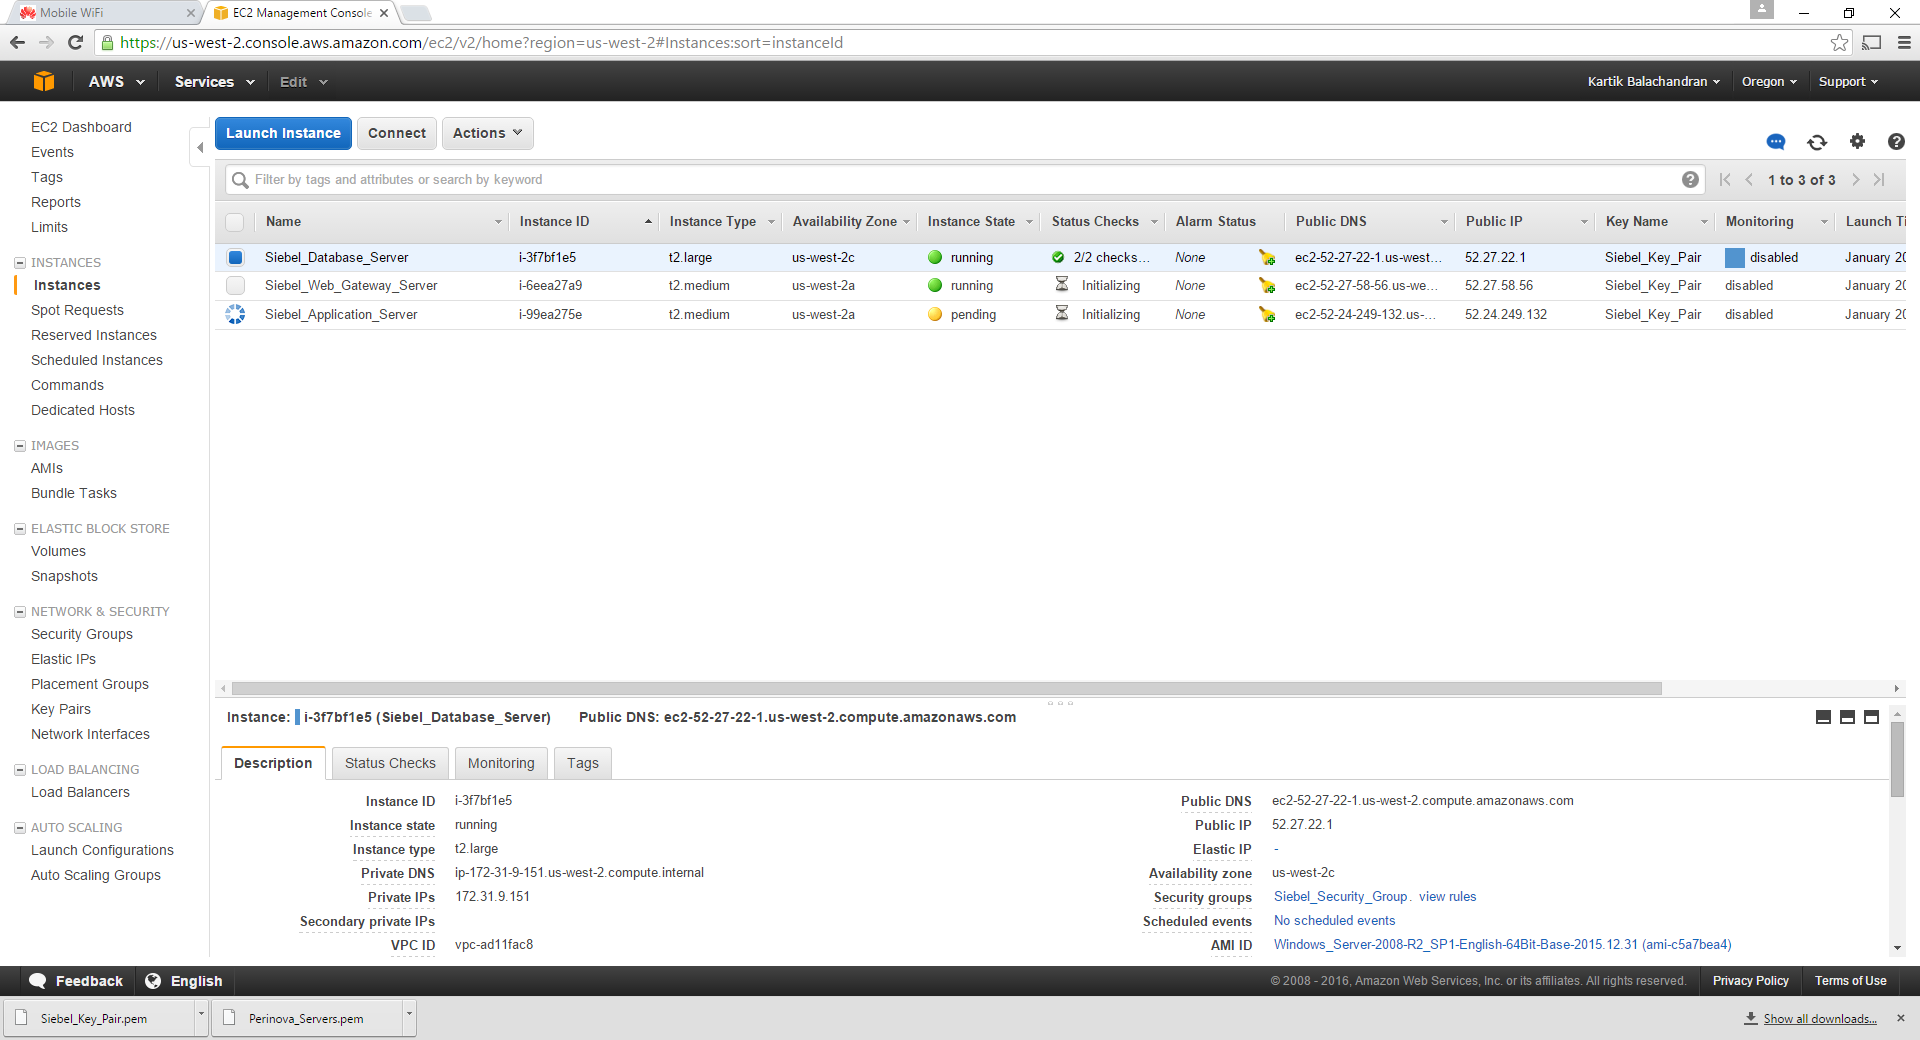
Wait for all of the servers to start running.

This concludes the creation of the instances.
Setting up of the Elastic IP
The elastic IP is a static public IP address allocated to your instance. This is mandatory for at least the web server. While all servers by default have public IP addresses allocated, these change with every reboot. Elastic IP addresses on the other hand do not change.
Click on Elastic IPs:

Click on Allocate New Address:
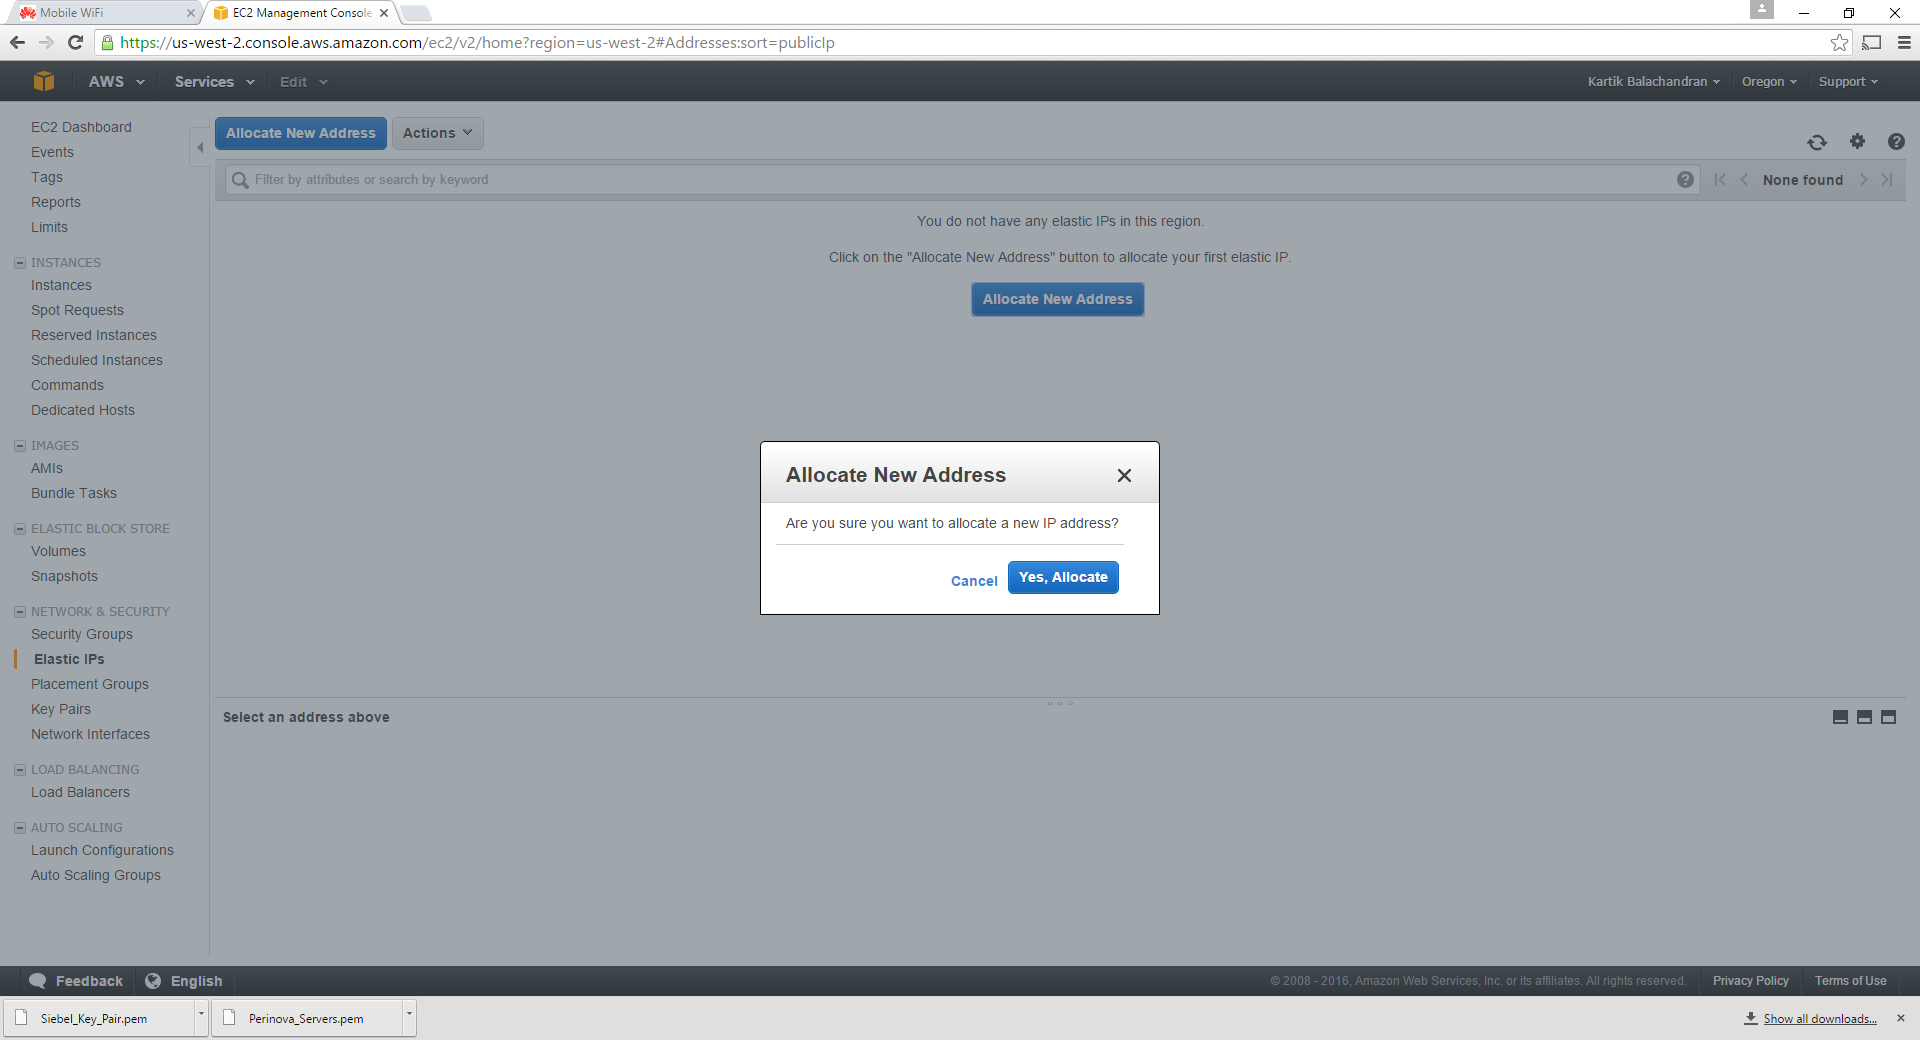
Click Yes:

We now need to associate the newly-created elastic IP address with the server designated as the webserver.
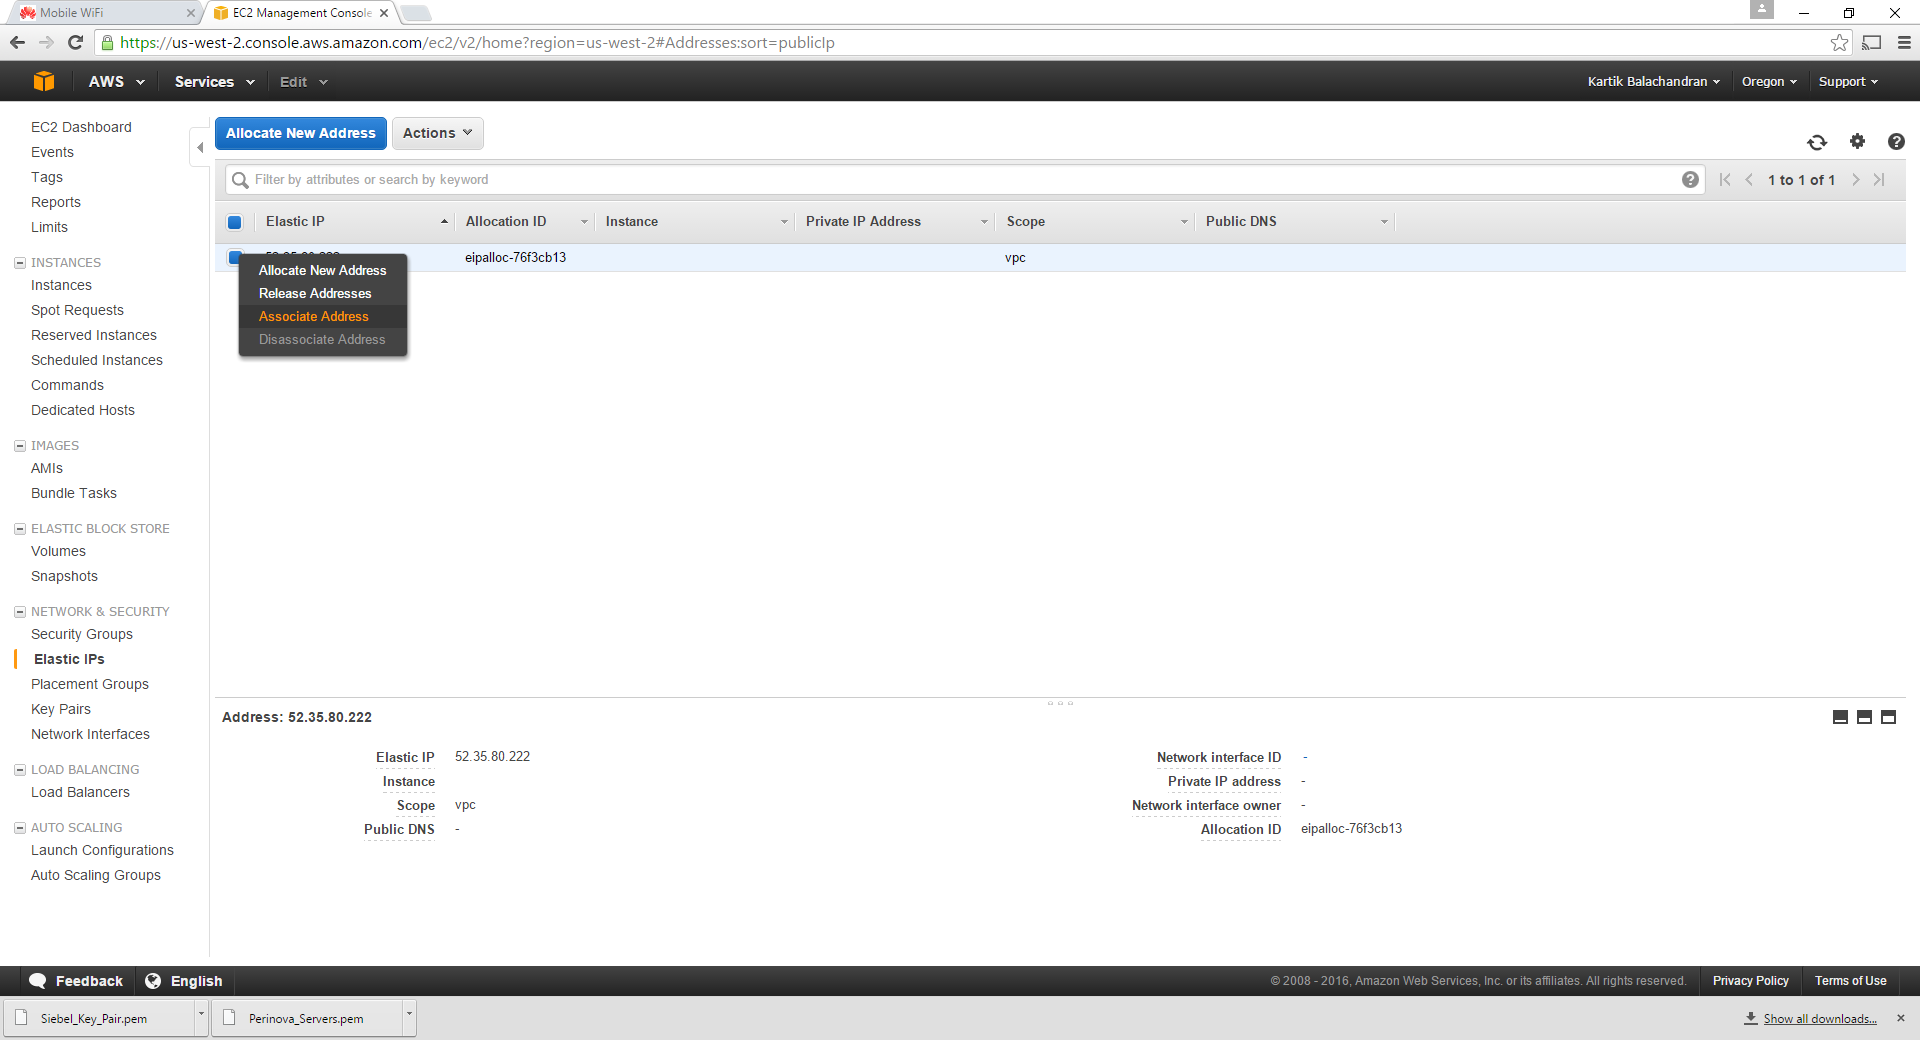
Right click and click on Associate IP Address:
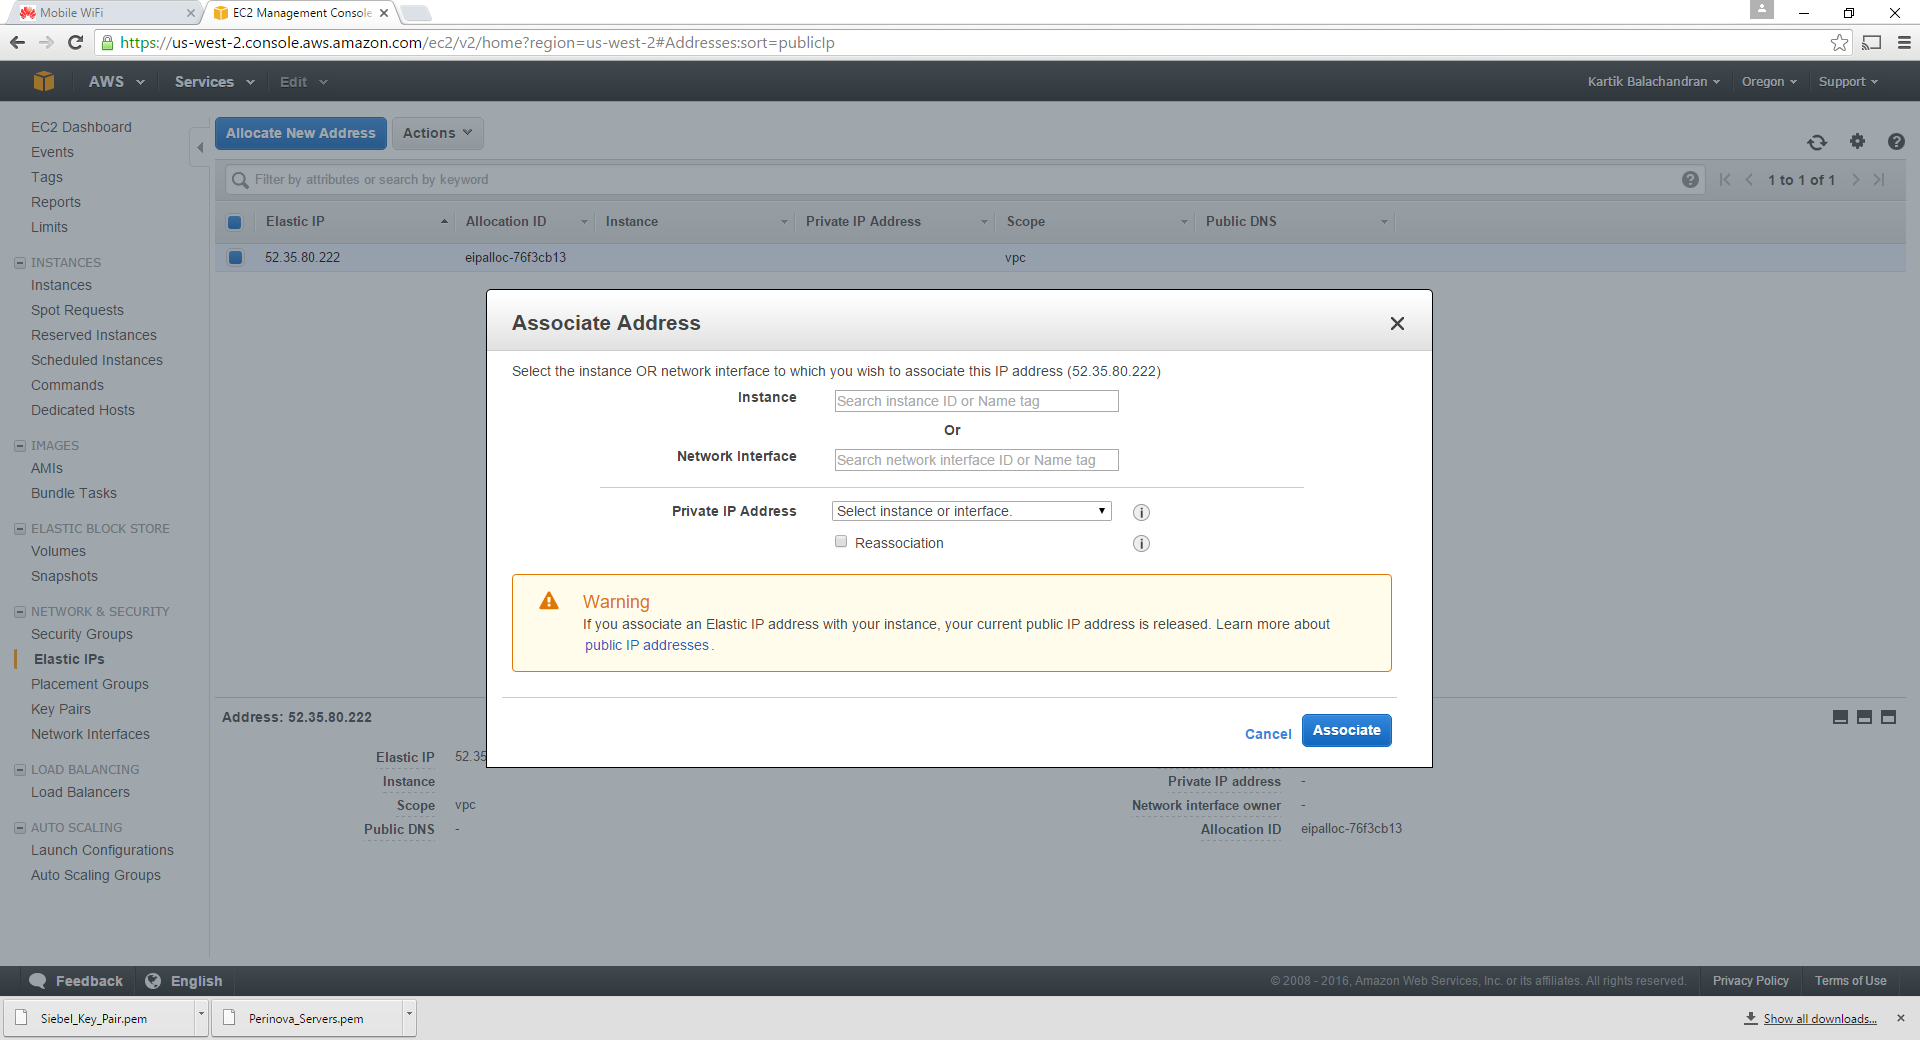
Click on Instance. This gives a list of all the instances created in the first steps.

Select the server tagged as the webserver.

Click on Associate.
This concludes the association of the Elastic IP address with the webserver.
Documentation
Navigate to instances:
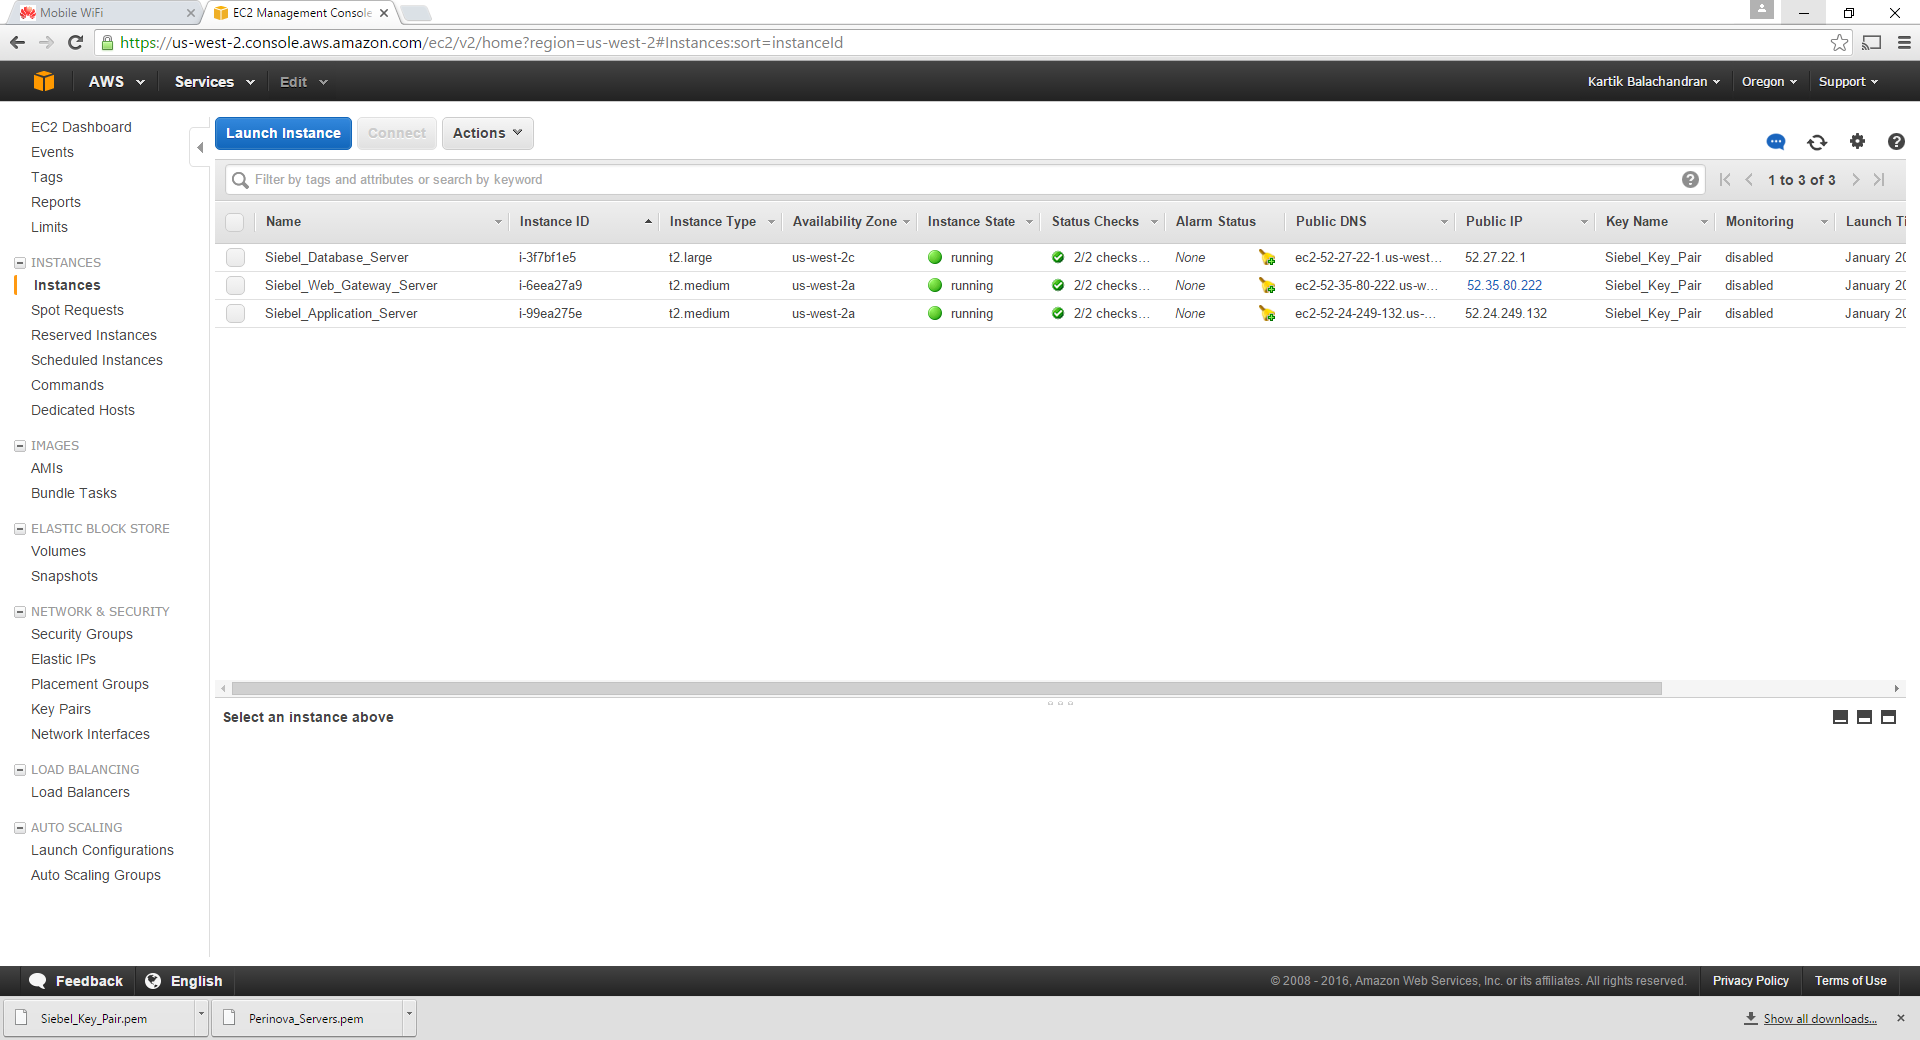
Note down the Name, the Instance ID and the Private IP address of each instance. The private IP address can be found by selecting the instance. Please note that the private IP addresses do not change with reboots and these are important since the servers communicate amongst each other using the private IP addresses.
Configuring the security group.
Navigate to Security Group:
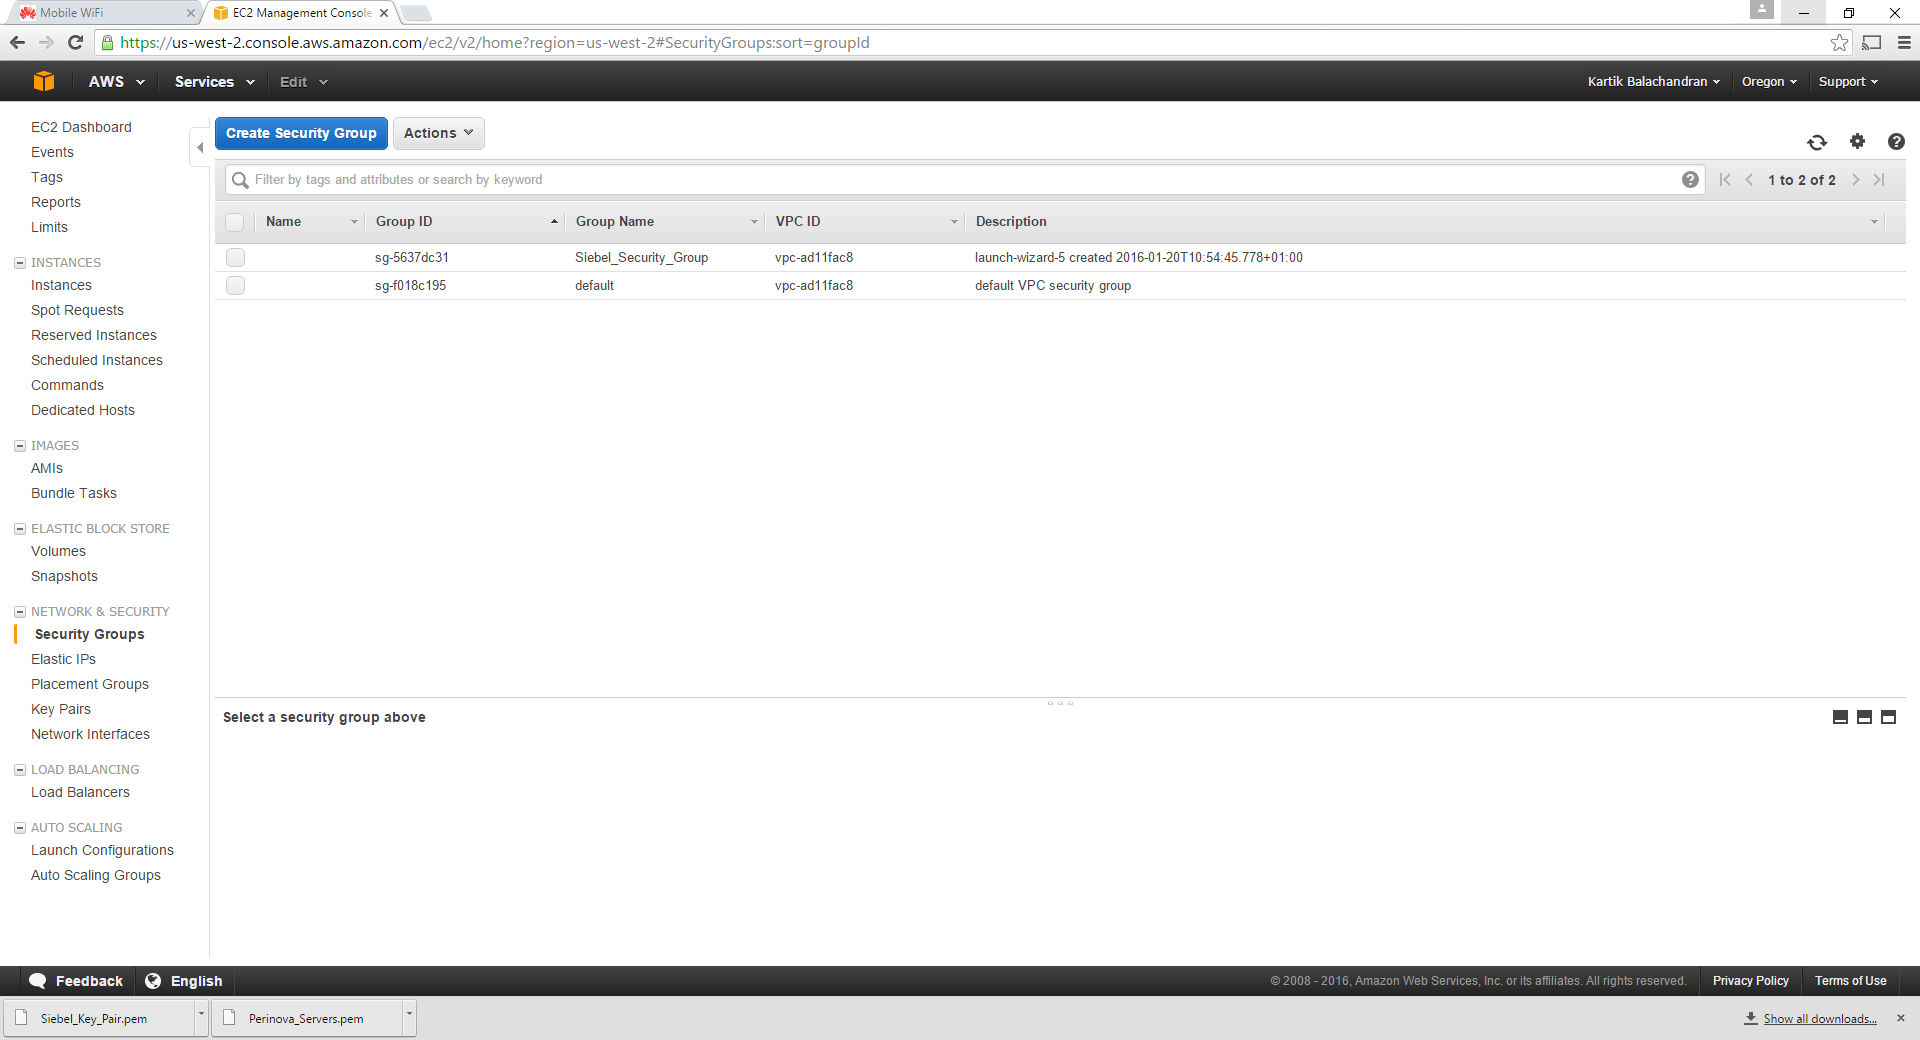
Select the security group and copy the group ID as shown below.

Choose inbound and click on Edit:
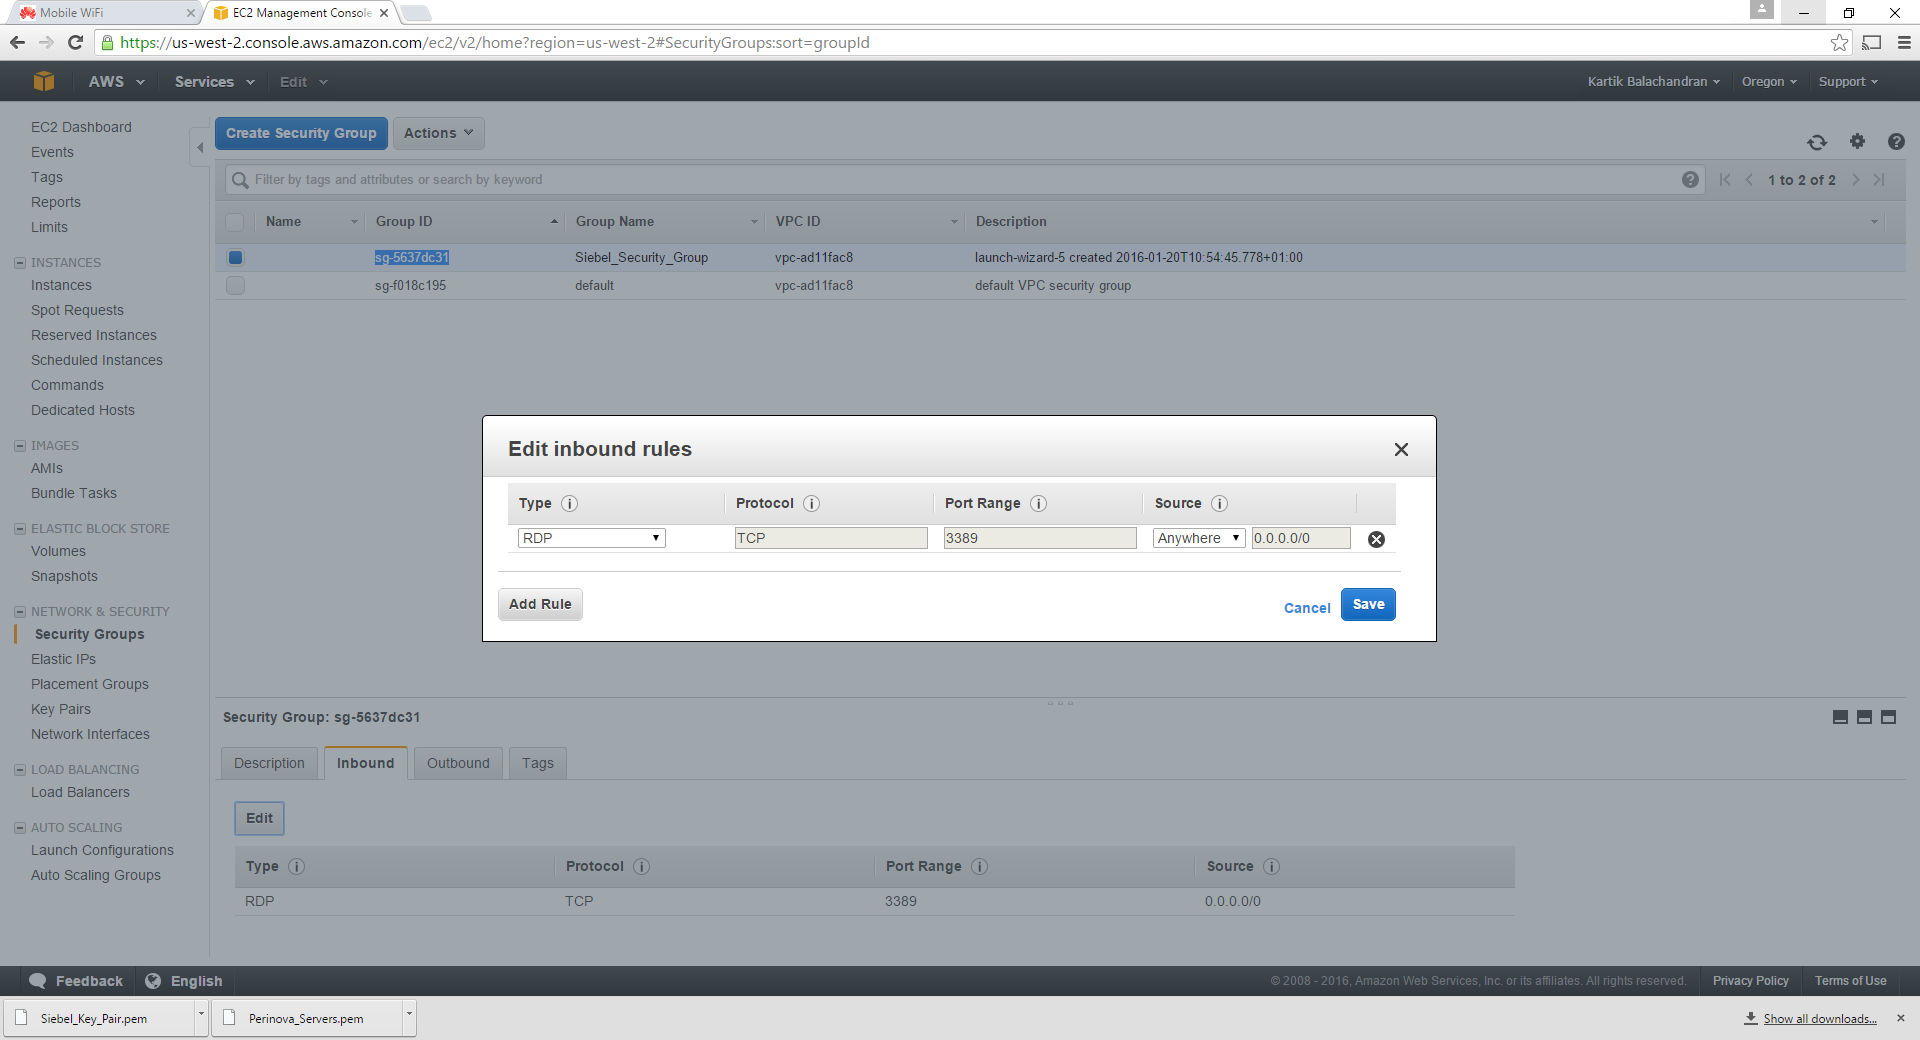
Click on Add Rule:
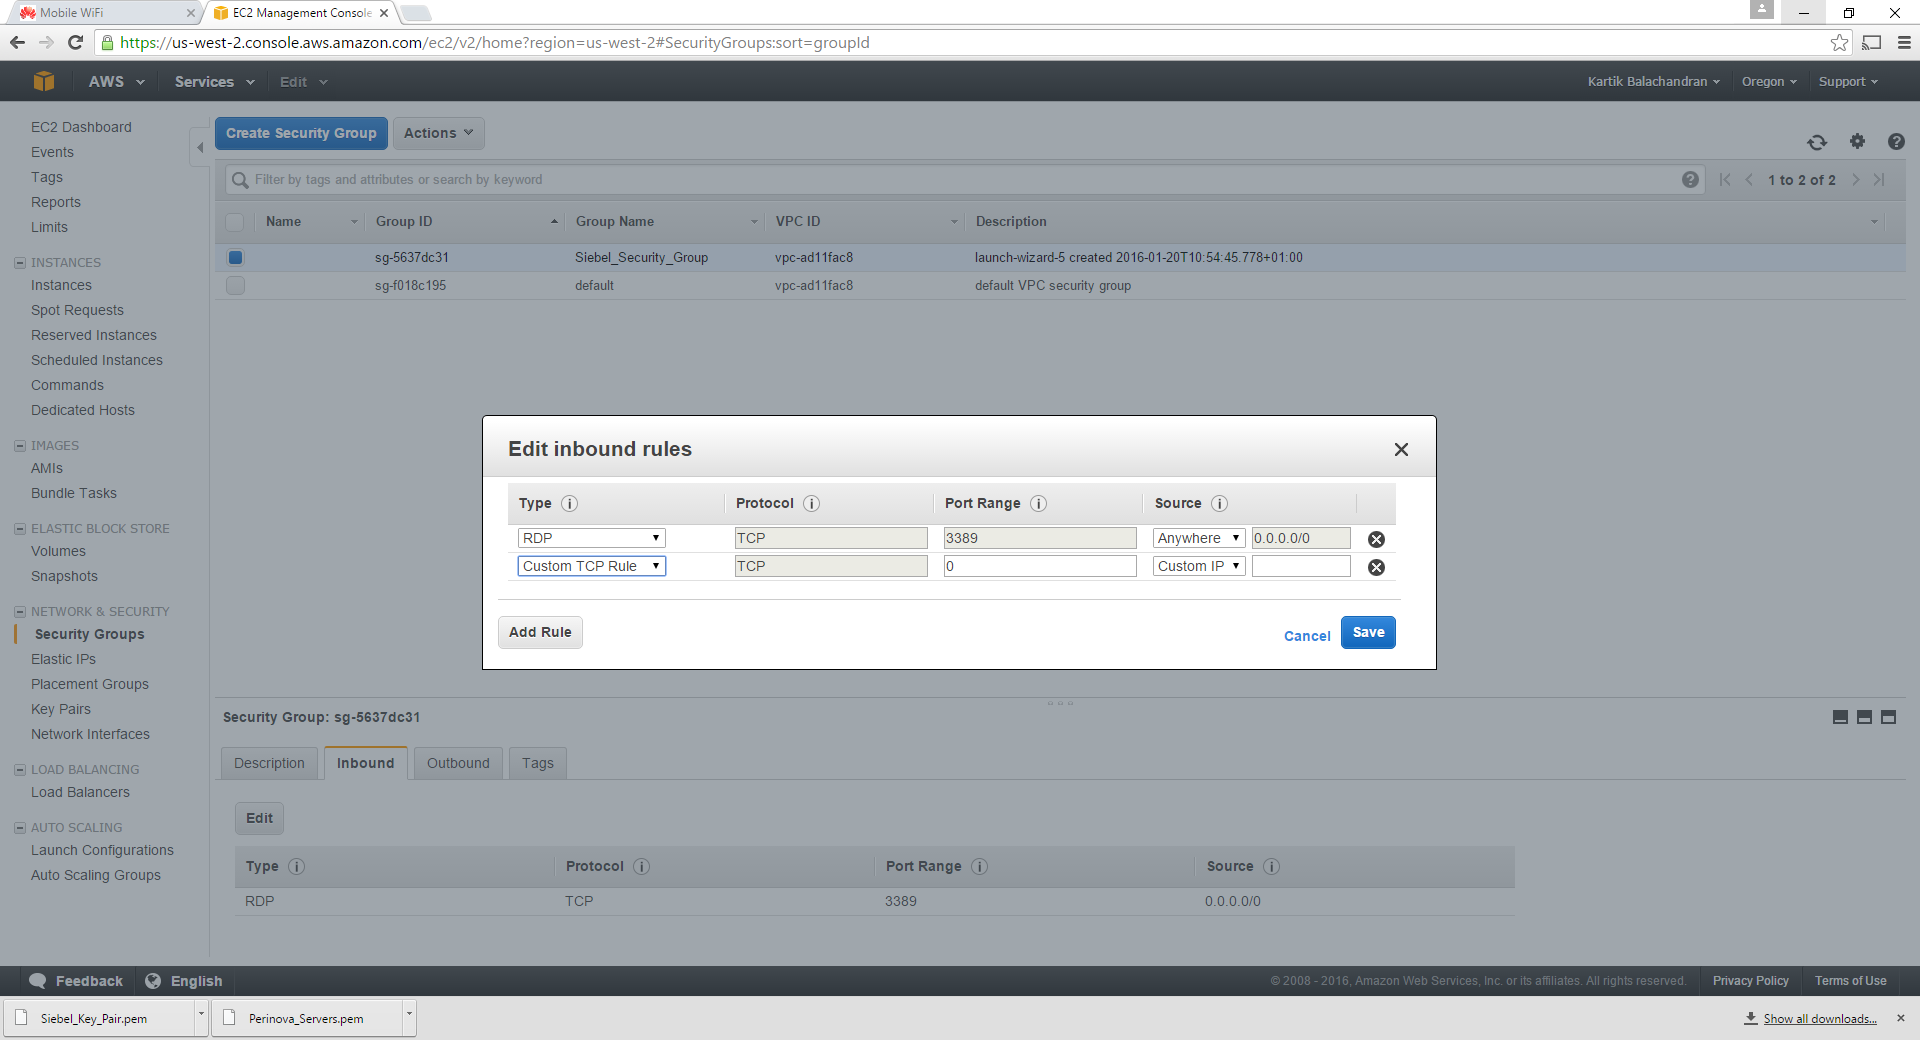
Choose All Traffic in type and Custom IP in source as shown below. Paste the security group name as shown.

Click on Save. This will allow traffic between the servers. The outbound traffic is set by default to all IPs.
Add similar rules for HTTP and HTTPS, but from all IP addresses. Please do keep in mind that this will allow traffic from everywhere to the servers. You can also restrict access if required here.
Once completed the structure should look like the below:

This structure will ensure HTTP, HTTPS and RDP traffic from anywhere and will block all other traffic.
This concludes the configuration of the security group.
Getting the Windows password and Logging On
Go back to the Instances:

Right click on a single instance:

Choose Get Windows Password:

Choose the path to the key pair created earlier:
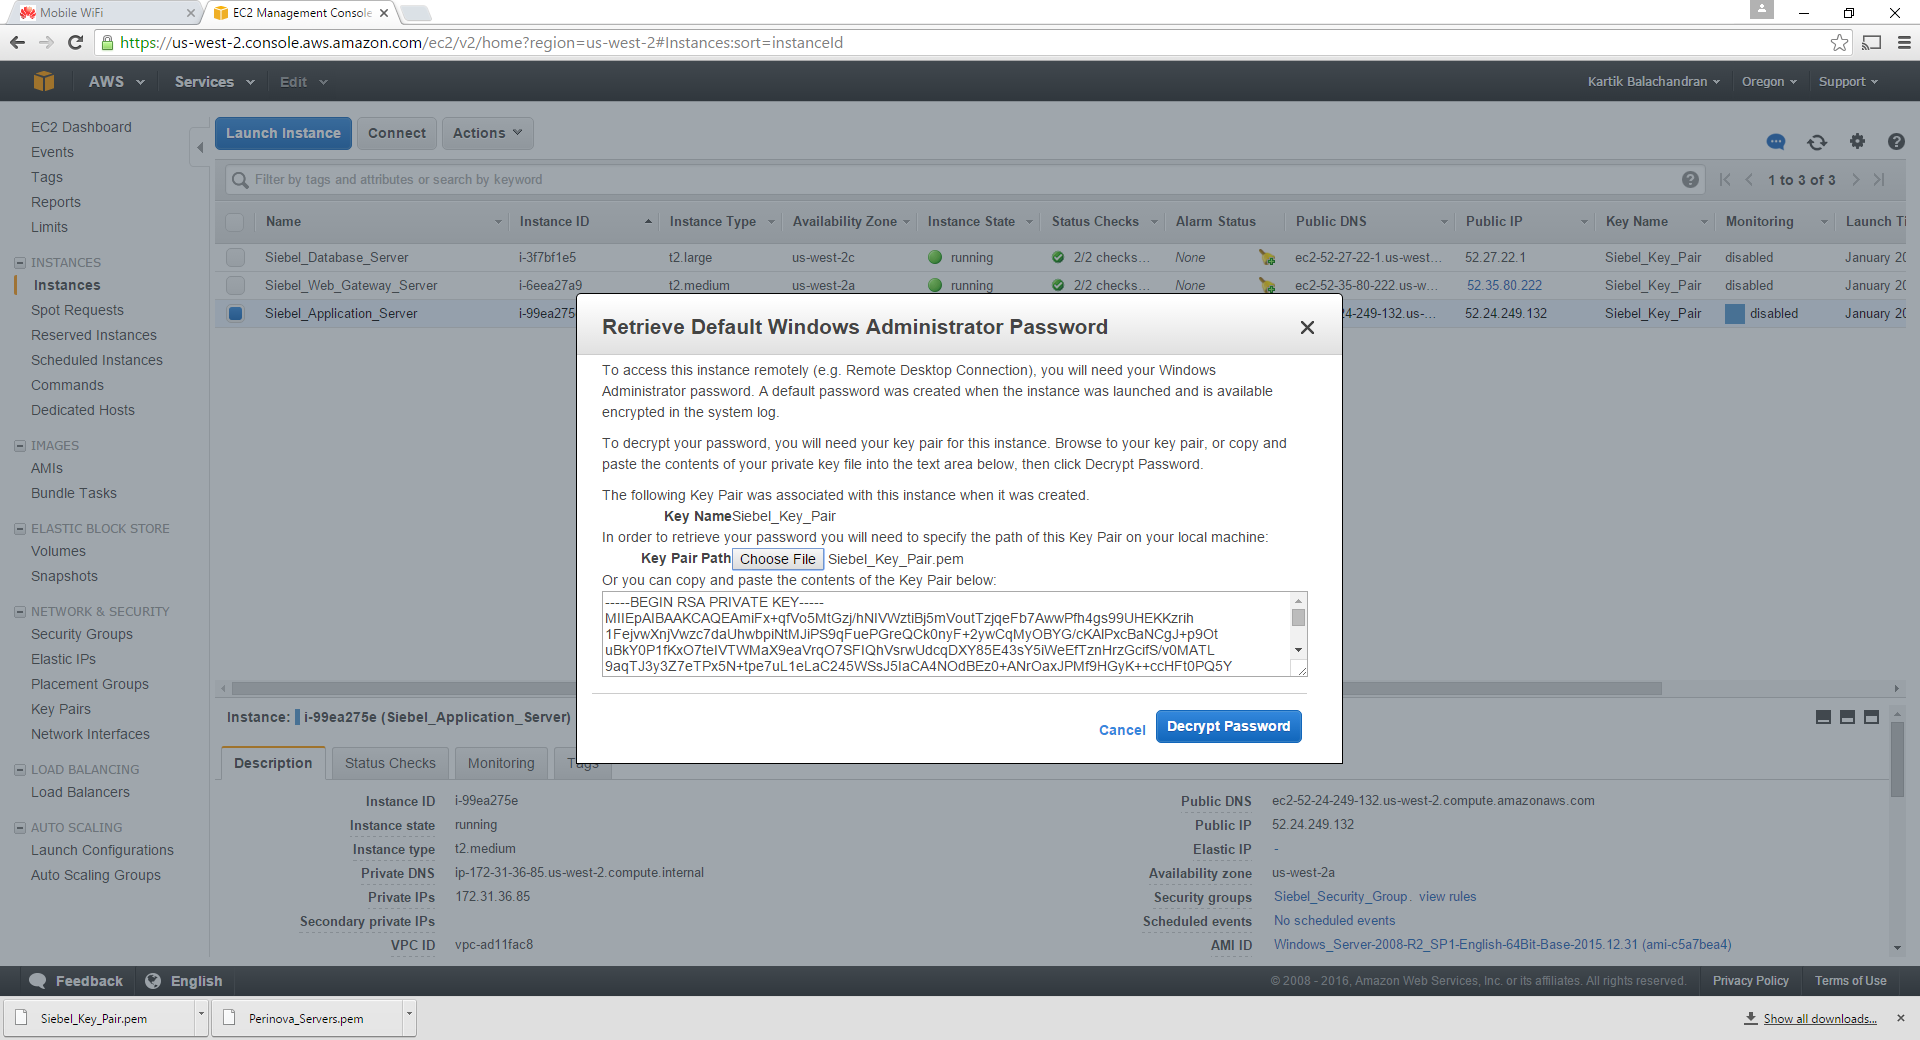
Click on Decrypt Password:
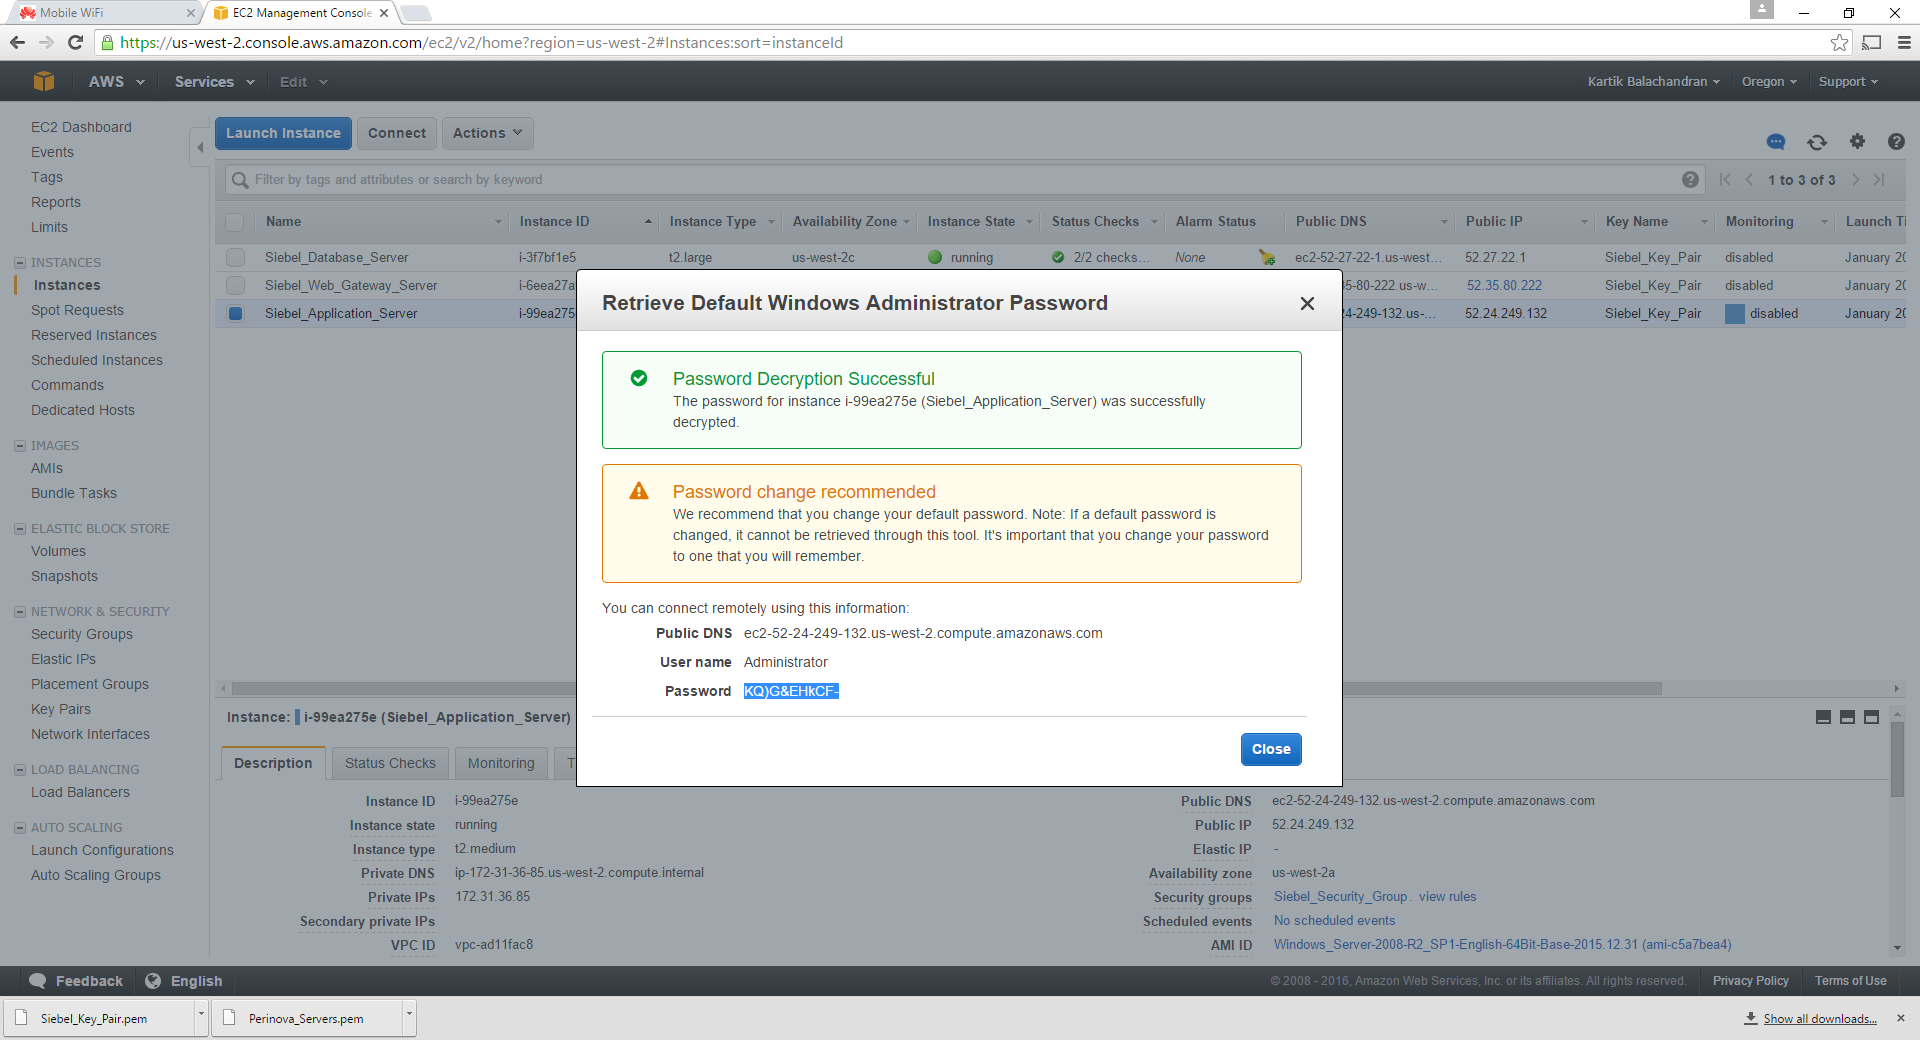
This will give you the Administrator password. Make sure this is saved in the documentation created earlier.
Repeat the same steps for the other servers to retrieve the relevant windows administrative passwords.
Connection to the Servers
Open a terminal services connection:

Put the Public IP address for the elastic IP created.
Log on as Administrator and use the password which was created. Once logged on, note the hostname for the server as well. This will be required for future steps.
Now connect to the other servers using terminal services and their Public IP addresses. The current Public IP can be found from the console. Please note that this IP address, since it is not an elastic IP will change every time the servers are rebooted.
After you have successfully logged on to all the servers, it makes sense to change the Windows administrator password to the same one for all servers. While this is a security hazard, it helps to maps shared folders without putting in the administrative password every time.
Configuring the Windows Firewall
The following steps are required so that the servers can communicate amongst each other. By default the Windows Firewall is switched on and blocks pretty much all ports between the servers, so it will not be possible for the Siebel Application servers to communicate amongst each other.
Bring up the Windows Firewall Administration:

Select inbound rules:
Click on New Rule:
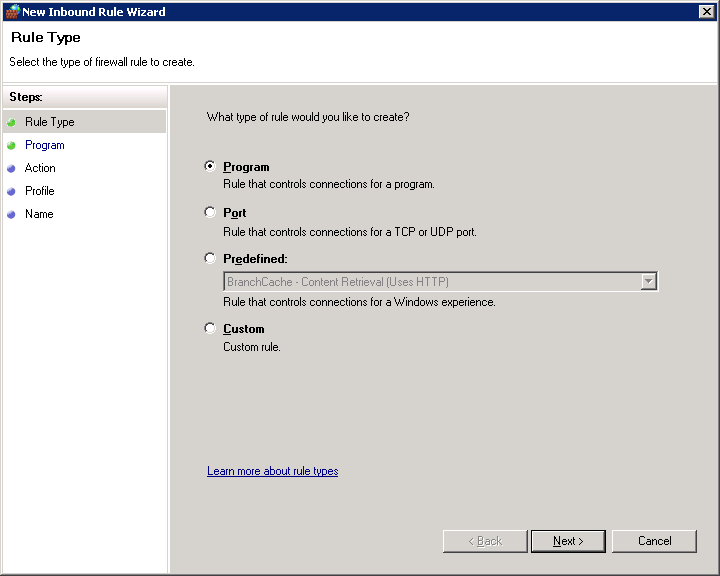
Select Custom and then click Next:

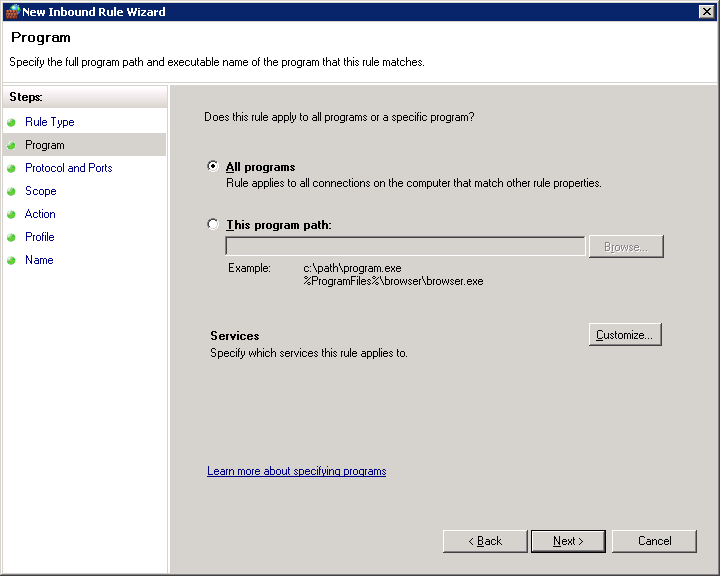
Choose All programs and click Next:

Choose “Any” for Protocol Type and click on Next.
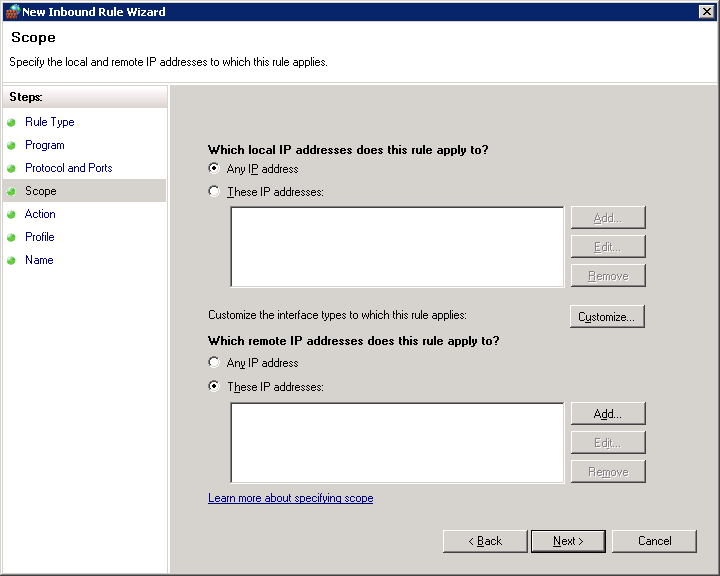
For security purposes choose “These IP addresses” for the remote IP and click on Add:
Input the 172.X.X.X IP addresses which were noted down during the initial documentation. The same step needs to be repeated for all the internal IP addresses which exist in the environment.
Once done, click on Next.
Choose Allow the Connection and click on Next.

Choose all 3 options and click on Next.

Type a meaningful name for the rule and click Finish.
The same steps above need to be completed for outbound rules.
These rules need to be created across all servers. The easy way is to create the rules on one server and just copy it across to the other servers (the ideal use of a CTRL+C and CTRL+V).
Once these steps are completed. The servers will be able to communicate amongst each other across all the ports.
Editing the Hosts File
Since the Amazon EC2 instances are automatically assigned their internal IP addresses and there is no DNS setup involved, we need to go back to basics to ensure that the servers can be accessed by their hostname or IP address and are capable of translating the two.
Navigate to C:\Windows\system32\drivers\etc:
Double-click on the hosts file. This file can be opened in Notepad.
The hosts file has the following structure:
|
1 2 3 4 5 6 7 8 9 10 11 12 13 14 15 16 17 18 19 20 |
<span style="color: red;"># Copyright (c) 1993-2009 Microsoft Corp.</span> <span style="color: red;">#</span> <span style="color: red;"># This is a sample HOSTS file used by Microsoft TCP/IP for Windows.</span> <span style="color: red;">#</span> <span style="color: red;"># This file contains the mappings of IP addresses to host names. Each</span> <span style="color: red;"># entry should be kept on an individual line. The IP address should</span> <span style="color: red;"># be placed in the first column followed by the corresponding host name.</span> <span style="color: red;"># The IP address and the host name should be separated by at least one</span> <span style="color: red;"># space.</span> <span style="color: red;">#</span> <span style="color: red;"># Additionally, comments (such as these) may be inserted on individual</span> <span style="color: red;"># lines or following the machine name denoted by a '#' symbol.</span> <span style="color: red;">#</span> <span style="color: red;"># For example:</span> <span style="color: red;">#</span> <span style="color: red;"># 102.54.94.97 rhino.acme.com # source server</span> <span style="color: red;"># 38.25.63.10 x.acme.com # x client host</span> <span style="color: red;"># localhost name resolution is handled within DNS itself.</span> <span style="color: red;"># 127.0.0.1 localhost</span> <span style="color: red;"># ::1 localhost</span> |
Edit the file so that at the end of the file the IP address and the host names for all the servers documented earlier are entered. Once edited, the hosts file should look like the example below:
|
1 2 3 4 5 6 7 8 9 10 11 12 13 14 15 16 17 18 19 20 21 22 23 |
<span style="color: red;"># Copyright (c) 1993-2009 Microsoft Corp.</span> <span style="color: red;">#</span> <span style="color: red;"># This is a sample HOSTS file used by Microsoft TCP/IP for Windows.</span> <span style="color: red;">#</span> <span style="color: red;"># This file contains the mappings of IP addresses to host names. Each</span> <span style="color: red;"># entry should be kept on an individual line. The IP address should</span> <span style="color: red;"># be placed in the first column followed by the corresponding host name.</span> <span style="color: red;"># The IP address and the host name should be separated by at least one</span> <span style="color: red;"># space.</span> <span style="color: red;">#</span> <span style="color: red;"># Additionally, comments (such as these) may be inserted on individual</span> <span style="color: red;"># lines or following the machine name denoted by a '#' symbol.</span> <span style="color: red;">#</span> <span style="color: red;"># For example:</span> <span style="color: red;">#</span> <span style="color: red;"># 102.54.94.97 rhino.acme.com # source server</span> <span style="color: red;"># 38.25.63.10 x.acme.com # x client host</span> <span style="color: red;"># localhost name resolution is handled within DNS itself.</span> <span style="color: red;"># 127.0.0.1 localhost</span> <span style="color: red;"># ::1 localhost</span> <span style="color: red;">172.X.X.X WIN-ABCD</span> <span style="color: red;">172.X.Y.Z WIN-DEFG</span> <span style="color: red;">172.X.Z.Y WIN-JKLM</span> |
Replace the IP Addresses and the hostnames with the relevant entries. Copy the edited hosts files to all servers to the same location so that all servers have the same copy of the hosts file.
If this step is completed successfully, you should be able to ping the hostname for all the servers.
This completes the Amazon instance setup. The next part in the series will cover the download and extraction of the Siebel installation files. While this seems easy enough, the process is time-consuming and not all of the zip files are actually required.
Load comments